

There's a quote from Author and Vlogbrother John Green on nerding out about things that I think is appropriate to share in this moment:
“…Nerds are allowed to love stuff, like jump-up-and-down-in-the-chair-can’t-control-yourself love it. Hank, when people call people nerds, mostly what they’re saying is ‘you like stuff.’ Which is just not a good insult at all. Like, ‘you are too enthusiastic about the miracle of human consciousness’.”

Hold on to your socks, my friends, because enthusiastic doesn't even begin to cover it!
When Jen of Jennifer Lauren Handmade asked if I'd like to review her new pattern, The Juniper Cardigan, I think I nearly fell out of my chair in excitement. A pattern review! Someone (a Kiwi pattern designer, no less!) wants me to review a pattern? I felt a bit like I'd 'made it' as a sewing blogger, you know? At first I tried to play it cool - but who are we kidding here? That's not me at all. I am unapologetically excited about all things handmade, and making New Sewing Friends, and learning from other pattern drafters is a bonus too! After checking to make sure that the pattern was, in fact, something that was interesting to me outside of review purposes (it was)- of course I said yes!

“How can I stand so that you can see the top of my shoulder? Is this awkward?”
Juniper is a fitted cardigan in two variations, and its defining feature is the vintage-inspired saddle shoulder that practically begs for color blocking. If you've been reading for a while you know how much of my brain revolvesaroundsleeves so it's probably no surprise that I was -if possible- even more excited by it. I decided to make two versions because I had too many ideas floating around in my head to leave it at just one.

(the zig zags actually do line up on either side of the button band… not that I remembered to photograph that…)
I cut a straight size 8 (the pattern's second smallest size) with no adjustments except to add 1.5" to the sleeve, and 1" to the body. When you're 6' tall, torsos and arms generally need adjusting for. For the sake of clarity, my measurements are below (listed first) against the listed finished measurements of the cardigan:
- Bust: 33" | 32 1/8"
- Waist: 25" | 25 3/8" cropped, 31 3/4" longline
- Hips: 35" | 36 5/8" longline

Why yes, I did make that purple crop top specifically to wear with this cardigan…
This was a really fun pattern to make, especially for a sleeve nerd like me: The first thing you do is sew the four sleeve seams, which by far require the most attention. You have to ease between different notches for different sections of the seam - not difficult, but definitely something you'd want pins for, and baste first if you're not sure. The best part I think is that since this happens first, there are immediate, really cool-looking results as your Juniper goes from 'weirdest looking puzzle piece ever' to 'hey this thing looks like a shoulder!'

(Pay no attention to the jeans muslin with the wonky twisted-grainline denim)
Post-sleeve setting, it sews up in the blink of an eye. It's just side seams, waistband, cuffs, and the button band. I made a concerted effort to read the instructions as I went for the sake of a complete review (and they are well written and clear with simple, plentiful diagrams, plus that great conversational writing that I love coming across whenever I read the instructions for indie patterns) but to be honest it's delightfully uncomplicated even without them.

My blue Juniper's body is a merino remnant from The Fabric Store, and I got some teal-blue 185gsm Merino with 5% Lycra for the sleeves and bands. I bought the length I needed for the sleeves (.8 meters) but I didn't use nearly the width of the yardage, so there are significant leftovers. This would definitely be a more fabric-economical project to make in one color, but where would be the fun in that? Alternatively, it'd be a good way to stash-bust if you have some leftover knit fabrics lying around.

As you can see from round 1, I did have a pretty pronounced upper bust wrinkle originating in the lower quarter of the armscye. You may remember this exact wrinkle from my T Shirt Quest recently - I'm sure there's a proper name for it, but I've been calling it 'armpit mouth' because it comes out of my armpit and looks like a mouth. Before I made my second version, I made a one inch underarm-originating full bust adjustment to vanquish the armpit-mouth wrinkle. Spoiler alert: it [mostly] worked!

Technically, the second part of this adjustment should have been to reintroduce the 1" I removed back in at the side seam in order to preserve the overall length of the sleeve curve- but I find that by tightening up the arm area a bit, the sleeves pull up less when I lift my arms. Since I don't feel the sleeve riding up into my armpit or anything, I'm happy to leave it how it is.

I've had to make some version of this adjustment to every sleeved-item I've made lately, so I'm entirely disinclined to think it has anything to do with the pattern, but rather everything to do with my bust size. I harbor no illusions that any pattern is ever going to fit me perfectly straight out of the envelope (or the zip file, as the case may be) but this one was darn close, all things considered.

Other than the armscye, for version 2 I stuck with my extra 1.5" in the sleeve, but made no length changes to the body. I have quite a long torso and this thing is the perfect length as is! The longer version has 5cm of ease at the hip, so it skims nicely when I wear it over jeans without straining the buttons. The seafoam is a 195gsm Merino, and the slate grey is a 200gsm Merino - both from The Fabric Store.

Secretly colorful pocket!
Jen has an useful post on her blog about fabric choice for the Juniper, which I tried to stick to when I was choosing these. I also chose them because they are a 'neutral' and an 'accent' from my Wardrobe Architect project, so I thought I'd have a good chance of getting it to go with other things in my wardrobe. It turns out these colors are a bit hard to wear with currently existing other things, but I'm working on it.

I did do a few things to the second version to make it more my own (perhaps I was compensating for the way I shamelessly copied the color blocking of Jen's mustard and navy sample...). It has pockets! I didn't add any to the cropped version because it ended too high for pockets, but I knew with the longline version that if I didn't put them in I'd be constantly 'looking' for them.
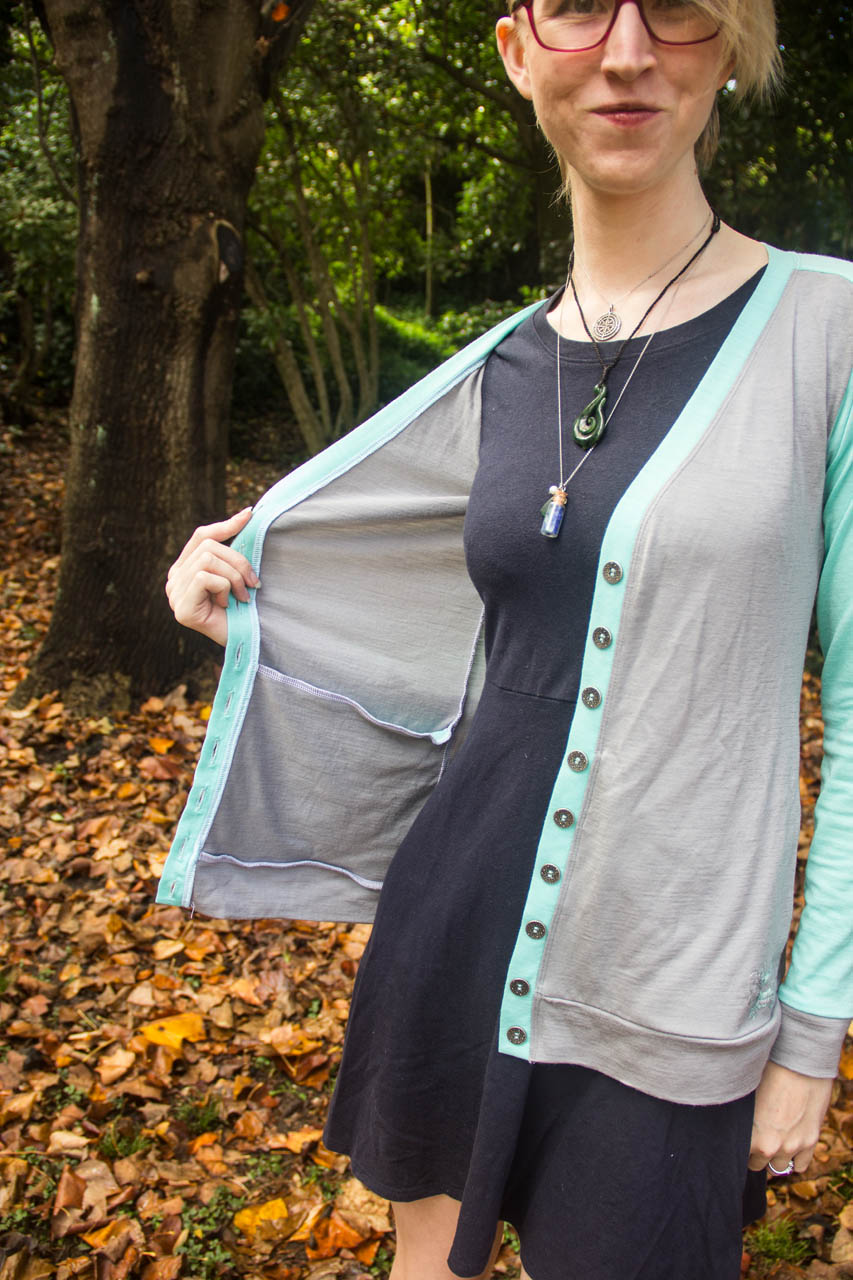
I used half seafoam and half grey for the pocket bags, so they're a little sneaky pop of color on the inside. Also, I loaded this thing up with buttons. Probably more than it needed, but aren't they perfect? I do love a good button. Or nine.

Lastly, and post cardigan-completion, I added a bit of tonal floral embroidery around one cuff, and put a little bee on the pocket. I found some silk embroidery floss at a local needlework shop, and drew a repeating floral motif that's repeated three times around the cuff.

“What can I do with my arm so that you can see the embroidery?”
The little hanks of silk embroidery floss were $7.50 each which is a lot compared to DMC cotton embroidery floss (less than a dollar for twice as much thread!) but nothing on this earth beats the buttery soft feeling of silk embroidery, and if I'm going to hand sew anything at all, silk is a thousand times easier to handle than cotton.

Okay, we're going to circle back to the unapologetic excitement for a minute: I follow Emma from Emma's Atelier on Instagram, and she's also reviewing the Juniper! We were both kind of working on them at the same time (as seen in our insta stories), and she sent me a message to ask how I liked it and we had a little chat- I didn't think being asked to review a pattern could get more exciting, but now I've made a new friend from the experience! Sewing (up until recently, at least) has generally been pretty solitary for me, but as I become more involved in the online sewing community, all these new amazing people keep popping up and I want to be friends with all of them!

“What can I do with my arm so that you can see the embroidery?”
In the interest of being thorough, I do want to touch on the wrinkles in the upper arm area of the sleeve. There are diagonal wrinkles originating at about armpit level that seem to 'point' to the shoulder in both of my cardigans. Generally, a wrinkle points to a stress point/ fitting issue, but in this case (after quite a lot of intense, page-ten level google search results and looking at every single other Juniper I could find) I can confidently say that the wrinkles are a byproduct of this style of sleeve. That said, the Juniper's wrinkles (from photos I've seen) are less obvious on sleeves that are a little closer fitting to the bicep (like Jen's sample) than on mine, where my bicep measurement is considerably smaller than the cardigan (I have skinny arms). If you do plan to make this cardigan, or anything with a saddle or raglan style sleeve, just be aware that the style will include some wrinkles. If it bothers you, consider grading to a smaller size in the bicep, which should help.

Can I do this with my arm? Surely this subtle boob-grab isn’t too awkward?
So, the review in summation: This is an easy couple of hours for an advanced sewist, and a rewarding next step for an adventurous beginner. I find the pattern well-drafted and the instructions well-written, and the saddle shoulder is such a fun design element. The extra shaping in the center front for the bust area was a thoughtful feature and having made similar cardigans without this shaping, I can certainly say that it's a great addition. Keep an eye out for sleeve length on the longer version, and measure the finished length on your body to make sure your cardi will end at the right place.
It pretty much made my week to have been given an opportunity to review this pattern, and I had such fun with it! I should mention that although Jen provided the Juniper pattern to me for free in exchange for a review, I was under no obligation to offer up anything except my honest opinion, and I'm not being compensated for any of my links, fabric choices, or whatever else have you. I'm just a girl, with a sewing machine, shouting into The Void and trying to make friends.
This week I've got a bonus post to wrap up Me Made May set for Wednesday, so you won't even have to wait a whole week to hear from me again! See you soon ;)