(Disclaimer before we begin: 2019 Kat wrote this, and 2023 Kat just pulled it out of a long lost drafts folder to share with you! I’ve made a few updates but enjoy the photos of our old house!)
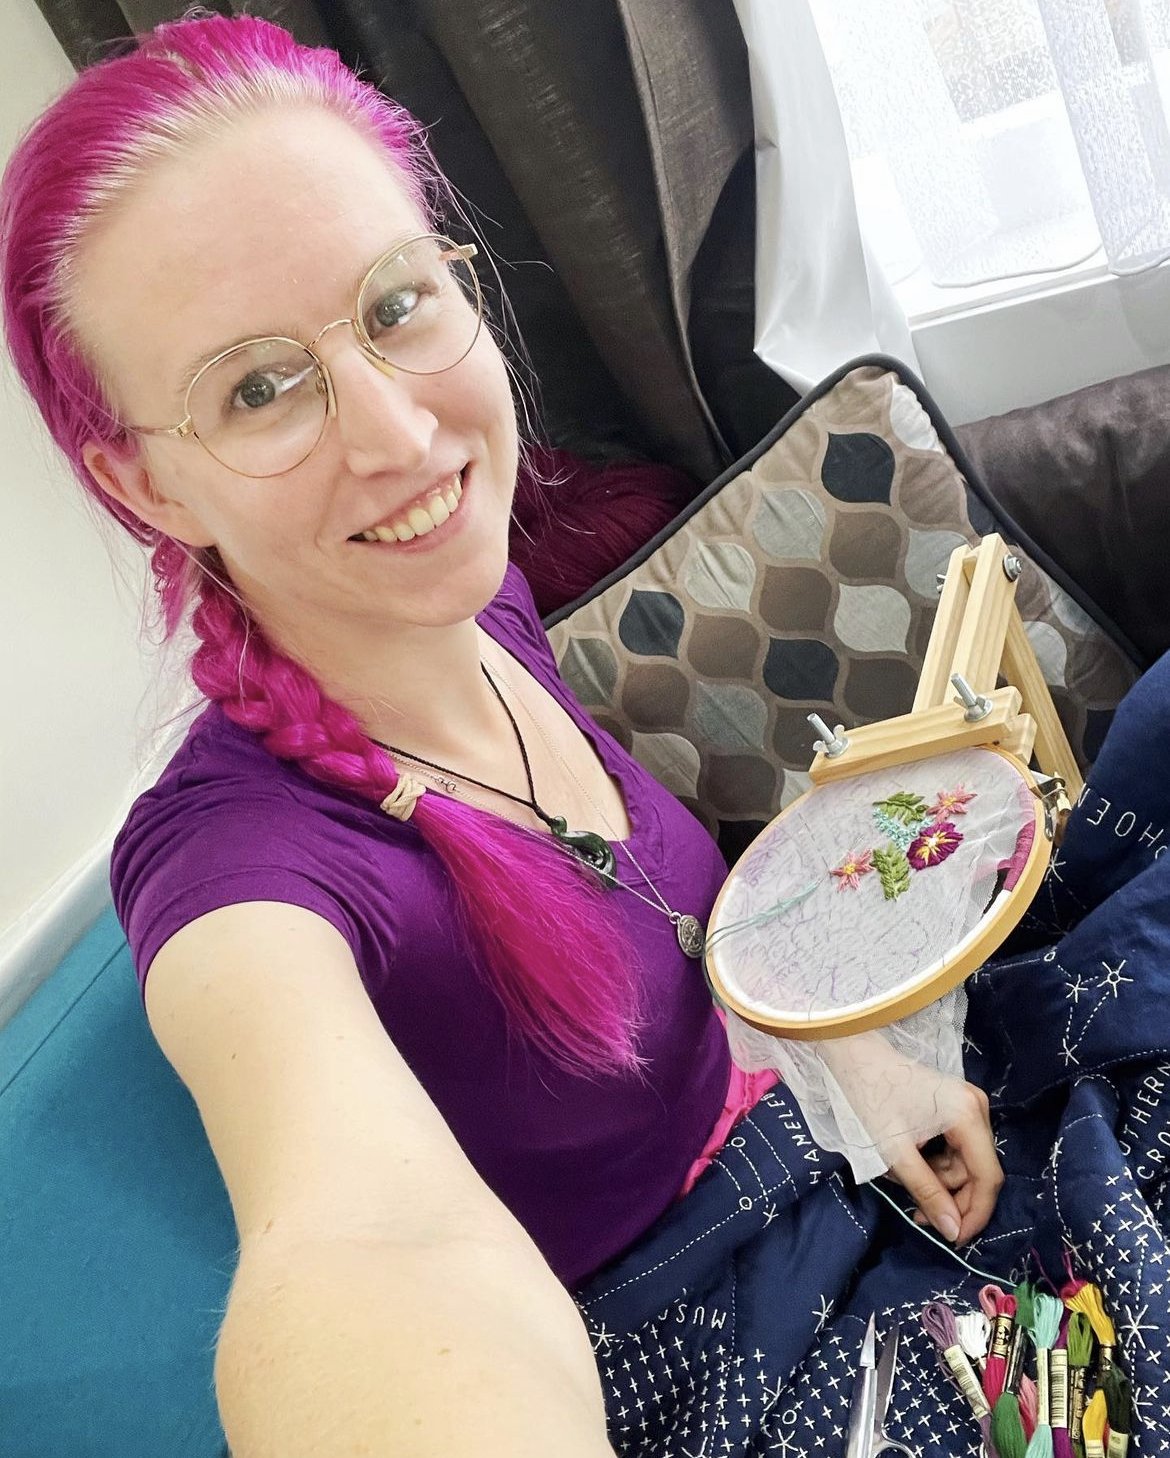
Hello! Today’s a bit different! There’s no sewing in today’s post, and no beading either - although there is intent to bead! I want to show you how (and tell you why) I built my embroidery hoop stand.
I’d better start with the why. There are a few caveats to using a hoop for Tambour Embroidery - specifically tambour beading. The hoop isn’t an ideal holder for tambour beading when the beadwork intends to be larger than the frame - you can’t move the hoop around over beads or you’ll crunch them between the inner and outer rings. The ideal answer is a slate frame (Which I built and talked about in this post) - because as the work is completed, it can be rolled over one of the arms of the frame so that a new area of the fabric is exposed for beading without damaging the work you’ve already done. This is great for large scale embroideries like my wedding dress, but I wanted something more portable that I could take around with me to work on - to places like knitting group, and the couch. I decided I was okay with confining myself to an embroidery the size of the frame in order to gain portability - there are plenty of things you can do with that, anyways - appliqués, epaulettes, pins. Basically, choosing to tambour bead in a hoop has its limitations, but it also certainly has benefits.
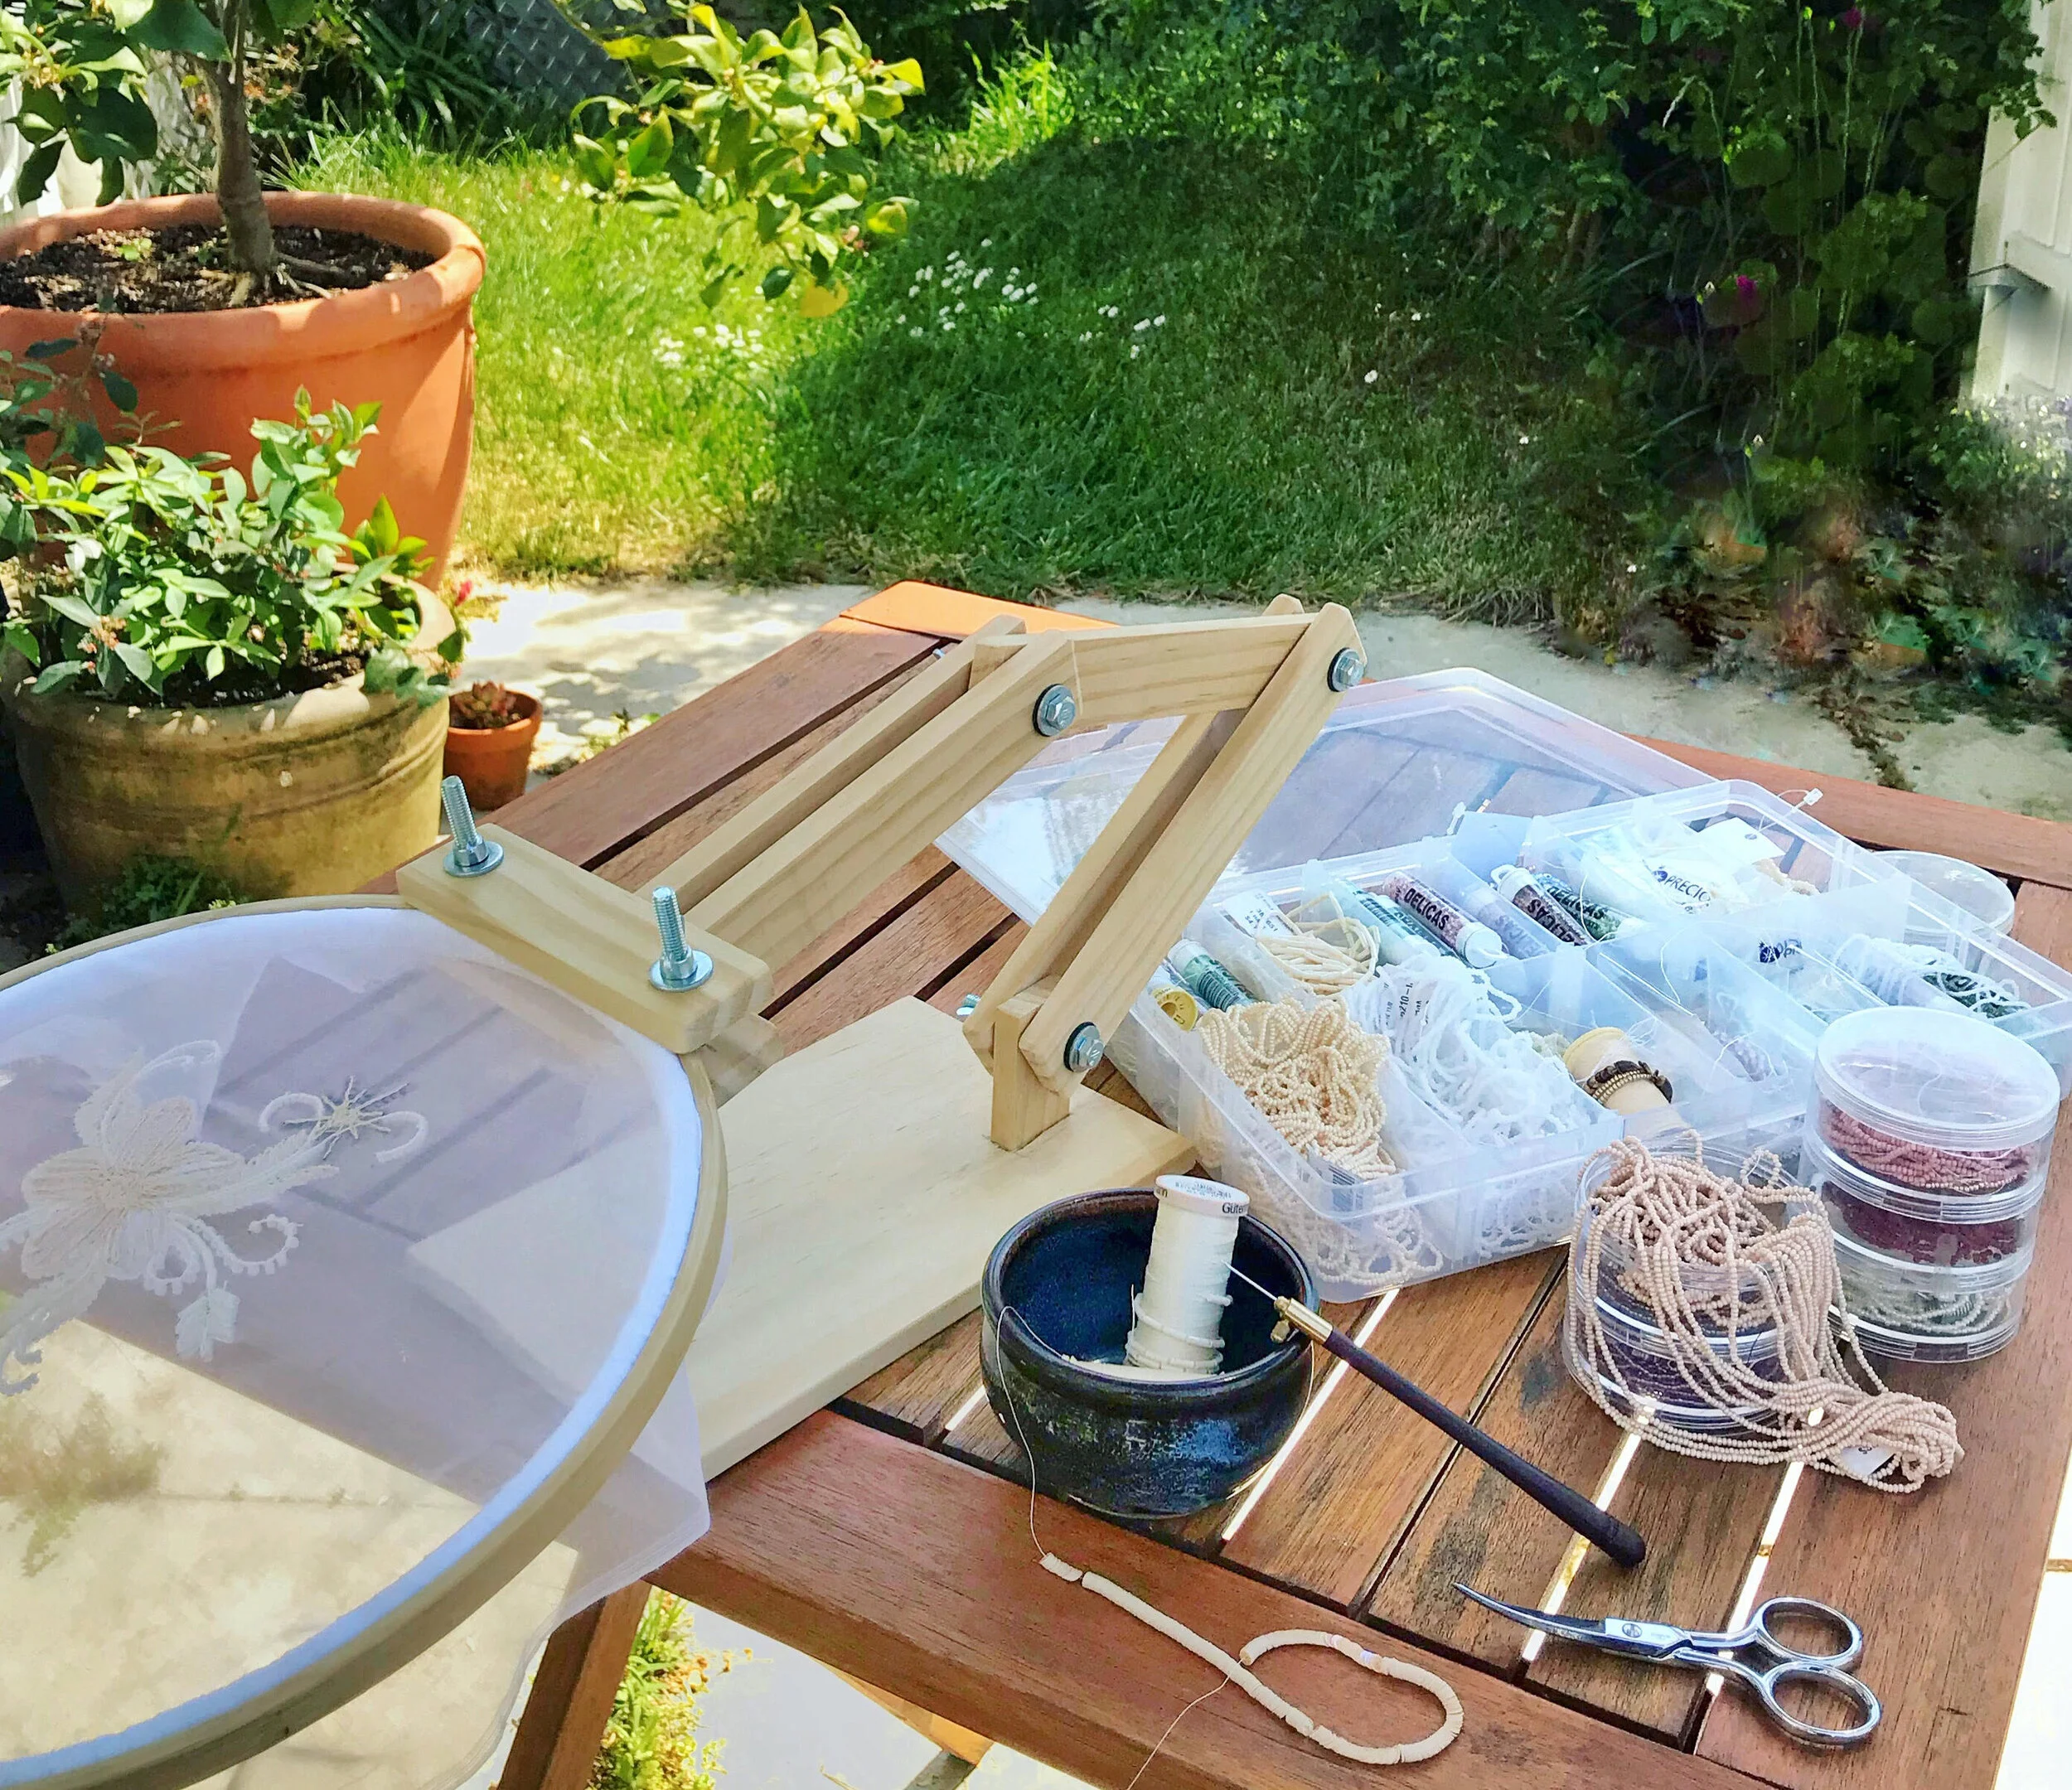
Now. The second problem. One cannot tambour bead while holding on to an embroidery hoop. Think about traditional needle embroidery - one hand holds the hoop and another holds the needle. In tambour, the thread is held on the underside of the hoop and the hook is held on the upper side - if you’re counting, that’s two things in two hands, leaving exactly no hands to hang on to a hoop. This is why I needed a hoop holder. With the slate frame, I was able to prop it up on two things of the right height to work, but the hoop is much smaller and needs to be held in place. I also was committed to having a portable project, which meant ideally I wanted something that could adjust to a variety of heights, depending on whether I was sitting at a table, on my couch, or in bed.
Enter, the adjustable hoop clamp! I drew my inspiration from a few similar objects I found photos of online. I even found a few that looked like exactly what I wanted, but for the very rich sum of $150 plus international shipping, I decided to at least try to make my own. I’m so glad I did: pleased with how it turned out, but also super pleased that I managed this build for exactly $28.67 NZD, very limited tools, and one afternoon. Let’s get on with the how-to, though, shall we?
I am assuming you have these tools:
1 drill, with a drill bit to match the width of your bolts
1 clamp, for holding glued pieces until they dry
Saw or wood-cutting device (I used a coping saw which made some steps very easy and other steps very hard)
A ruler and a pencil
Sandpaper - ideally a rough and a fine grit. Can’t have any rough edges catching on our fabric!
You will need:
‘neck’ wood (I got 2 90cm lengths of pine - 1cm by 3cm width)
‘base’ wood (1 90cm length 12cm by 1cm plank, though I only used a small piece)
3 neck bolts, plus 3 wing nuts and 6 washers to fit the width of your ‘neck’ wood times 3 (plus room for adjustment) My bolts were size M6 (which is just shy of 1/4”) and 45mm in length.
6 Rubber washers - to fit neck bolts.*
2 head bolts - size M6, but longer - 50mm- to support a variety of embroidery hoop widths - plus 2 wing nuts and 4 washers. (I would have preferred smaller diameter bolts here - an M4 would have been nice, but those only came in packs of eight, plus packs of wing nuts and washers, so I opted for larger ones I could buy individually to save money)
Wood Glue. I used a type for ‘indoor projects’ which dried clear. I’m not super familiar with brands of wood glue in NZ but it set quickly which was a bonus, and seems to be holding up well.
*this construction process doesn’t show the rubber washers - I constructed and tried to use my stand without adding the rubber washers at first, but the whole thing had a frustrating tendency to sag as I used it. Adding rubber washers between each piece of wood (so, two per joint in the neck) solved this problem!
I decided the lengths I wanted my wood pieces to be based on how I thought I’d be using the frame - I also chose three joints instead of two for maximum adjustability, but feel free to modify yours to make it work for you! Have a read-through first and see if you’d like to make any changes to my version - I also have very limited access to woodworking tools so I’ve made do in a lot of ways you might not have to!
You’ll need five neck pieces at 20cm long, two head pieces at 12cm, one base at 6cm, and one head spacer piece at 4cm. Like this:

Sand them all down so you don’t have any splinters or sharp corners. I used an 80 grit followed by a 120 grit, which is going to elicit a disgusted reaction from any reader who’s a proper woodworker, but they got the job done.
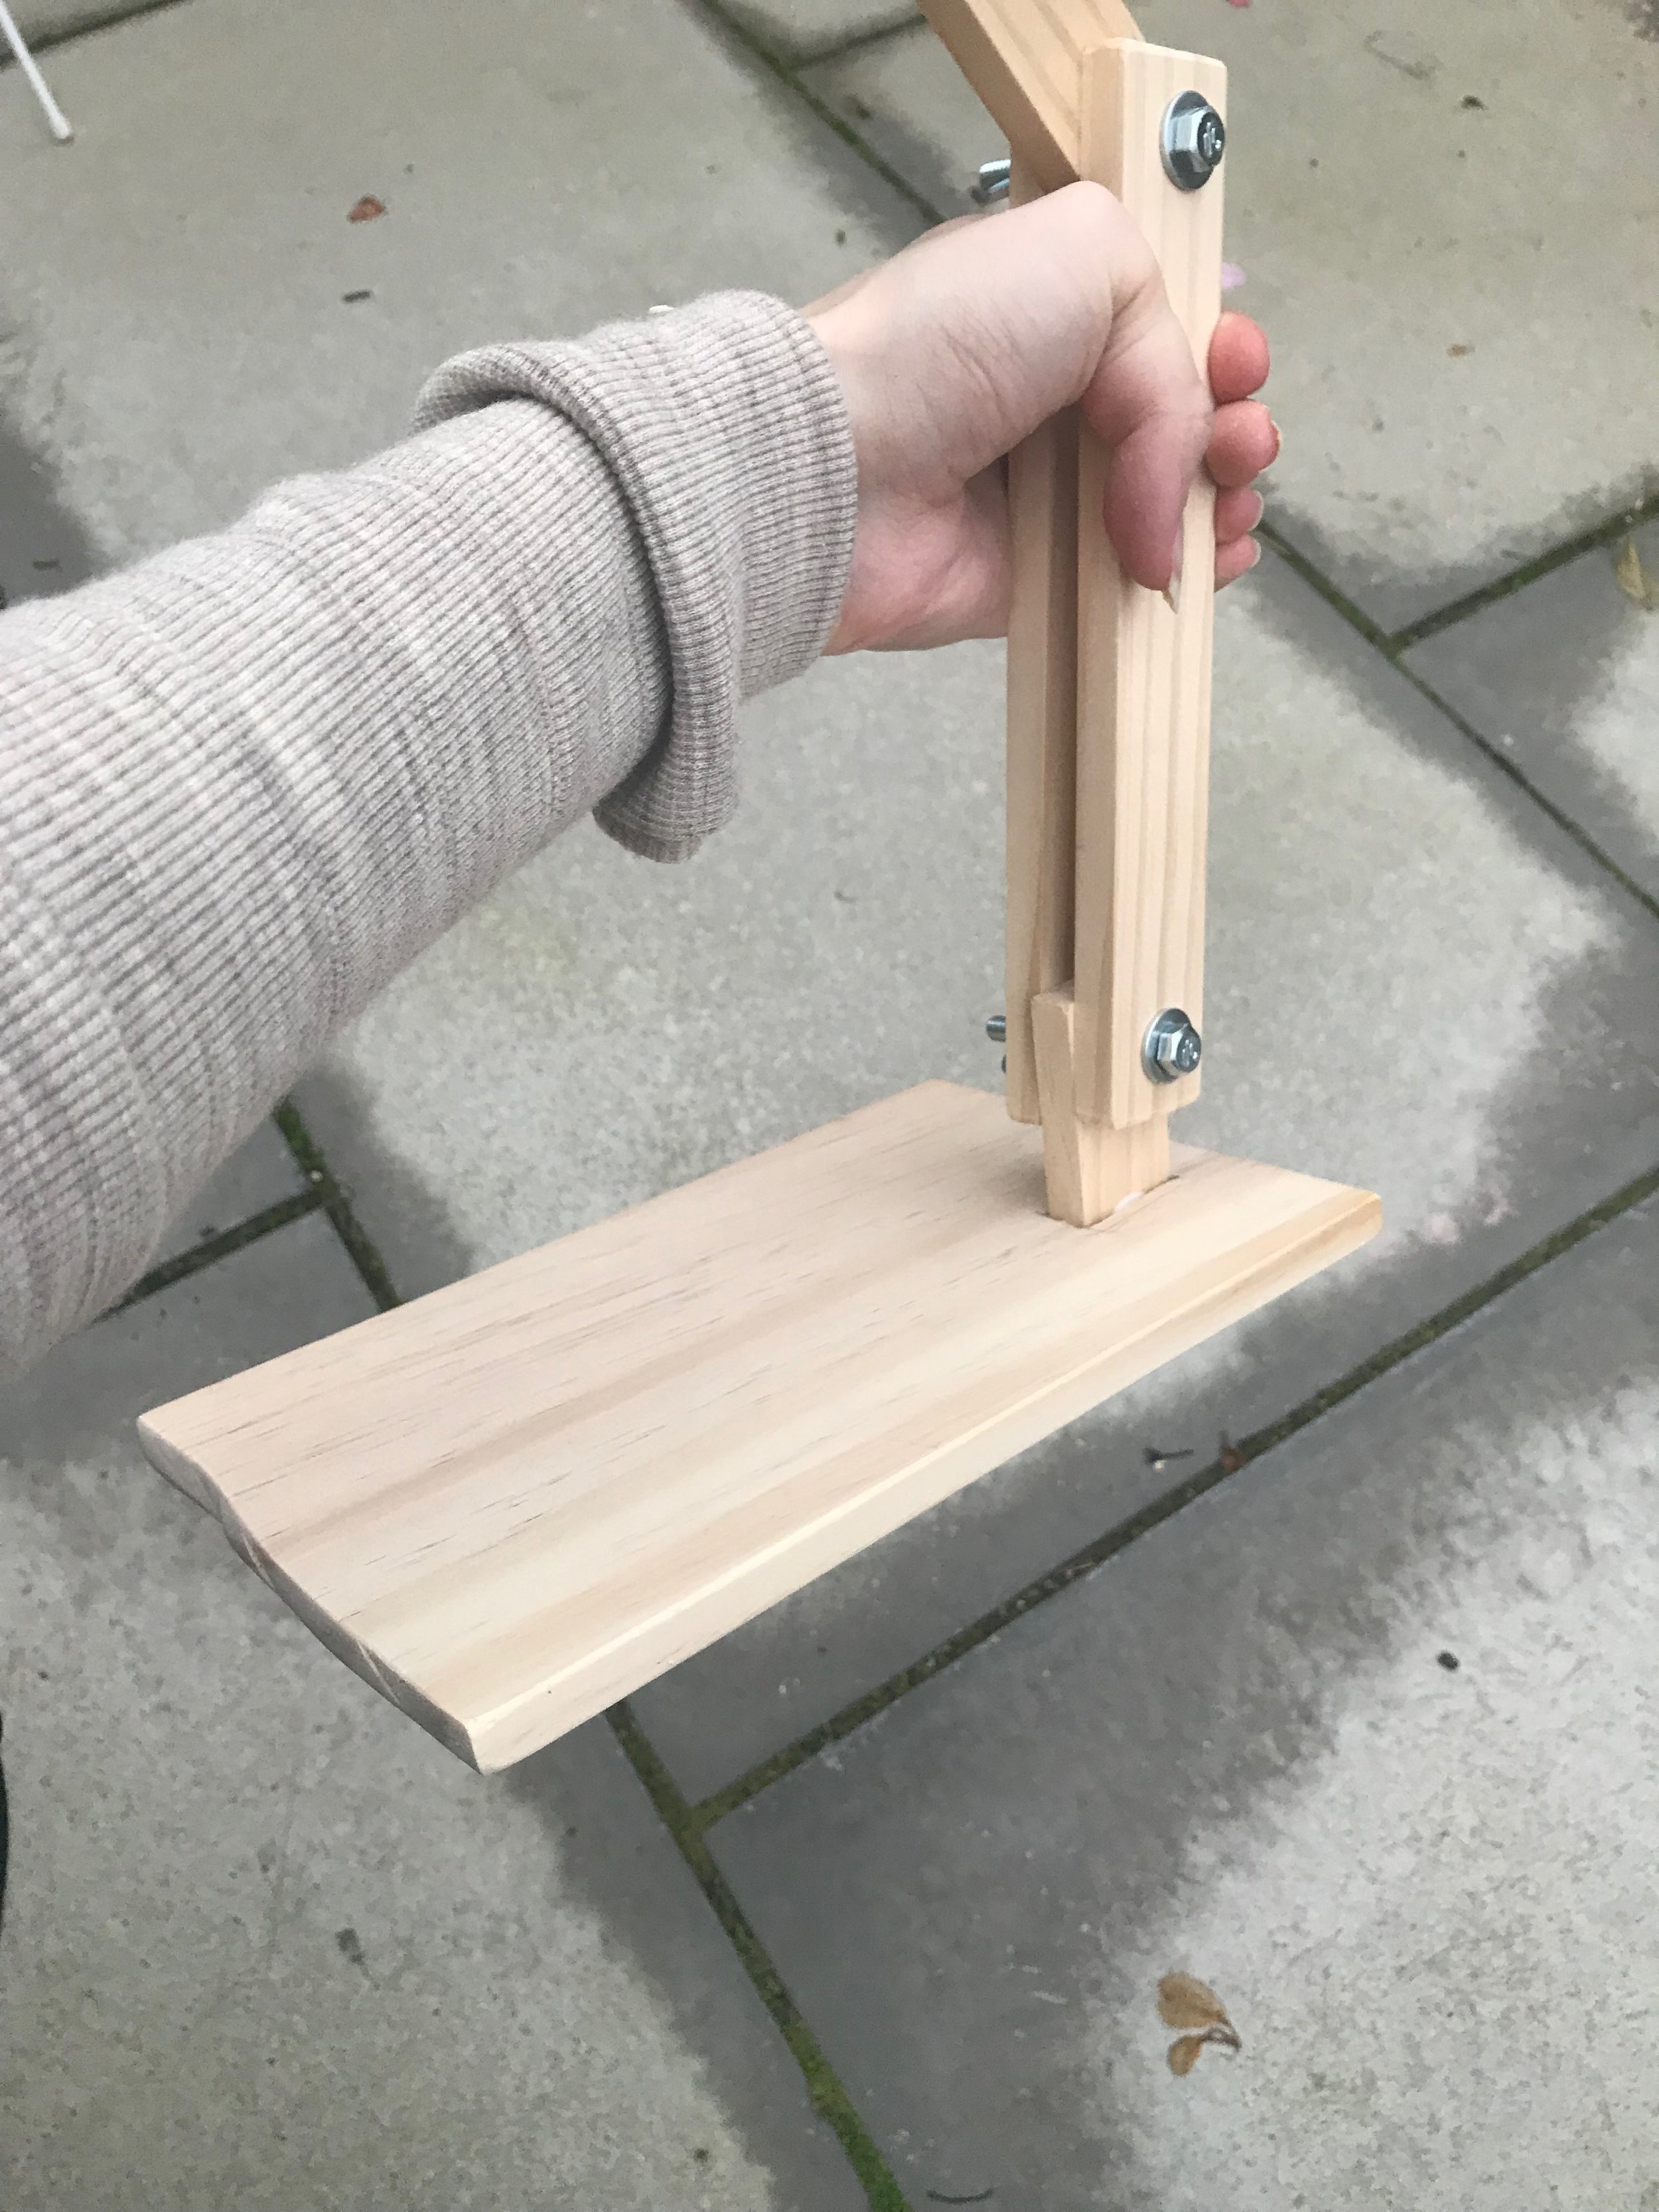
Next, drill holes in both ends of three pieces, and in one end of two pieces - mine are 3cm wide, so my holes are centered at 1.5cm, and 1.5cm in from the end. Drill a hole in the same manner in one end of the 6cm base. Test fit your bolts. the two neck pieces with only one hole are for the upper portion of the neck.
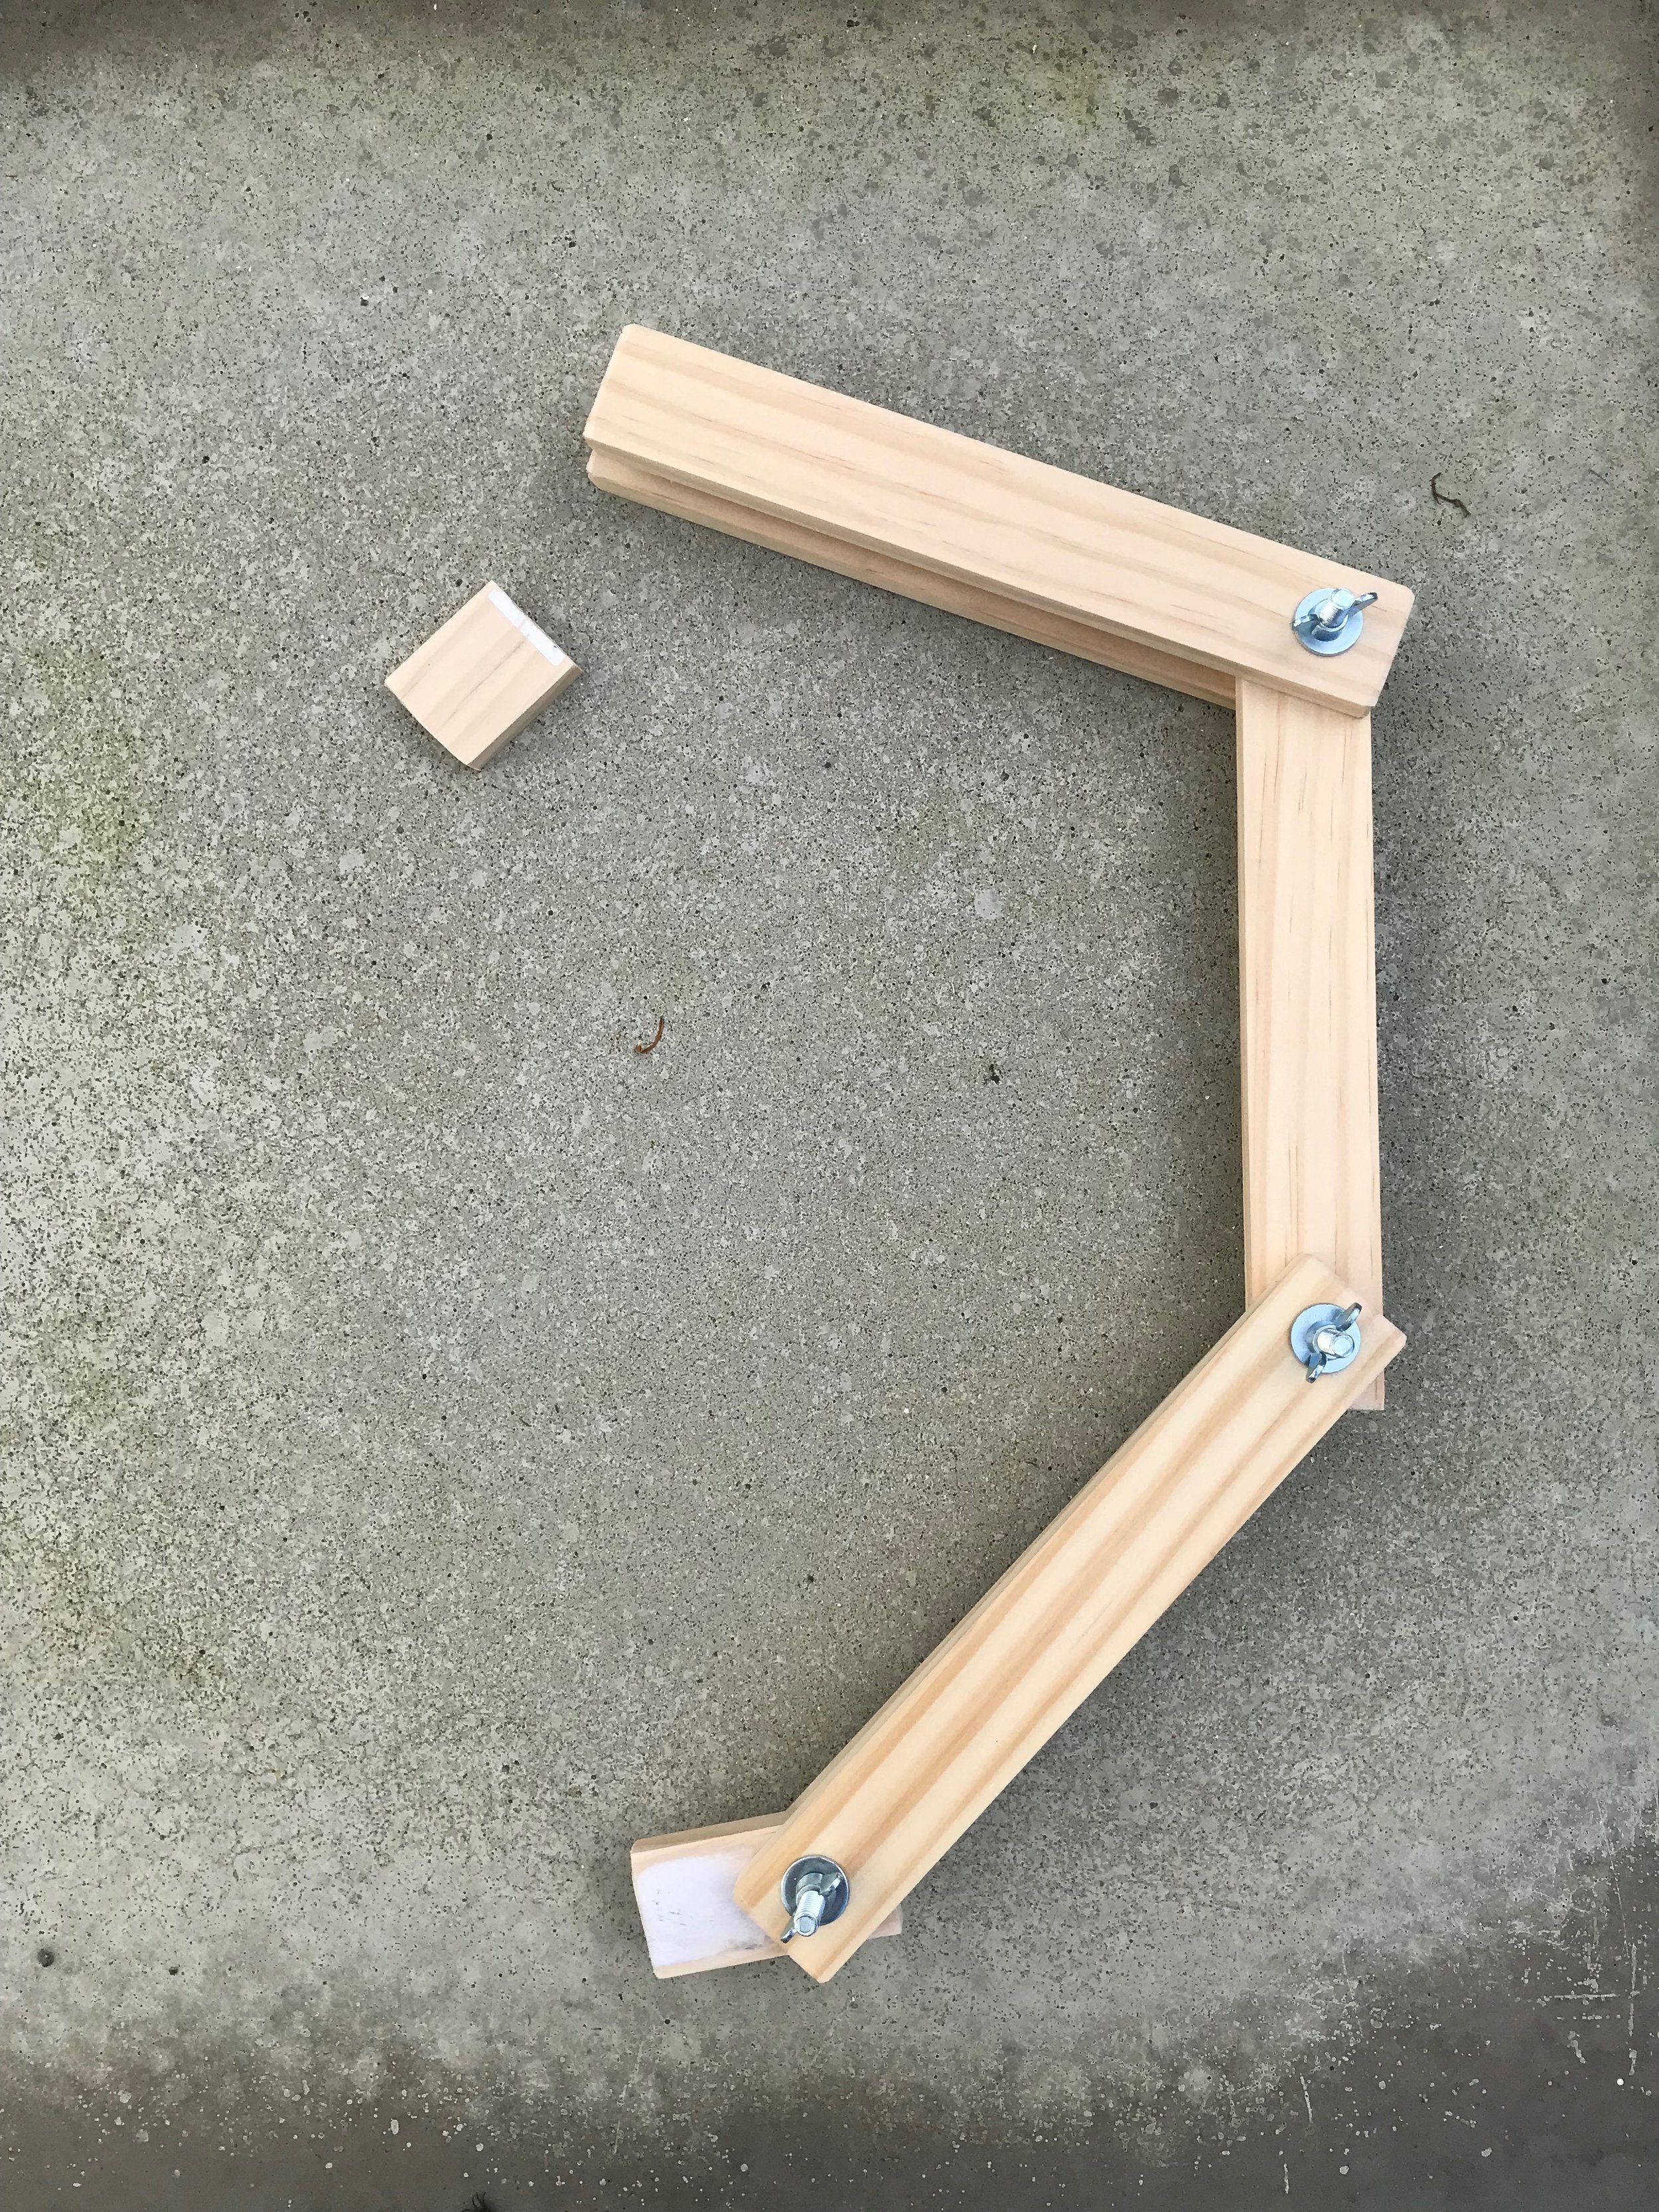
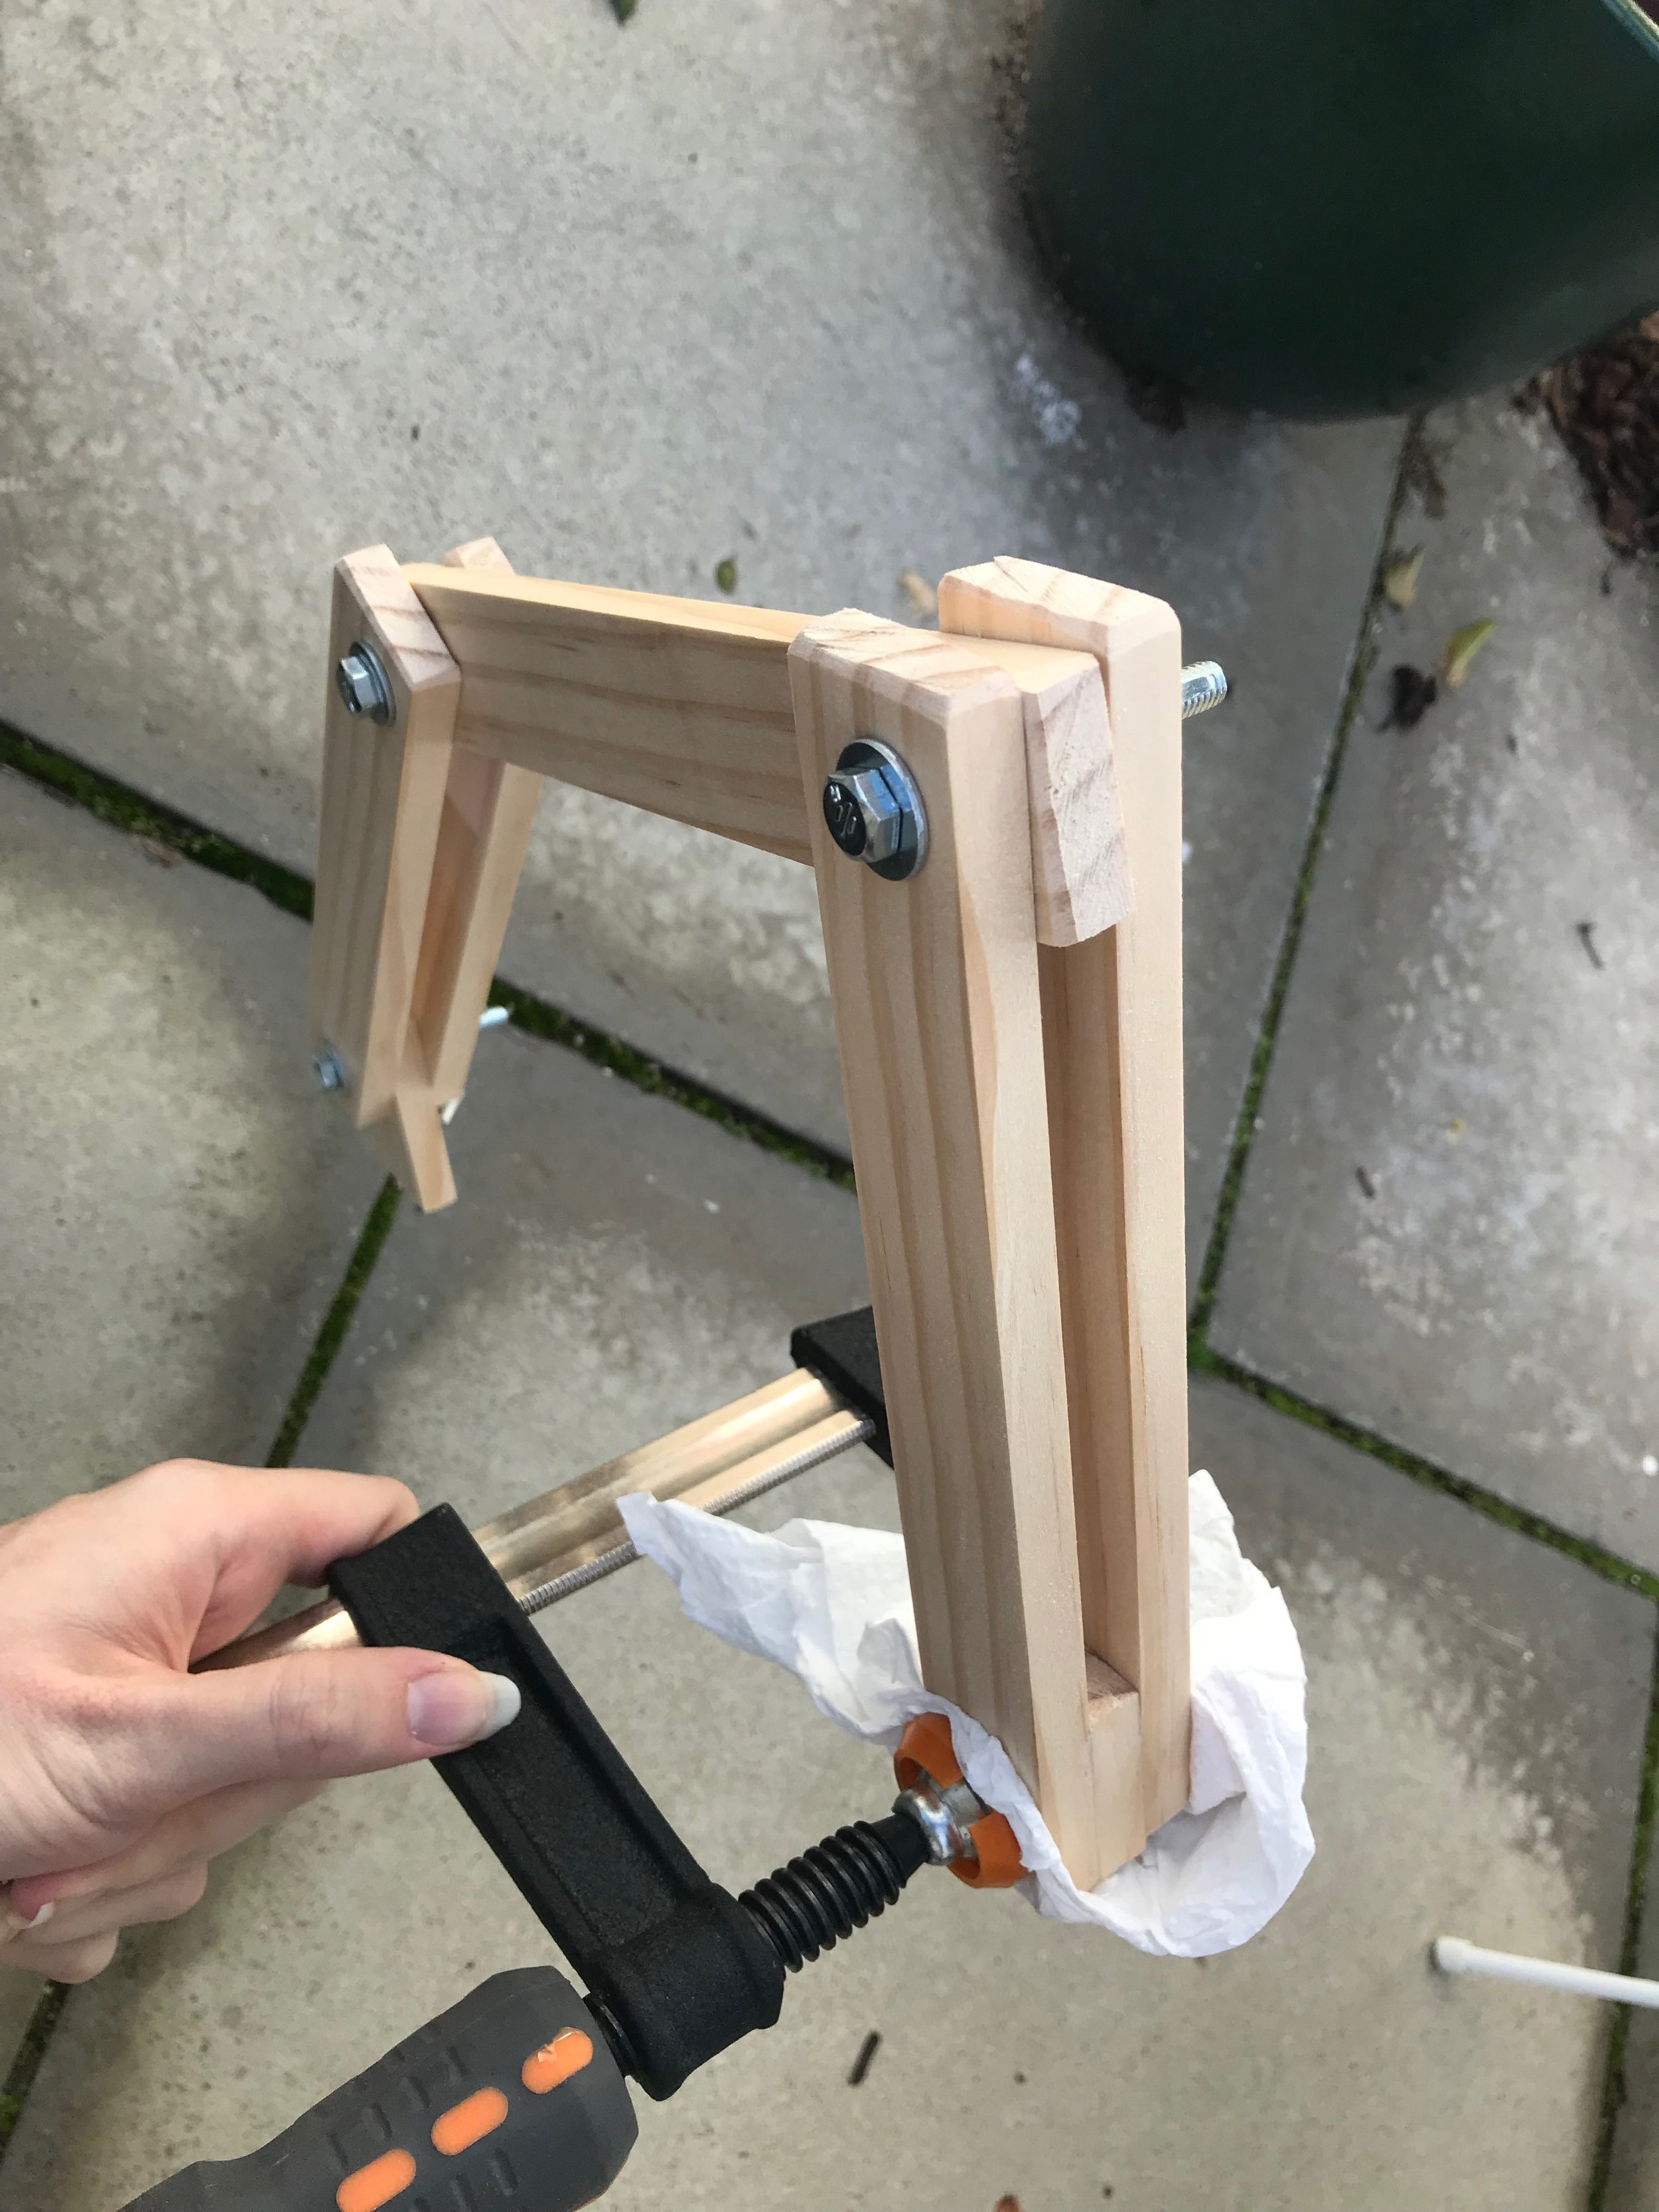
Glue the head spacer piece between the two upper portions of the neck - clamp and wait for it to dry for the actual curing time, not just an hour or two.
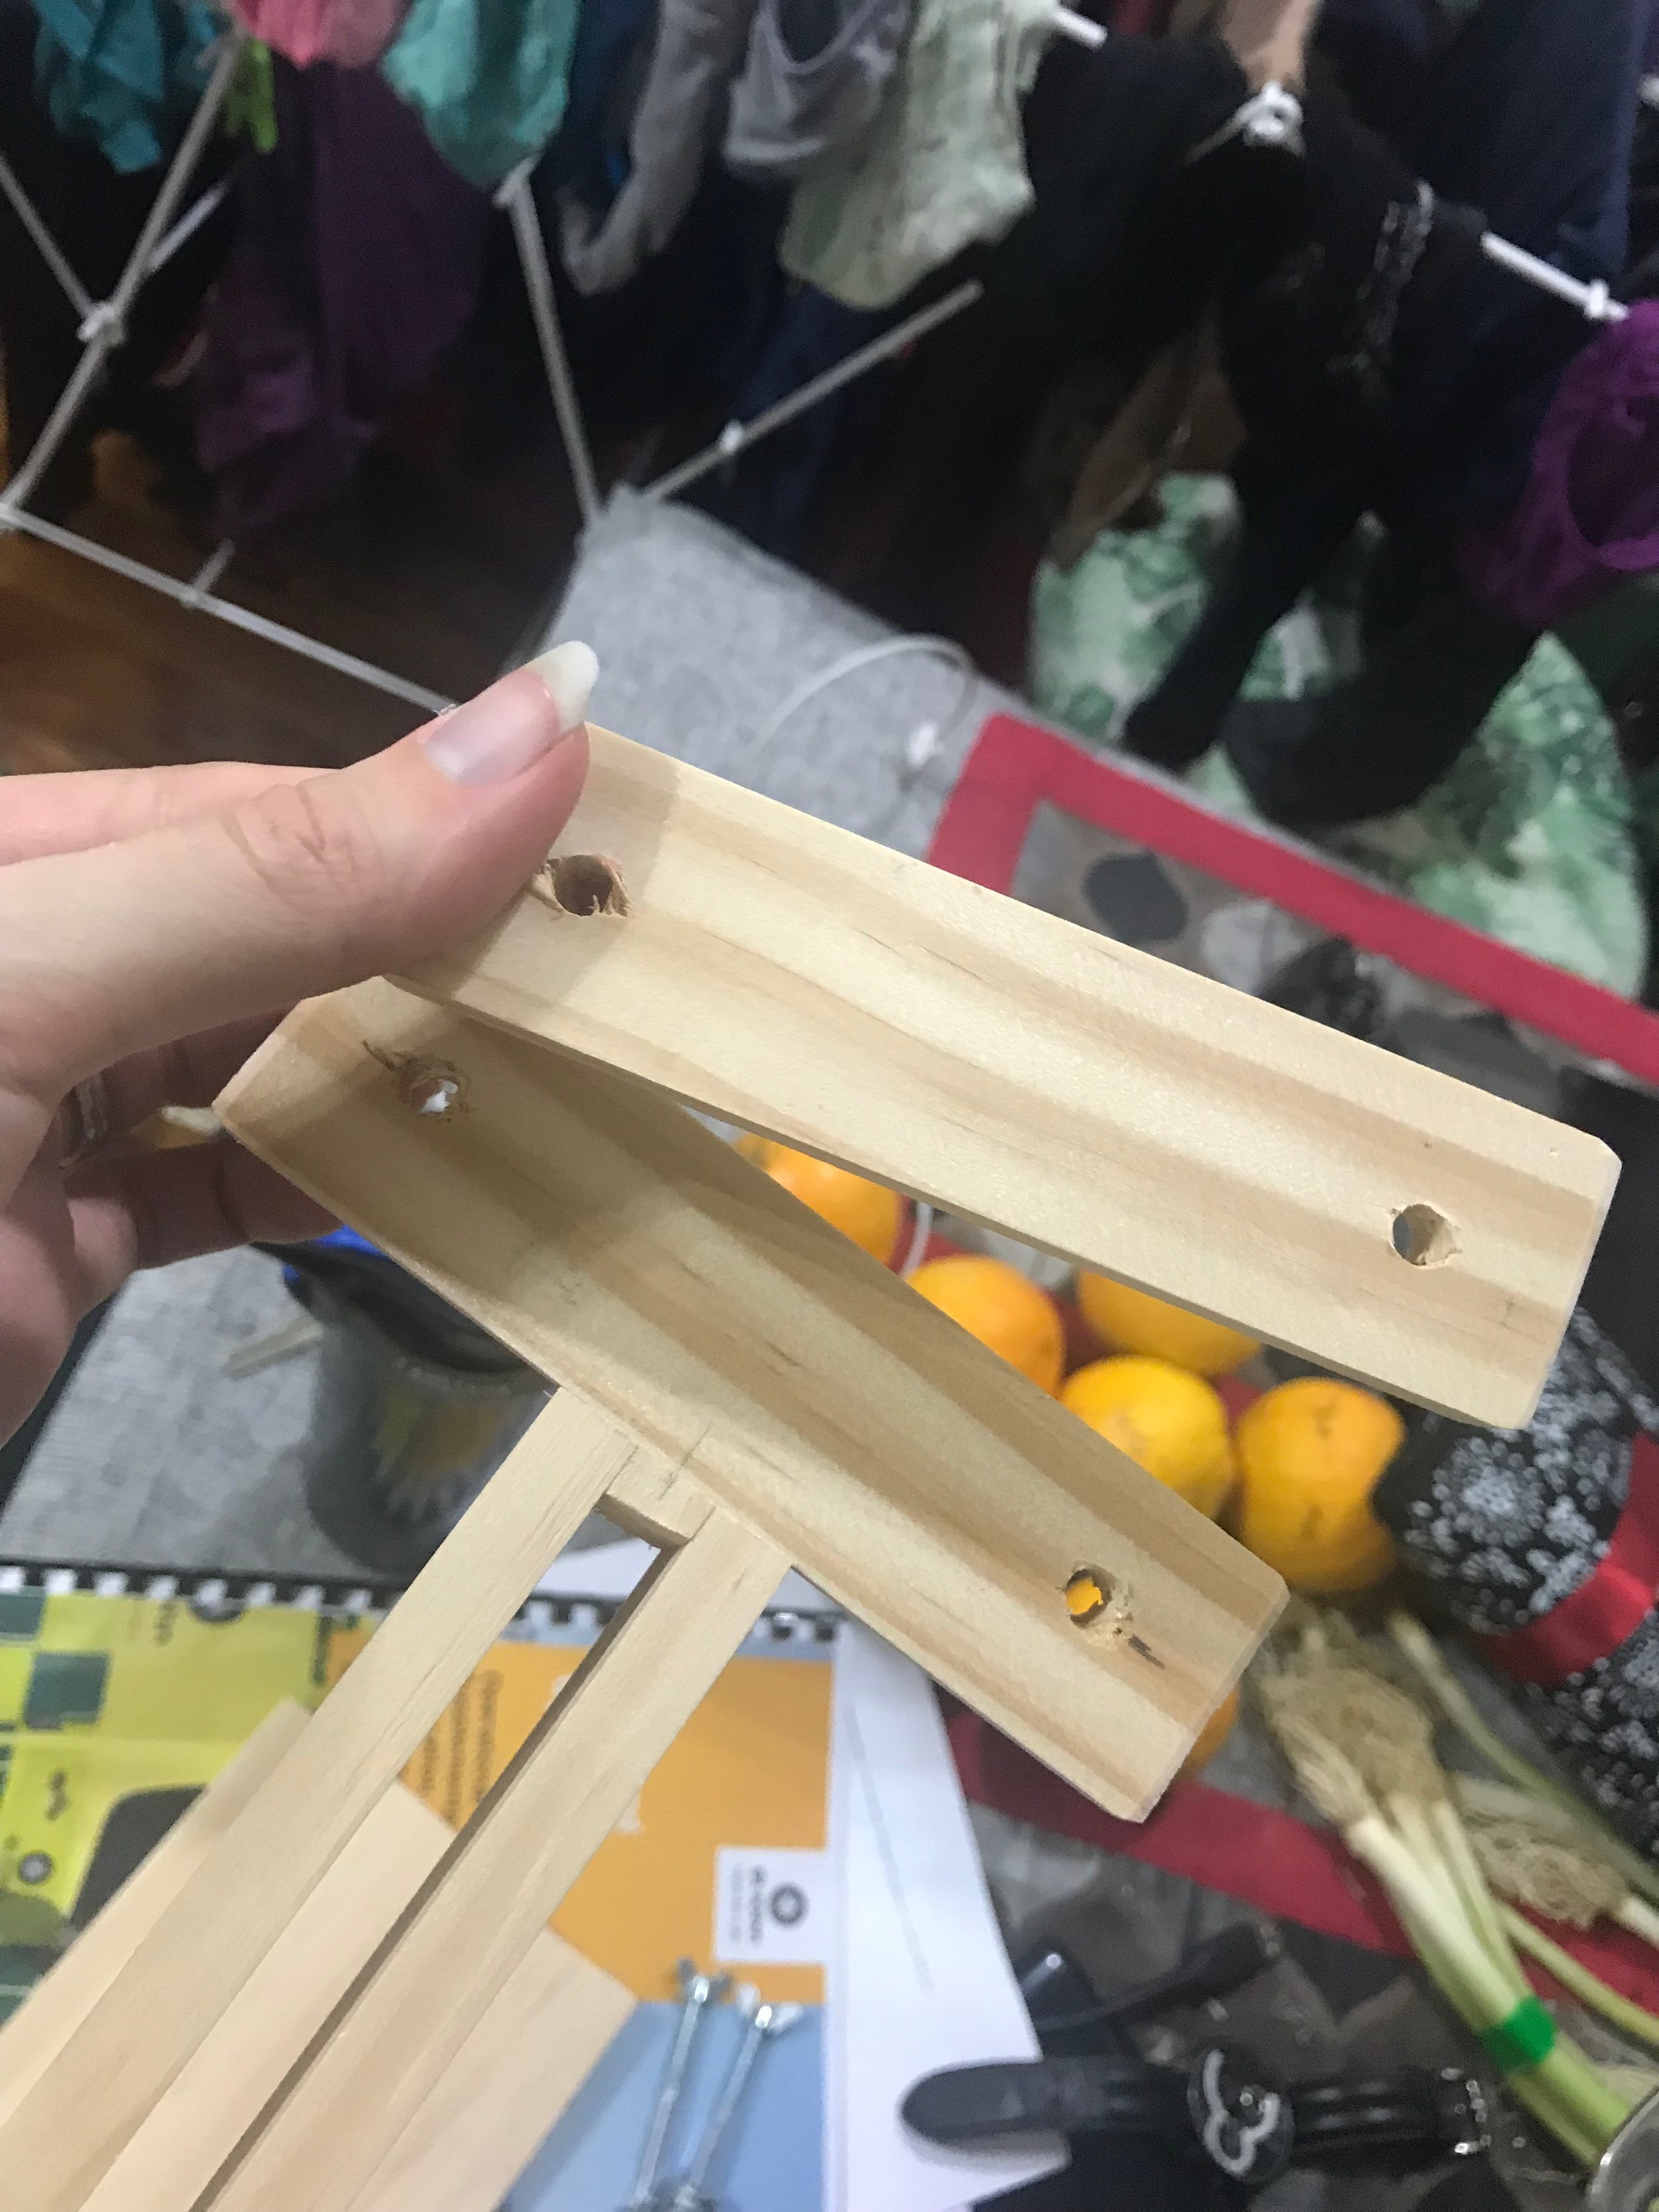
In the meantime, drill two holes in the ends of the two head clamp pieces - the width of the bolts, 1.5cm centered and 1.5cm from the edge. (I didn’t drill my holes first, but you should do that, it’ll make things easier)

Once the glue has cured, you’ll notch out a section of the head to attach the lower piece of the head clamp (as above). Make your notch the width and depth of your wood - in my case, 1cm down and 3cm back. I definitely recommend a coping saw for this job, but cut out the notch however you like. Glue and clamp the head clamp in to the neck.


Cut a rectangular piece off your base plank - mine was 22cm long. I did a horrible job of cutting mine because my only cutting implement was my cheap coping saw which, in fact, broke right as I was finishing the cut. The coping saw was perfect for the notch on the head, but really not good at all for just cutting a piece off my plank. I paid special attention to sanding this piece, as I intend to put it under my leg when I’m sitting at a couch. In one corner, mark a rectangle that is the size of the neck wood - mine is 1cm by 3cm - and use a coping saw (a scroll saw would also work if you have one, and I happen to know that a Dremel will work in a pinch - aforementioned broken coping saw) to cut out this rectangle. Sand to open it up a bit more if you need to. Insert the neck into this hole in the base, and secure with glue. You won’t be able to clamp this one, but I suggest letting the glue dry with just the base piece (i.e. not connected to the rest of the neck) with a piece of masking tape over the bottom to protect whatever table you set it down on. Once it’s dry, sand down any rough edges created by the glue, and you’re off to the races!
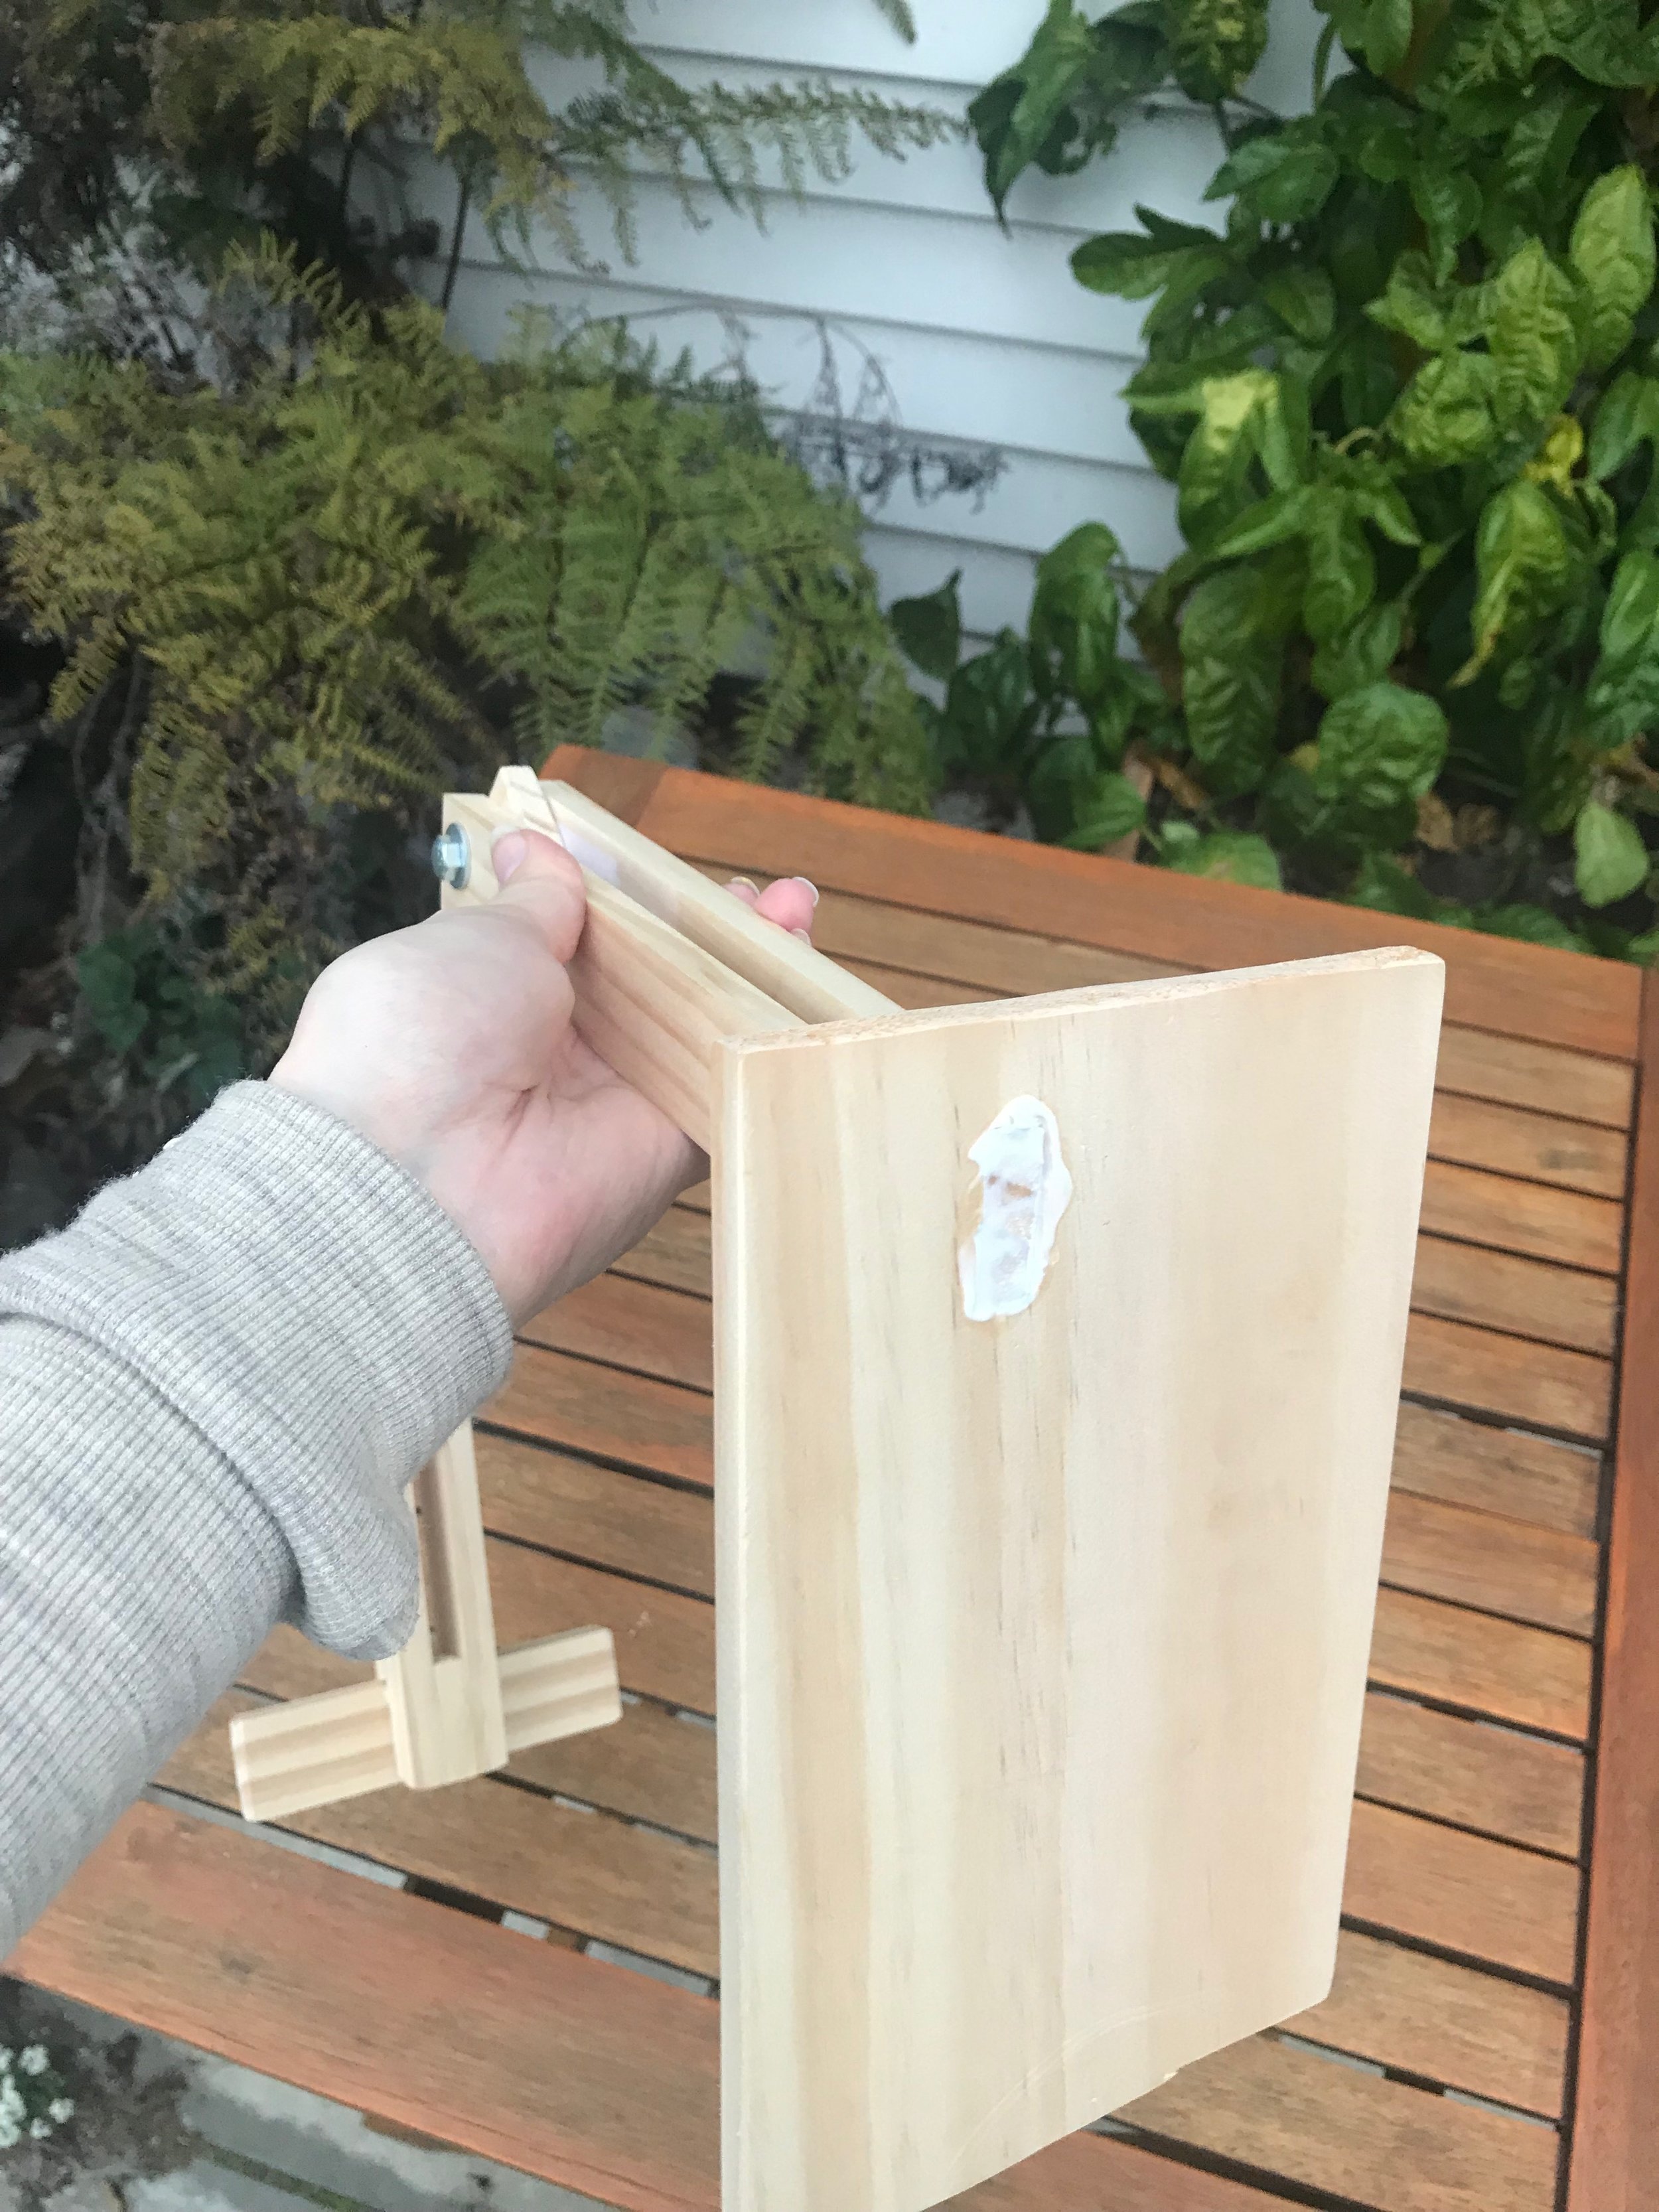
Final assembly - assuming you haven’t been working on it in a semi-assembled state like I have in these photos (couldn’t help myself… awkward to work with but so cool!!!) - bolt two of the neck pieces to the base - pass the bolt through a washer, neck piece 1, base, and neck piece 2. Add the third neck piece: pass the bolt through a washer, neck piece 1, neck piece 3, and neck piece 2. Add the head in the same way, and you’re nearly there! The last step is to use the head bolts to attach the upper clamp to the lower clamp. That’s it! you’re done!
The hoop fits between the top and bottom pieces of the head clamp, and you can use the bolts to tighten the hoop into the frame. If you have hoops of different widths, be sure to get a bolt that is long enough to accommodate it.
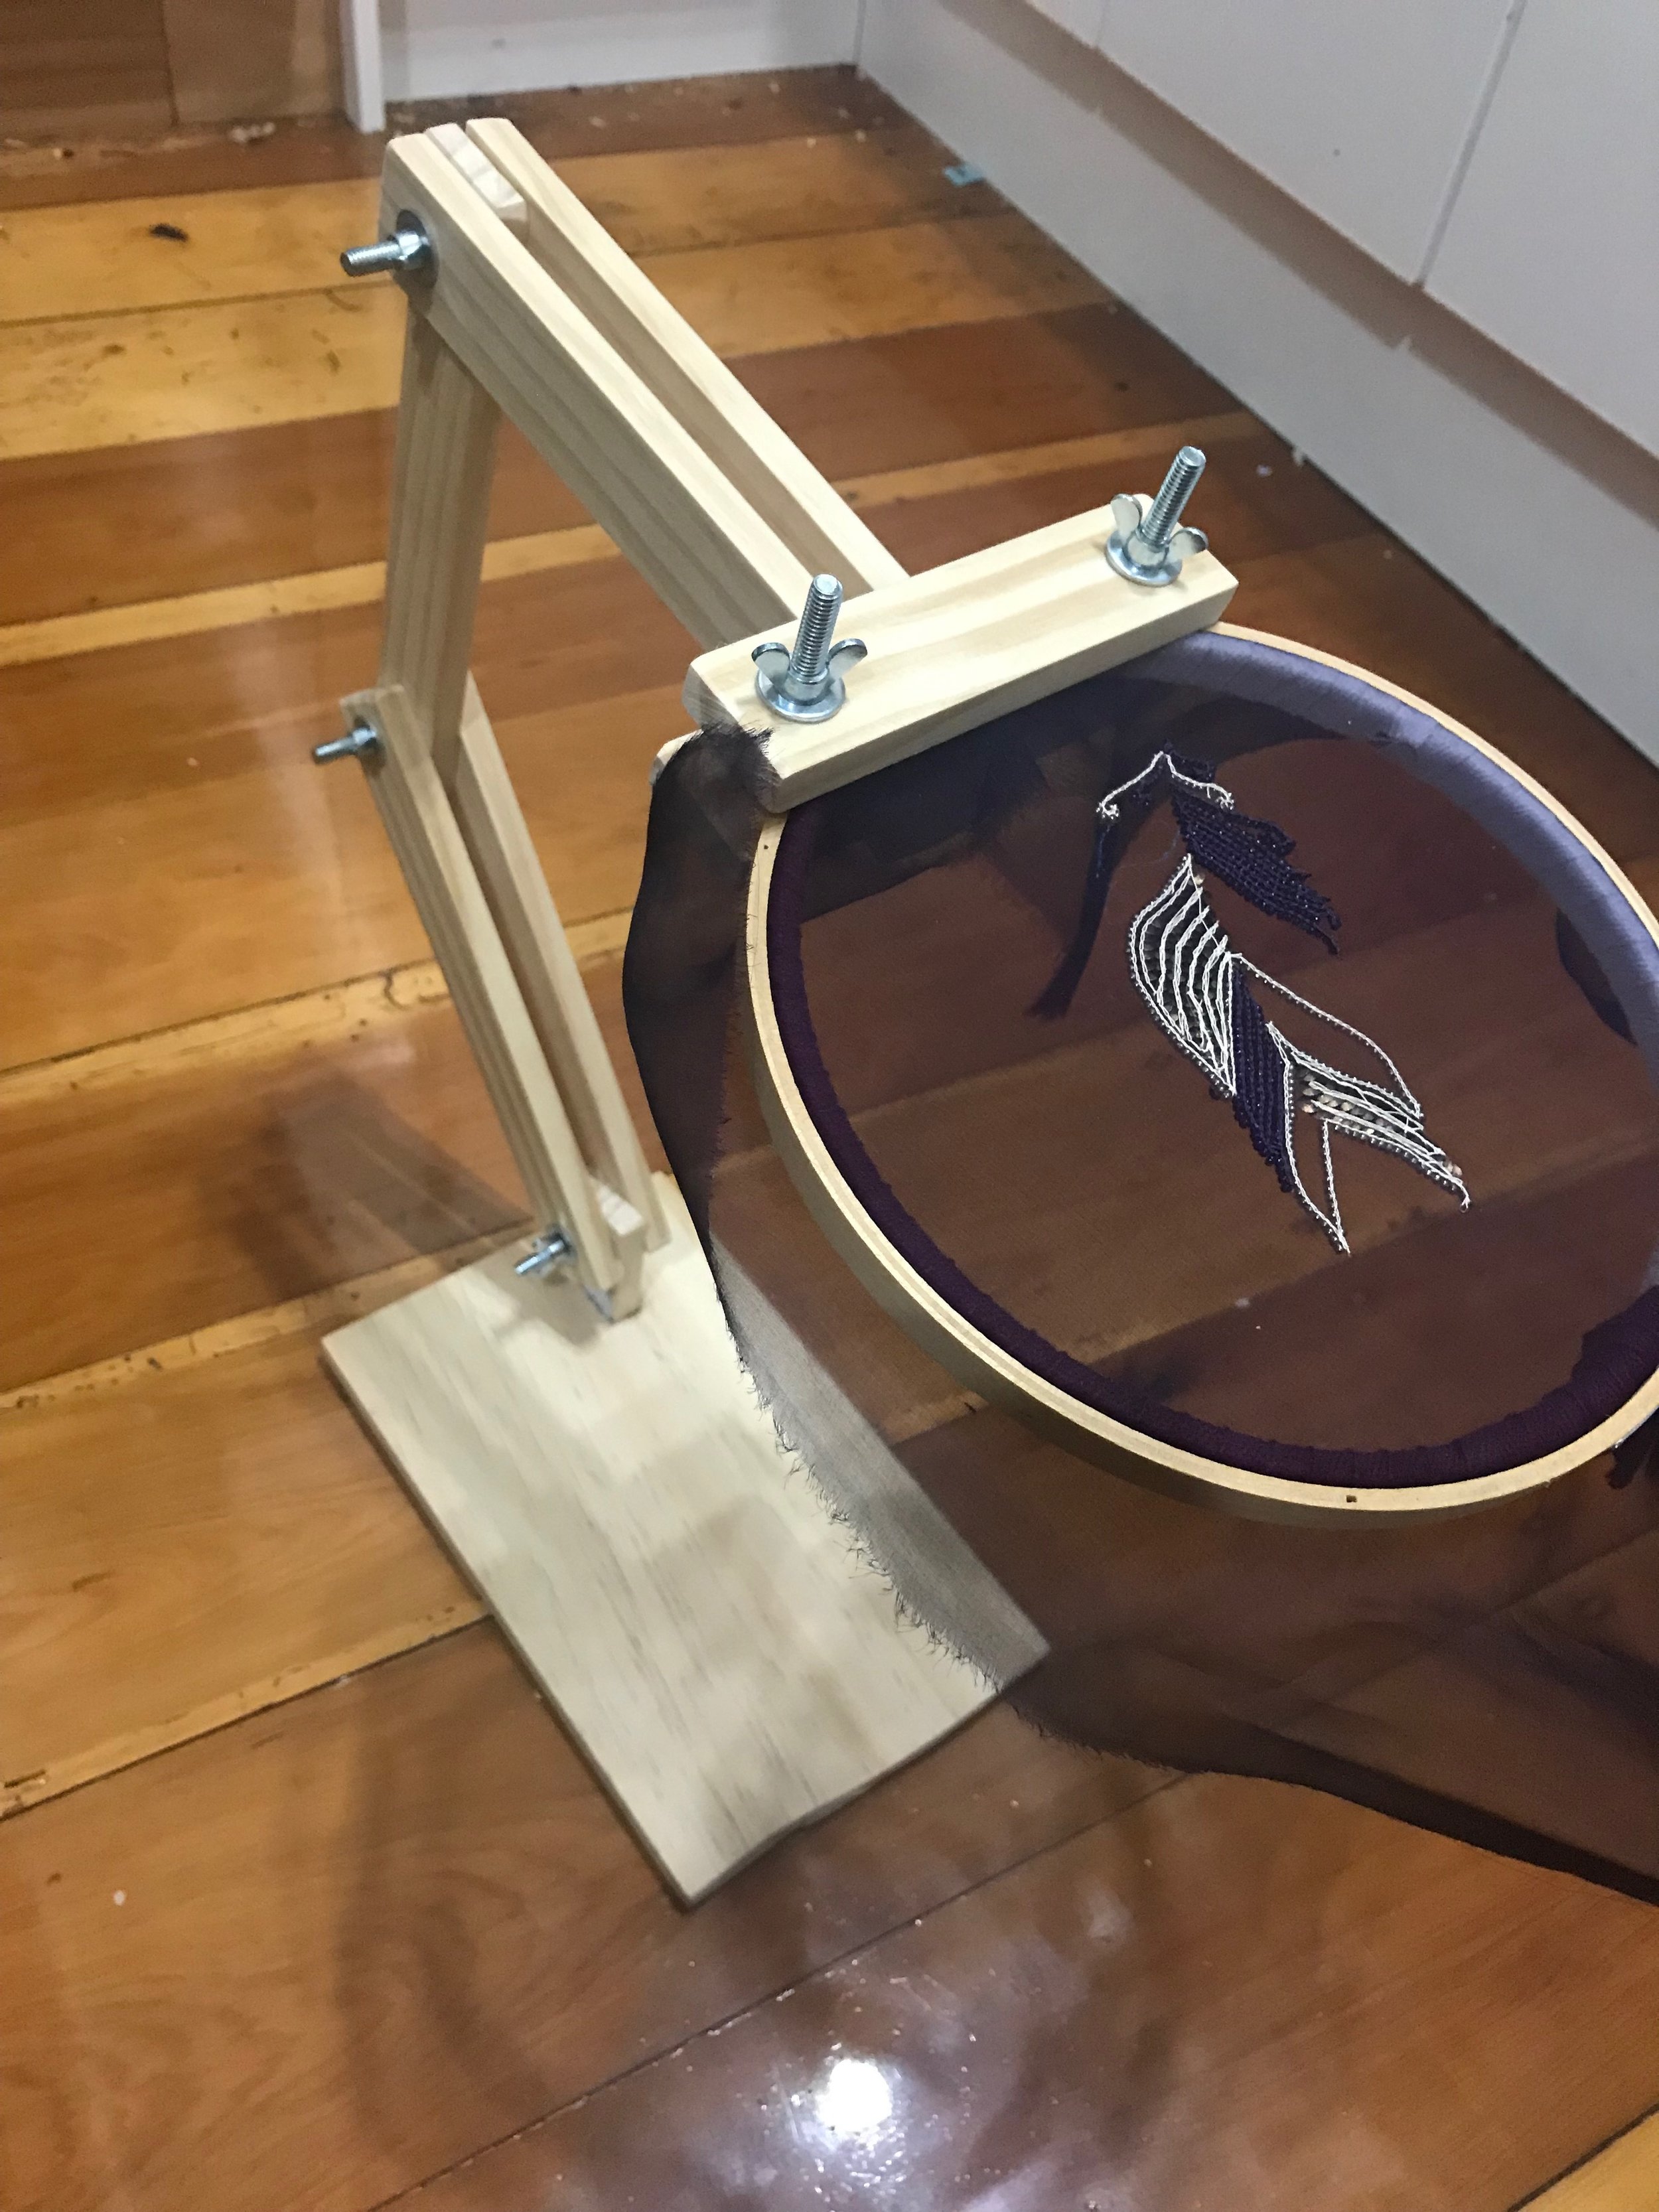
Hello from the future! It’s 2023 Kat again. I still have - and use - this embroidery stand, and I ended up purchasing a few larger embroidery hoops so I can work on projects as large as frame-bags and bra cups with this setup. The bonus of the flat base is I can tuck it under my leg when I’m on a soft seat, or clamp it to a table if I’d prefer to work that way. It folds down relatively easily, and the addition of the rubber washers is perfect for holding everything in place. I’m so happy I saved my money with this project, because ultimately it meant more cash for beads and we love that!
I’m still doing my best to catch you up on some of the old projects - I’ve got quite a few, and also a handful of Tambour projects you haven’t seen, which is very exciting!