

Have you been…. maybe sort of wondering what’s up with this whole Project Wedding Dress situation? I talked about it a lot for a while, made a couple videos and then… well, unless you watch my Instagram stories… there was nothing. My last video was over 7 months ago!
I’ve been putting off writing this post for a long time. I really really wanted to make YouTube videos of the process. I wanted to document my feelings about each step, tell you what I’d done and learned, and have that little series of videos to look back on a couple decades from now. In theory, it was this great golden thing in the sky that I was so certain I could manage, but in reality things were a bit more difficult. Each time I made a video, I’d spend four or five hours filming on Saturday, and three or four hours editing and uploading on Sunday, and just like that my whole weekend was gone - with no discernible dress-related output. I could only film on sunny days since I don’t have studio lighting in our tiny house, and this was also a problem. One of the things I’ve gotten really good at over the last few months has been taking advantage of the small in-between times: ten minutes here and five minutes there adds up, especially for the bodice embroidery, but that’s still no substitute for an entire sewing weekend, interrupted only for food and coffee breaks. (another thing I’ve been really good at is telling myself - ‘I’m gonna do a video this weekend’ and then doing literally everything except make a video. I learned how to make sauerkraut! I worked in the garden! I even learned the most chemical-light way to get blood out of an EMT uniform!)
Something had to give. As I continued plugging away at the dress (instead of filming videos) I started to realize that in putting off making new videos, I was neglecting to share anything at all. That was exactly the opposite of what I was trying to achieve! At that rate, I was going to have absolutely no in-progress documentation of this dress. I finally connected some dots this past weekend - something I probably should have figured out several months ago - that there was no reason I shouldn’t just… blog the progress. The same as the video updates, but without the actual…videos. To be honest, I enjoy sitting down in front of a keyboard a lot more than I do in front of a camera, so I’m not sure why it took me so long to come around to the idea. It does still take a bit of time to write a blog post, and I have to remember to take photos, but for a variety of reasons that aren’t all totally reasonable to any sane person, that concept is so much less intimidating than making videos. I suppose, without further bush-beating, here it is: The documentation of Project Wedding Dress will continue, from this day forward, at a much quicker pace and by text and photo instead of by video.
Hopefully that gives you a bit of understanding around my wedding dress radio silence over the past few months. I have and will continue to post updates in my Instagram stories, but a documentation method that disappears after 24 hours is hardly a documentation method at all.

So. Now we’re on the same page. Are you ready for seven months worth of Project Wedding Dress updates? I’m going to have to split up the posts, I think, because there’s so much to tell! Holy heckin’ heck, I hope you’re ready for this.
In my last video, I talked about sourcing fabric and supplies for the dress so I really, REALLY have quite a lot to catch you up on. Let’s start at the beginning, shall we? Here’s a quick rundown in bullet point format to get you familiar with the plan:
To make the ceremony dress:
Draft Pattern, make sure it fits and is supportive!
Build Tambour Beading Frame (slate frame)
Stretch embroidery base fabric over slate frame
Design/Plan Embroidery
Begin Tambour Beading
Build Corselet - coutil understructure
Dye fabric (three types of silk, three graduated intensities of blush pink)
Assemble silk part of bodice and attach to corselet (also, lining)
Cut skirt pieces- assemble each layer individually, baste three layers at waistline
Complete Tambour Beading - remove from frame, cut out, attach to bodice
Attach bodice to skirts
Try on??? Hem??? (I’m a bit fuzzy on the details at this stage!)
It’s the end of November, and I’m hoping to be at hemming stages by Christmas if everything goes according to plan. I’m up to the seventh bullet point, with plans to dye the fabric this weekend. That should give you an idea of where I’m at, progress wise. And no, I’m not nervous that I won’t finish. If I can wrap up the ceremony dress by Christmas, I’ll have plenty of time to make the reception dress - still a big project, but significantly less time intensive as it won’t have the same type of beading.
Okay. Today’s episode of catching up: I knew that the single most time intensive task out of this whole project was going to be the bodice beading, so I needed to get started on that right away. There were two things that stood in the way: First, I needed a pattern. The beading had to follow the exact pattern of the bodice, because you can’t just cut into beaded fabric, or else you’ll cut the threads and the beads will fall off - so the pattern had to be established first. Second, I needed an embroidery frame to hold the piece while I worked on it. I decided to build a slate frame as it was significantly less expensive than buying one from overseas and having it shipped.
Drafting the Pattern
I started with a princess-seamed variation of my basic block, which I already knew fit pretty well. It’s actually the pattern I used to make this white silk dress, although it’s hard to recognize after all the changes it went through!

To take it from a body-skimming sundress to a tight, supportive base for several hundred grams of beads, pearls, and sequins plus a couple pounds of skirt, I had to take a significant amount of width out of almost all the pieces, focusing on the side and front-side seams. I intend, for this dress, that the interior structure of the dress will also support my boobs. Going braless meant that support was a pretty critical factor.
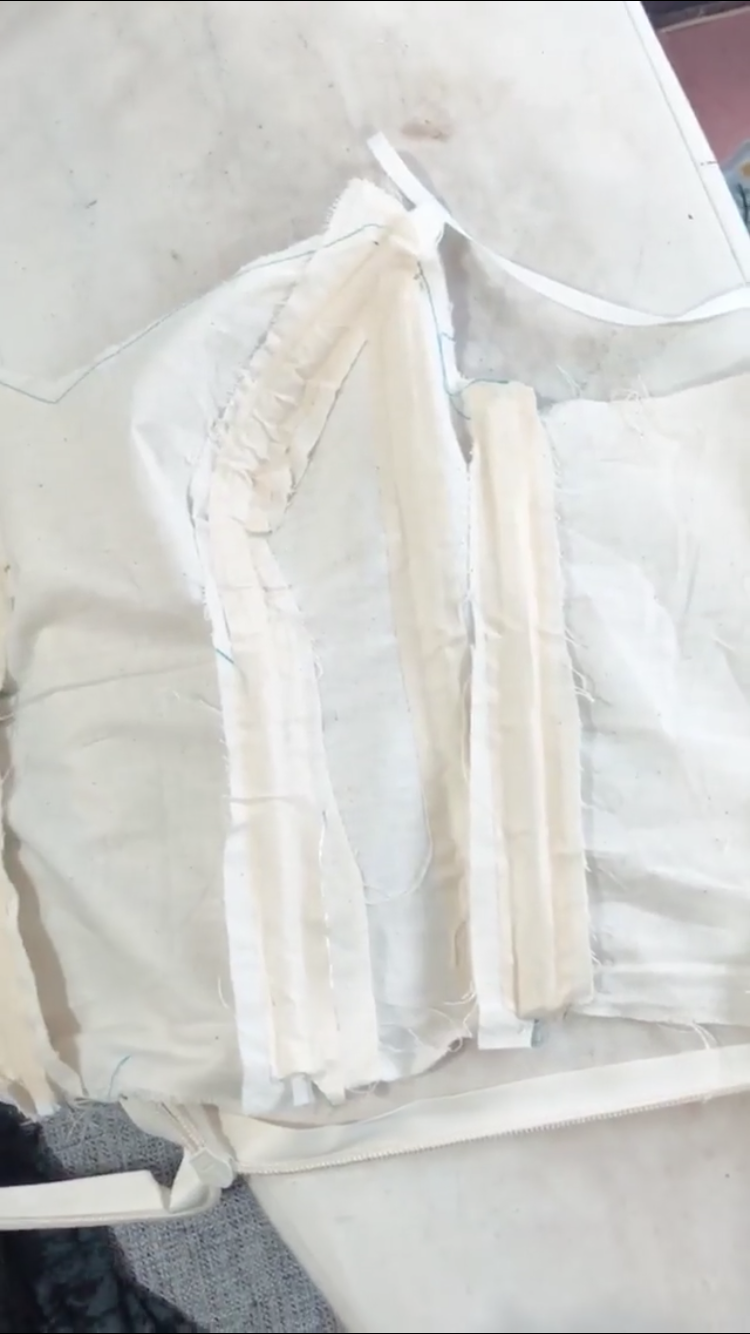
I used masking tape to quickly apply plastic boning to the seams in order to test placement - the real dress will have spiral steel boning in proper channels.
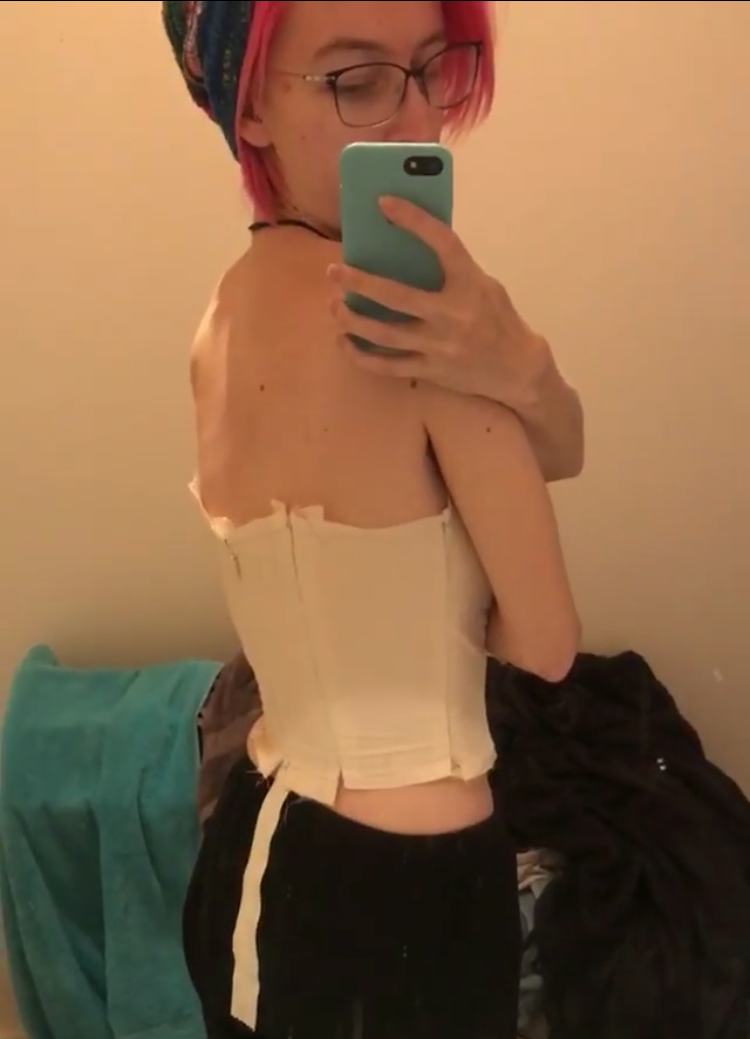
After the basic shape was established, I cut the back lower and lower in stages. I wanted to get it as close to ‘backless’ as possible, without losing an unreasonable amount of structure. I ended up removing a total of 5.5 inches from the original draft. About 3” down, the side seams started to gape open under my arms, so I took them in about 1/2” which solved that problem quite well.

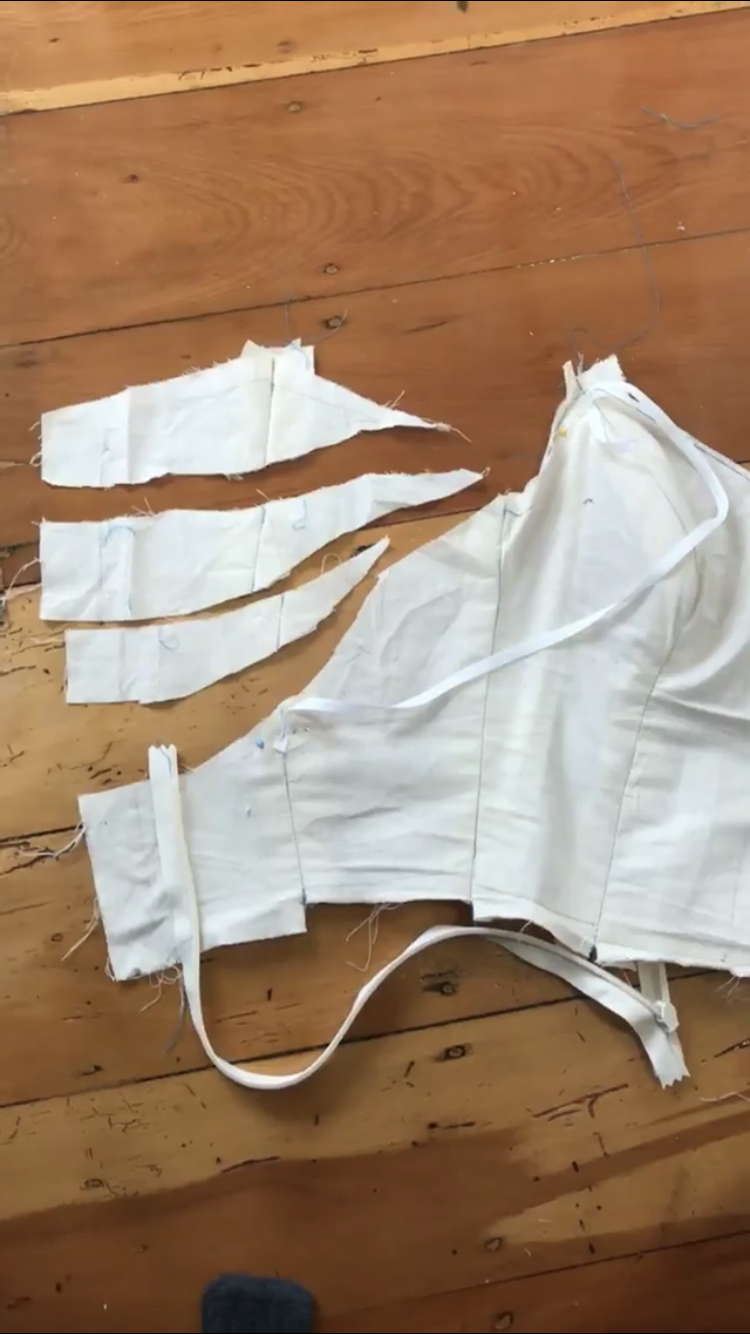
I ended up quite happy with the sloping low back! I planned a partial sheer beaded overlay which would rise about 2 inches up the back, but the base of the dress would still be supportive enough on its own. Here’s what the draft looked like when it was finished, compared to the original version:

A few months from drafting, I’d use the pattern pieces to build the corselet - the interior structure layer of the dress - but the important thing at this stage was that I had my pattern pieces ready for the embroidery, so I got to work on that next instead.
Building the Slate Frame
Now that my pattern pieces were ready, I turned my attention to making the slate frame so that I could begin the embroidery process. Slate Frames are one of the oldest embroidery technologies - there are illustrations of them in use dating back to the 1500s! The design is quite simple - a square or rectangular frame that connects (in various ways) at the corners and holds the fabric taut for embroidery. They can sit on table tops, or have trestle legs, and they can be adjustable or static in size and shape.
It’s important to note that I could have gotten away with a much smaller frame. I could have managed with a frame just large enough to hold one dress panel at a time, and then treated it like a scroll, rolling from side to side as I completed the pieces. However, since this was my first ever tambour beading project, and I was pretty convinced my plans for the design were going to evolve over the course of the project (psst, I was right), I wanted to have access to all seven panels so that I could work on them (and see them) all at once. With that in mind, I found that the cost of purchasing a slate frame large enough for my needs and having it shipped was going to be several hundred dollars, especially since I came up empty when searching in New Zealand, so I decided to go the DIY route.
One trip to the lumber store and $26.63 later, I had everything I needed to get started. I borrowed a positively ancient power drill from Jon’s parents, and purchased the following: One 1m length of 5cmx5cm pine - cut in half. Two 1m lengths of 2cmx7cm pine. The wide flat pieces would become the top and bottom of the frame, and the square pieces would be the sides. I also bought three different grits of sandpaper to make sure my frame was 100% snag free for my very delicate fabric, and some small nails.
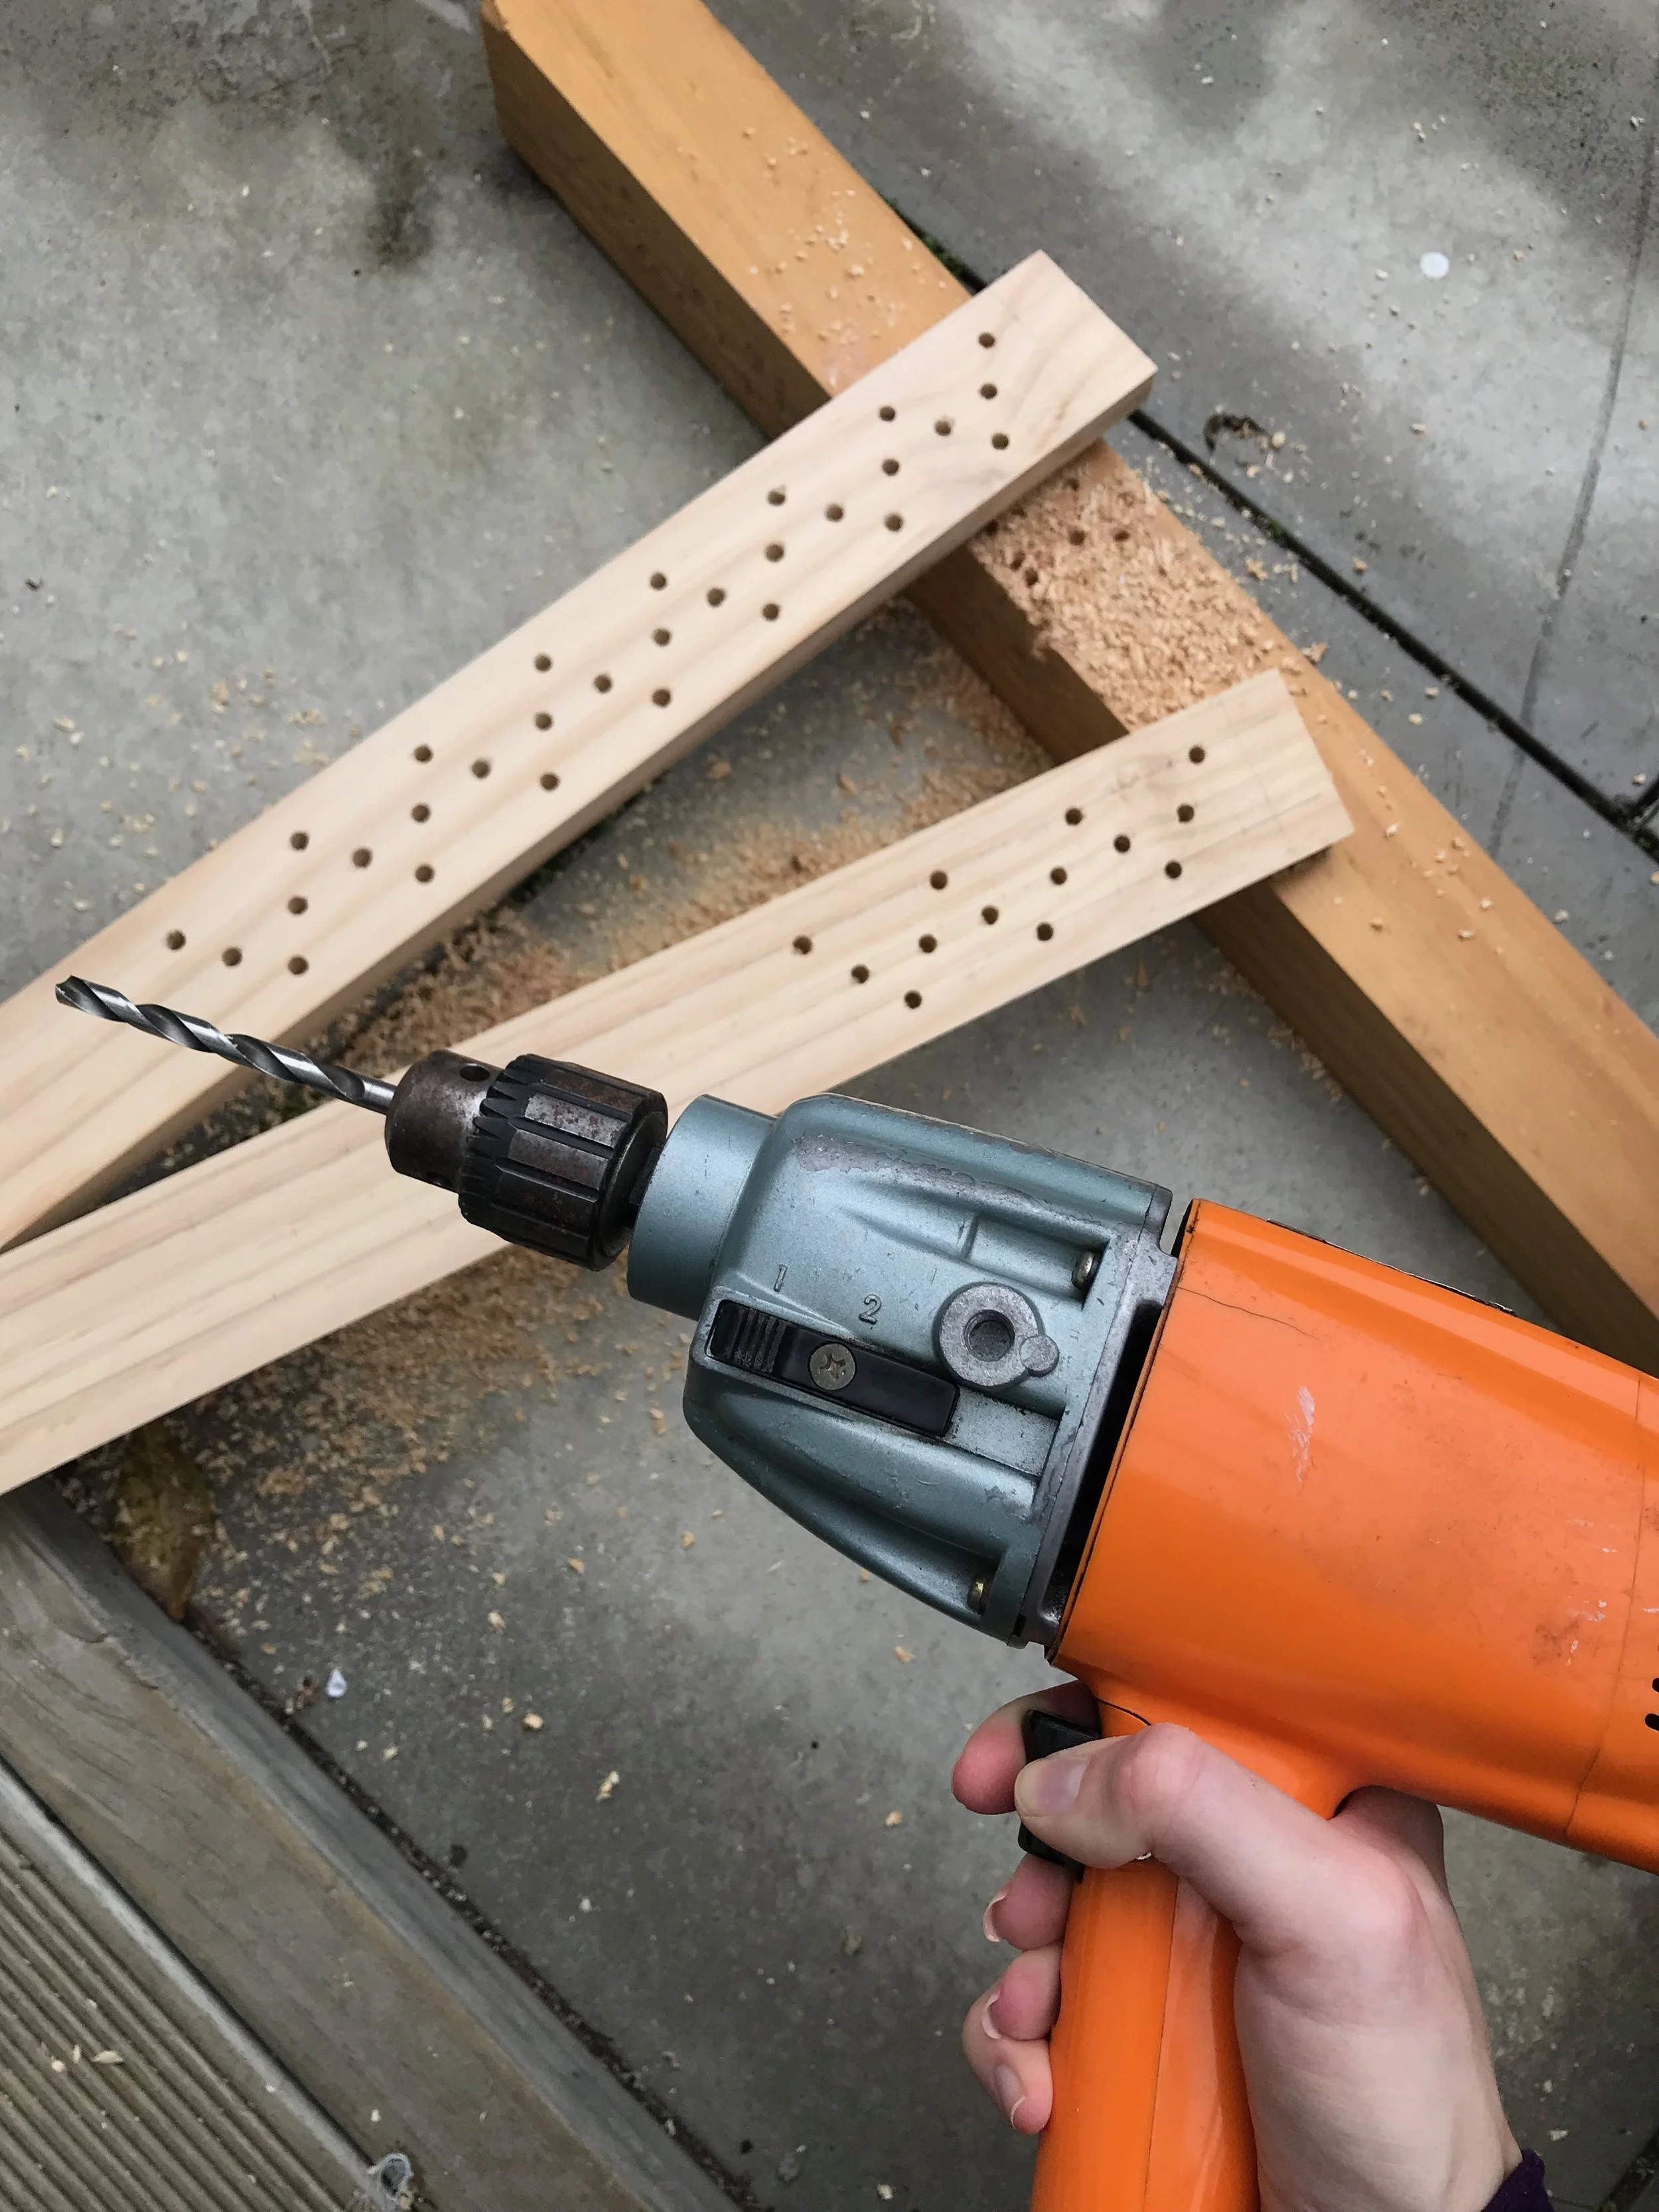
First, I measured out and drilled holes every 1/2” in a zig zag pattern in from the ends of each flat piece, so that my frame would be adjustable. This, dear reader, was the easy part.

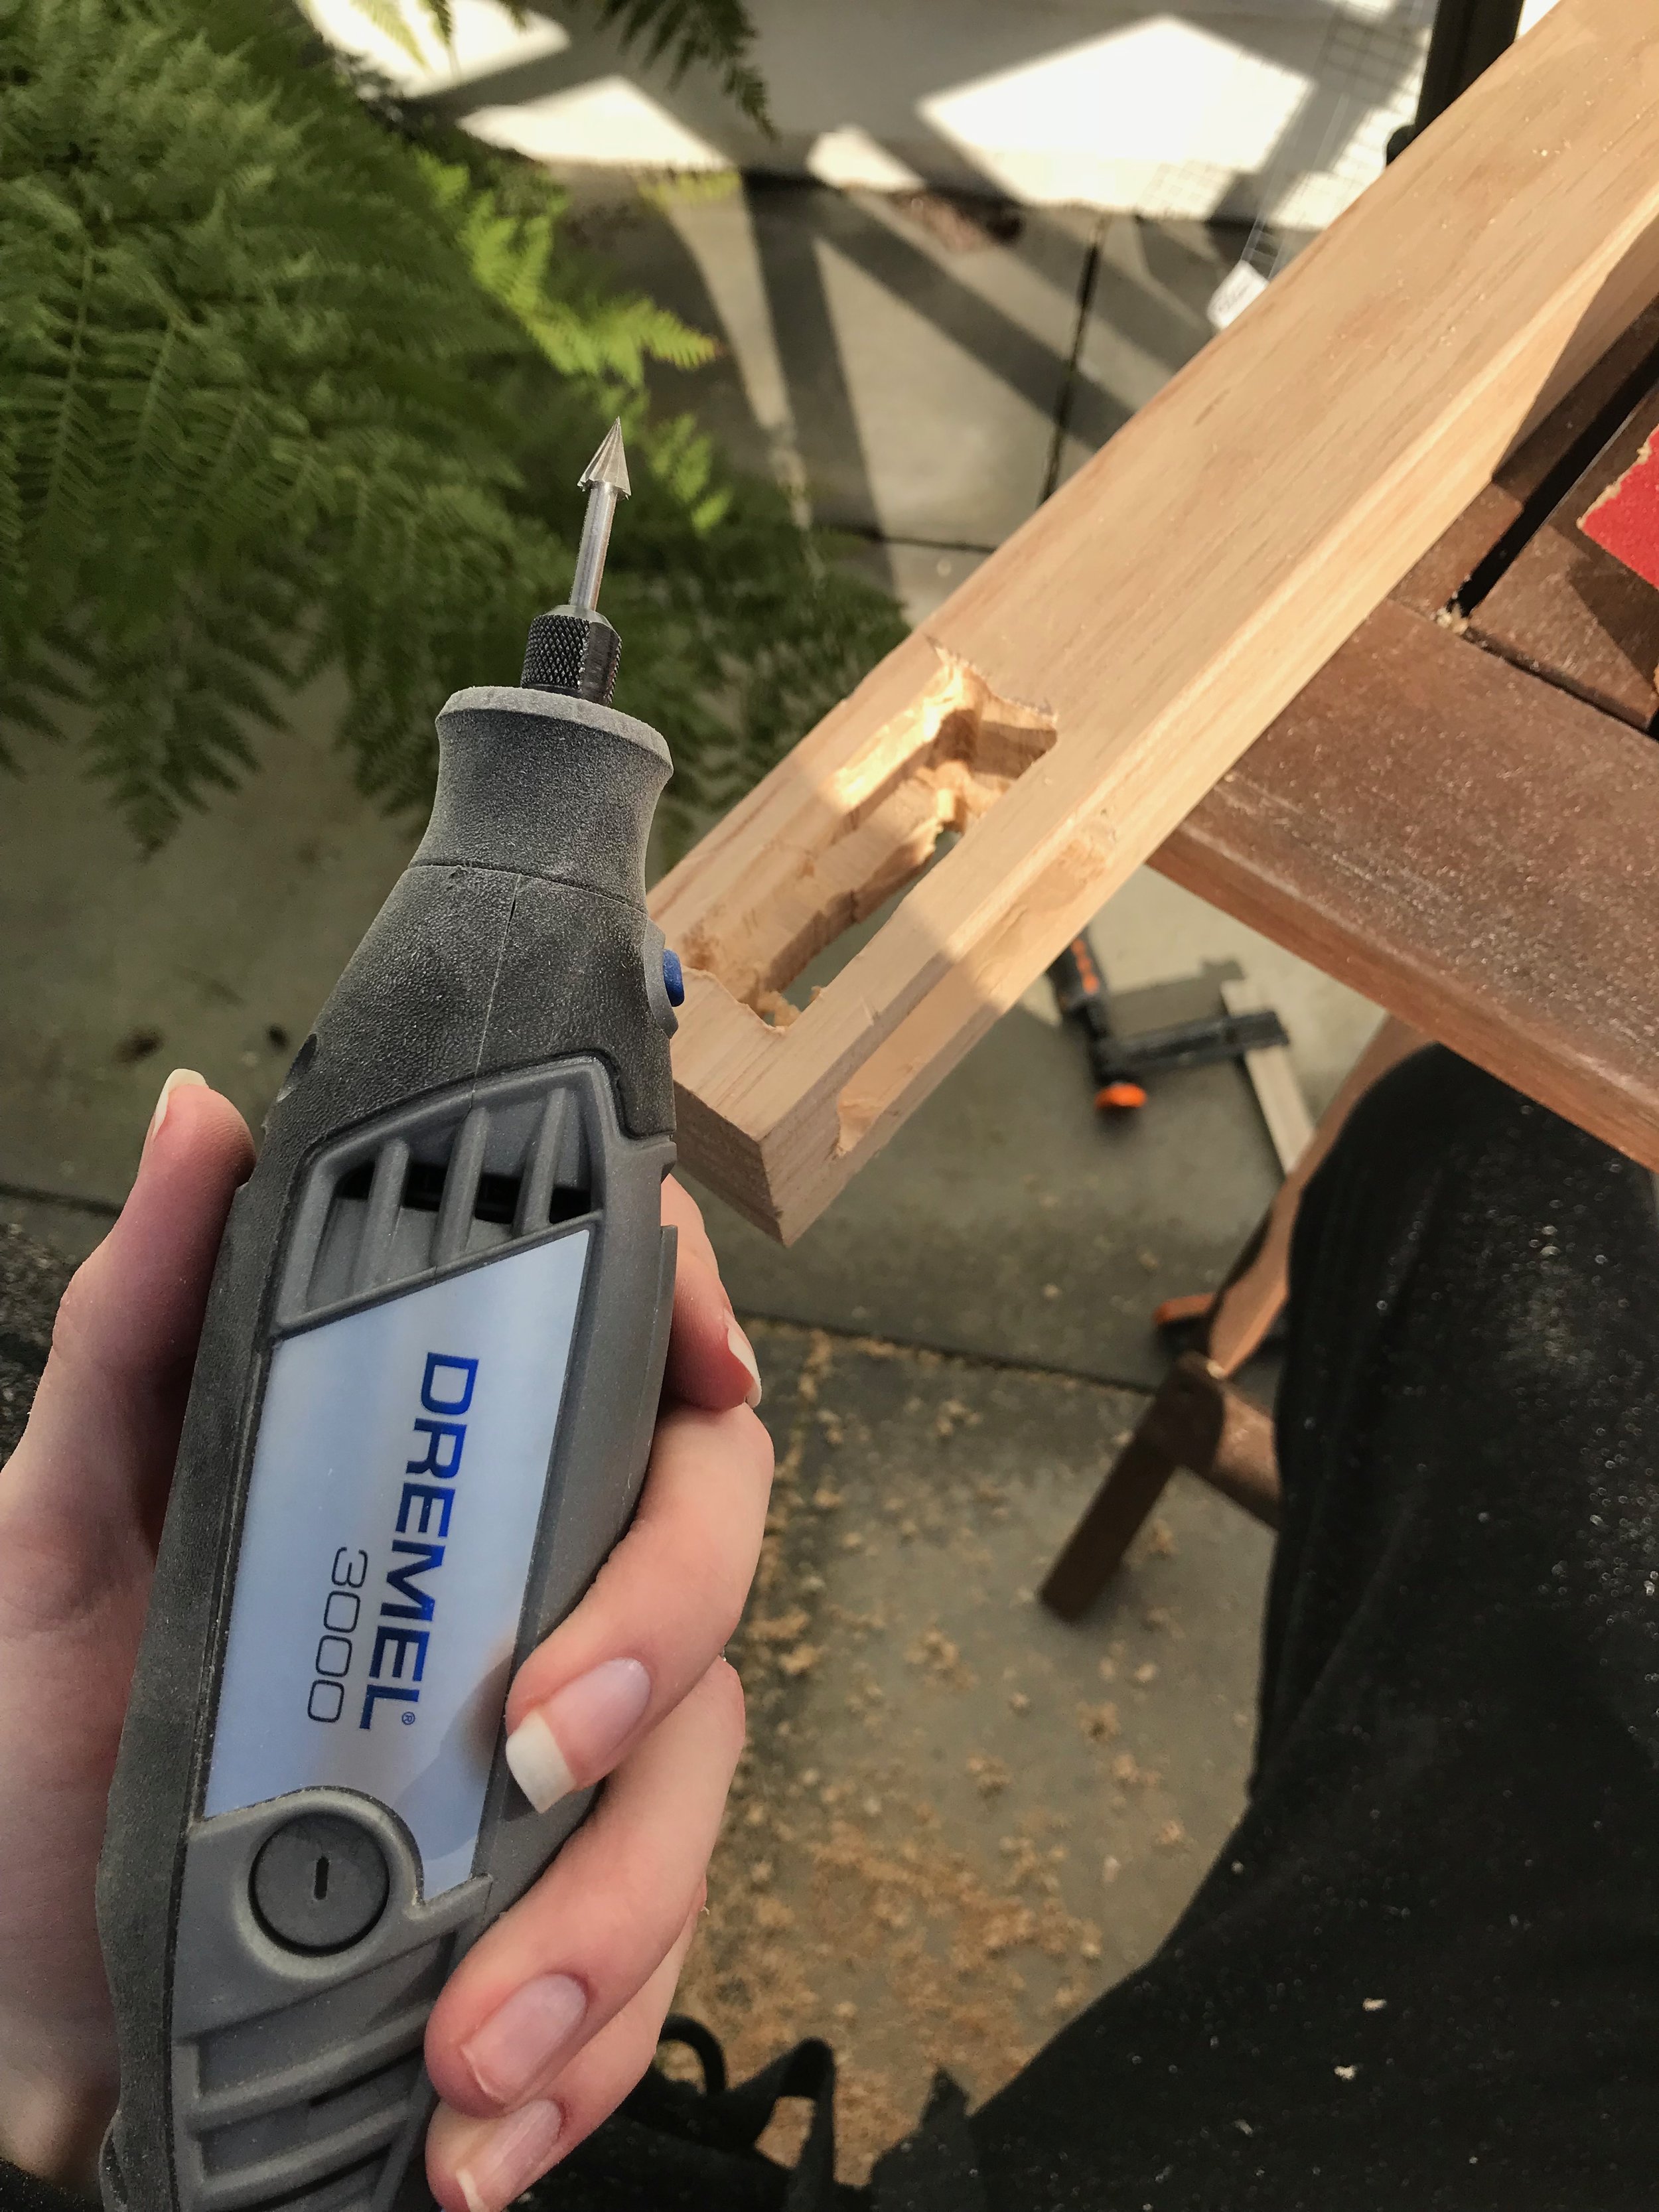
I struggled for a long time with what came next. I needed to cut a slot in each end of the side pieces of the frame for the flat pieces to fit through, and an additional slot so that I could fit my bolts through to secure the frame. Armed with only the power drill and no other tools, I wasn’t sure how to accomplish this task - one that I was certain my Dad and his workshop full of power tools on the other side of the world would have been able to manage for me in less than half an hour. I was walking through the process with my Mom on skype over the weekend, and she interrupted my rant about trying to find friends with power tools to say - “what you need is a coping saw.”

I didn’t know this at the time, but a coping saw is a hand saw with a thin blade that is connected at both ends by a D-shaped frame. What’s critical, though, is that a coping saw’s blade is removable. You can pop the blade out, stick it through a pre-drilled hole, reattach it, and then proceed to cut a shape out of a piece of wood without disturbing the edges. It was, in fact, exactly what I needed - and I managed to find an inexpensive one for only $11 at the lumber store!

I finished the pieces using my Dremel and the sandpaper to shape and smooth out the openings until the cross bars fit well, and then knocked all the sharp edges down with more sandpaper until I was happy that there wasn’t a single splinter in sight.
I wrapped up the frame by using small copper tacking nails to attach lengths of wide twill tape to the two side pieces. These twill tape tabs are used to attach the fabric to the frame, which I will show you in next week’s post.

Now. This is all still a lot easier to explain than it was to actually do - it took me an entire 9am to dinnertime weekend day to cut everything out by hand and it very definitely was not a thing my wrists appreciated me for in the following week, but dear reader, I was so proud. I’d been able to complete a whole, entire woodworking project - a specialty well outside my fabric-based comfort zone, with very few power tools, and it fulfilled exactly the need it was intended for. Even several months later, I can still remember exactly how giddy I was with excitement when it was finished. It’s wonky, and the holes aren’t quite straight, and it looks very silly up close, but it’s mine and I made it with my own two hands.

If I start telling you about the rest, we’re going to end up with a novel on our hands so I’m going to break things up into two or three more posts. I have so much left to share! (spoiler alert - Tambour beading ALL DAY EVERY DAY!) - but you won’t have to wait long - this time, I’m sure. I am still a bit sad that the videos didn’t work out, but to be honest I’d much rather have that time to actually work on the dresses!
If you have any questions about the progress so far, give me a holler in the comments! I’ll either answer your comment or I’ll address it in next week’s post if there’s a chance others might find it helpful too. I think that just about covers it for today - I just have one last thing to say. Thank you - from the bottom of my heart - for sticking around and reading these crazy rants of mine, and for all the wonderful things you guys always have to say. One of the reasons I wanted to post these dress updates as I went (rather than saving them all for post-wedding) was how important I felt the community aspect was to its creation, so thank you for being my community even though I’ve managed pretty effective accidental radio silence on the wedding dress front for the past seven months. I love you all!