
I have something awesome to share with you today, and it's a long one with a lot of pictures so maybe pour yourself a nice big glass of whatever it is you drink, and settle in for the ride. Not sorry!


A few weeks ago, Lulu from Drapers Fabrics emailed me and asked if I'd consider collaborating with them to introduce their new online shop to the world! I'm in Drapers Fabrics pretty much every weekend, and I'm pretty sure if you've been reading this blog for a while you'll recognize the name. Basically, I said yes just as quickly as my little fingers could type!
I've partnered with Drapers Fabrics to create the pieces featured in this post. Of course, all the words and opinions are my own, and I'm not about to support anything I don't love. As well as providing fabric for our collaboration, Drapers Fabrics has also generously offered a discount code for you to use, so keep on reading to find out more about that!
Like I said, I get a lot of my fabric from Drapers Fabrics already, so I went into this project with the idea that I'd make something fun (read: challenging/new/different than usual) that I wouldn't have made otherwise, instead of just using the fabric to tick something off my to-do list.

After a few sketches and quite a bit of deliberation, I chose three fabrics: A delightful silk/cotton blend called "Bella" with thin satin stripes for my dress, a sustainably manufactured Tencel made from Eucalyptus called "Spike", for a light jacket, and a pretty, leafy viscose called "Paris" for the jacket underlining. I feel like silk, cotton, tencel, and viscose are basically the definition of a good summer wardrobe, so we're already off to a great start.

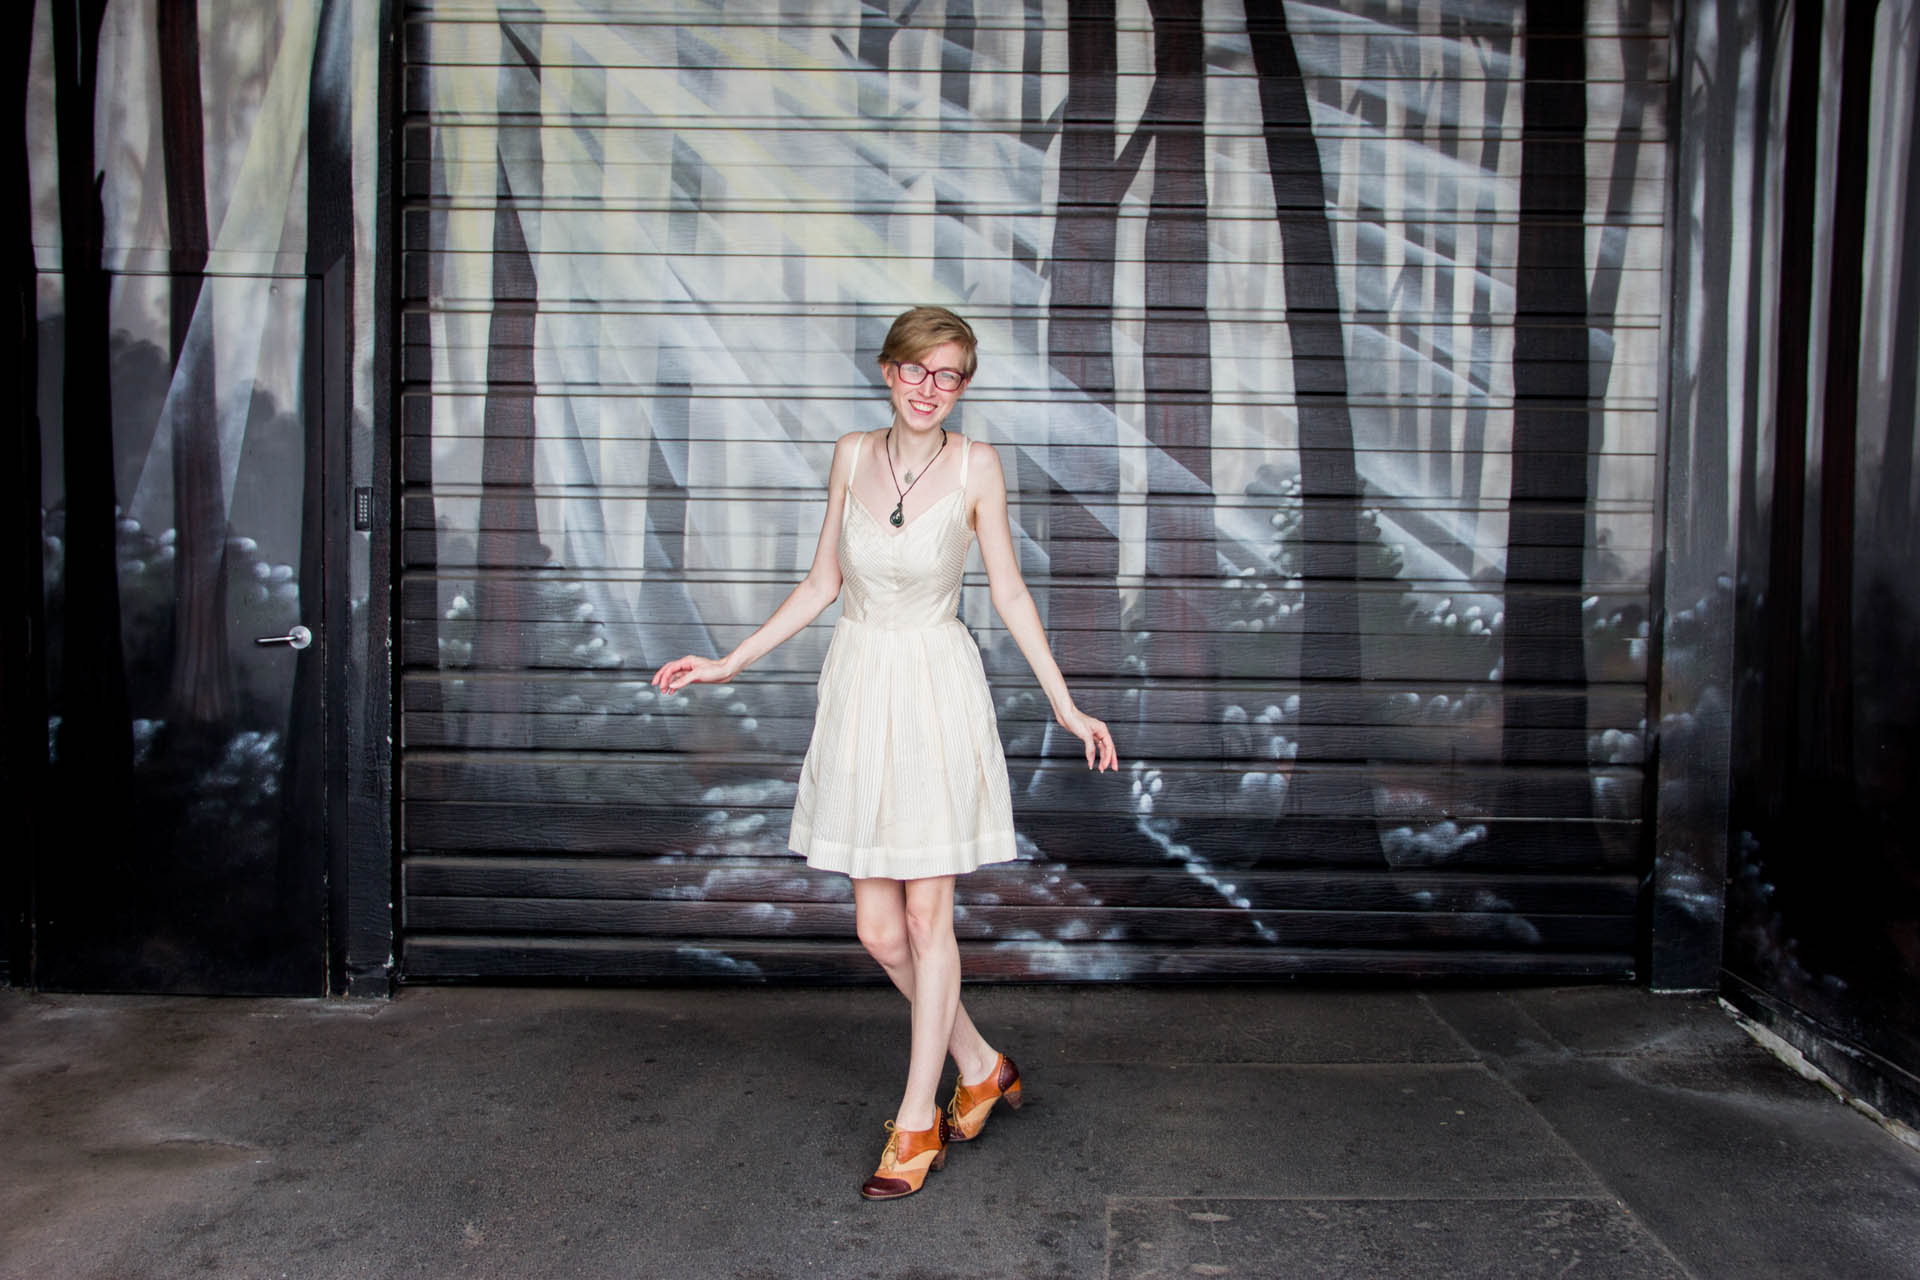
This is definitely the most editorial blog shoot I've ever done, and I am 100% here for it! Also: I forgot how much fun it is to get overly dressed up in public and watch people watch you :)
Drafting the Jacket
Coming off the great success of my sleeve, I decided to use the same body block as a starting point for my jacket. At first, I followed the instructions in my drafting book to transform the 'dress foundation' into the 'jacket foundation', which seemed like a very solid plan in theory but in execution was actually nothing short of disastrous. I'm sorry I didn't remember to take a picture, it was truly comical in its failure.

After stewing for a few days, my new plan was to apply the logic that worked so well when I drafted my shirt. I just graded it up by one full size, gave it an extra 1/4" of cap height at the underarm as a precaution, and I had myself a jacket muslin that fit perfectly on the first try. I did end up reworking the lapel to change the style lines but that was a design change, not a fit alteration so it doesn't count against the total number of muslins ;)

The nice thing about making outerwear with cool linings is that it's much more socially acceptable to flash it at people than it is when you make colorful bras!
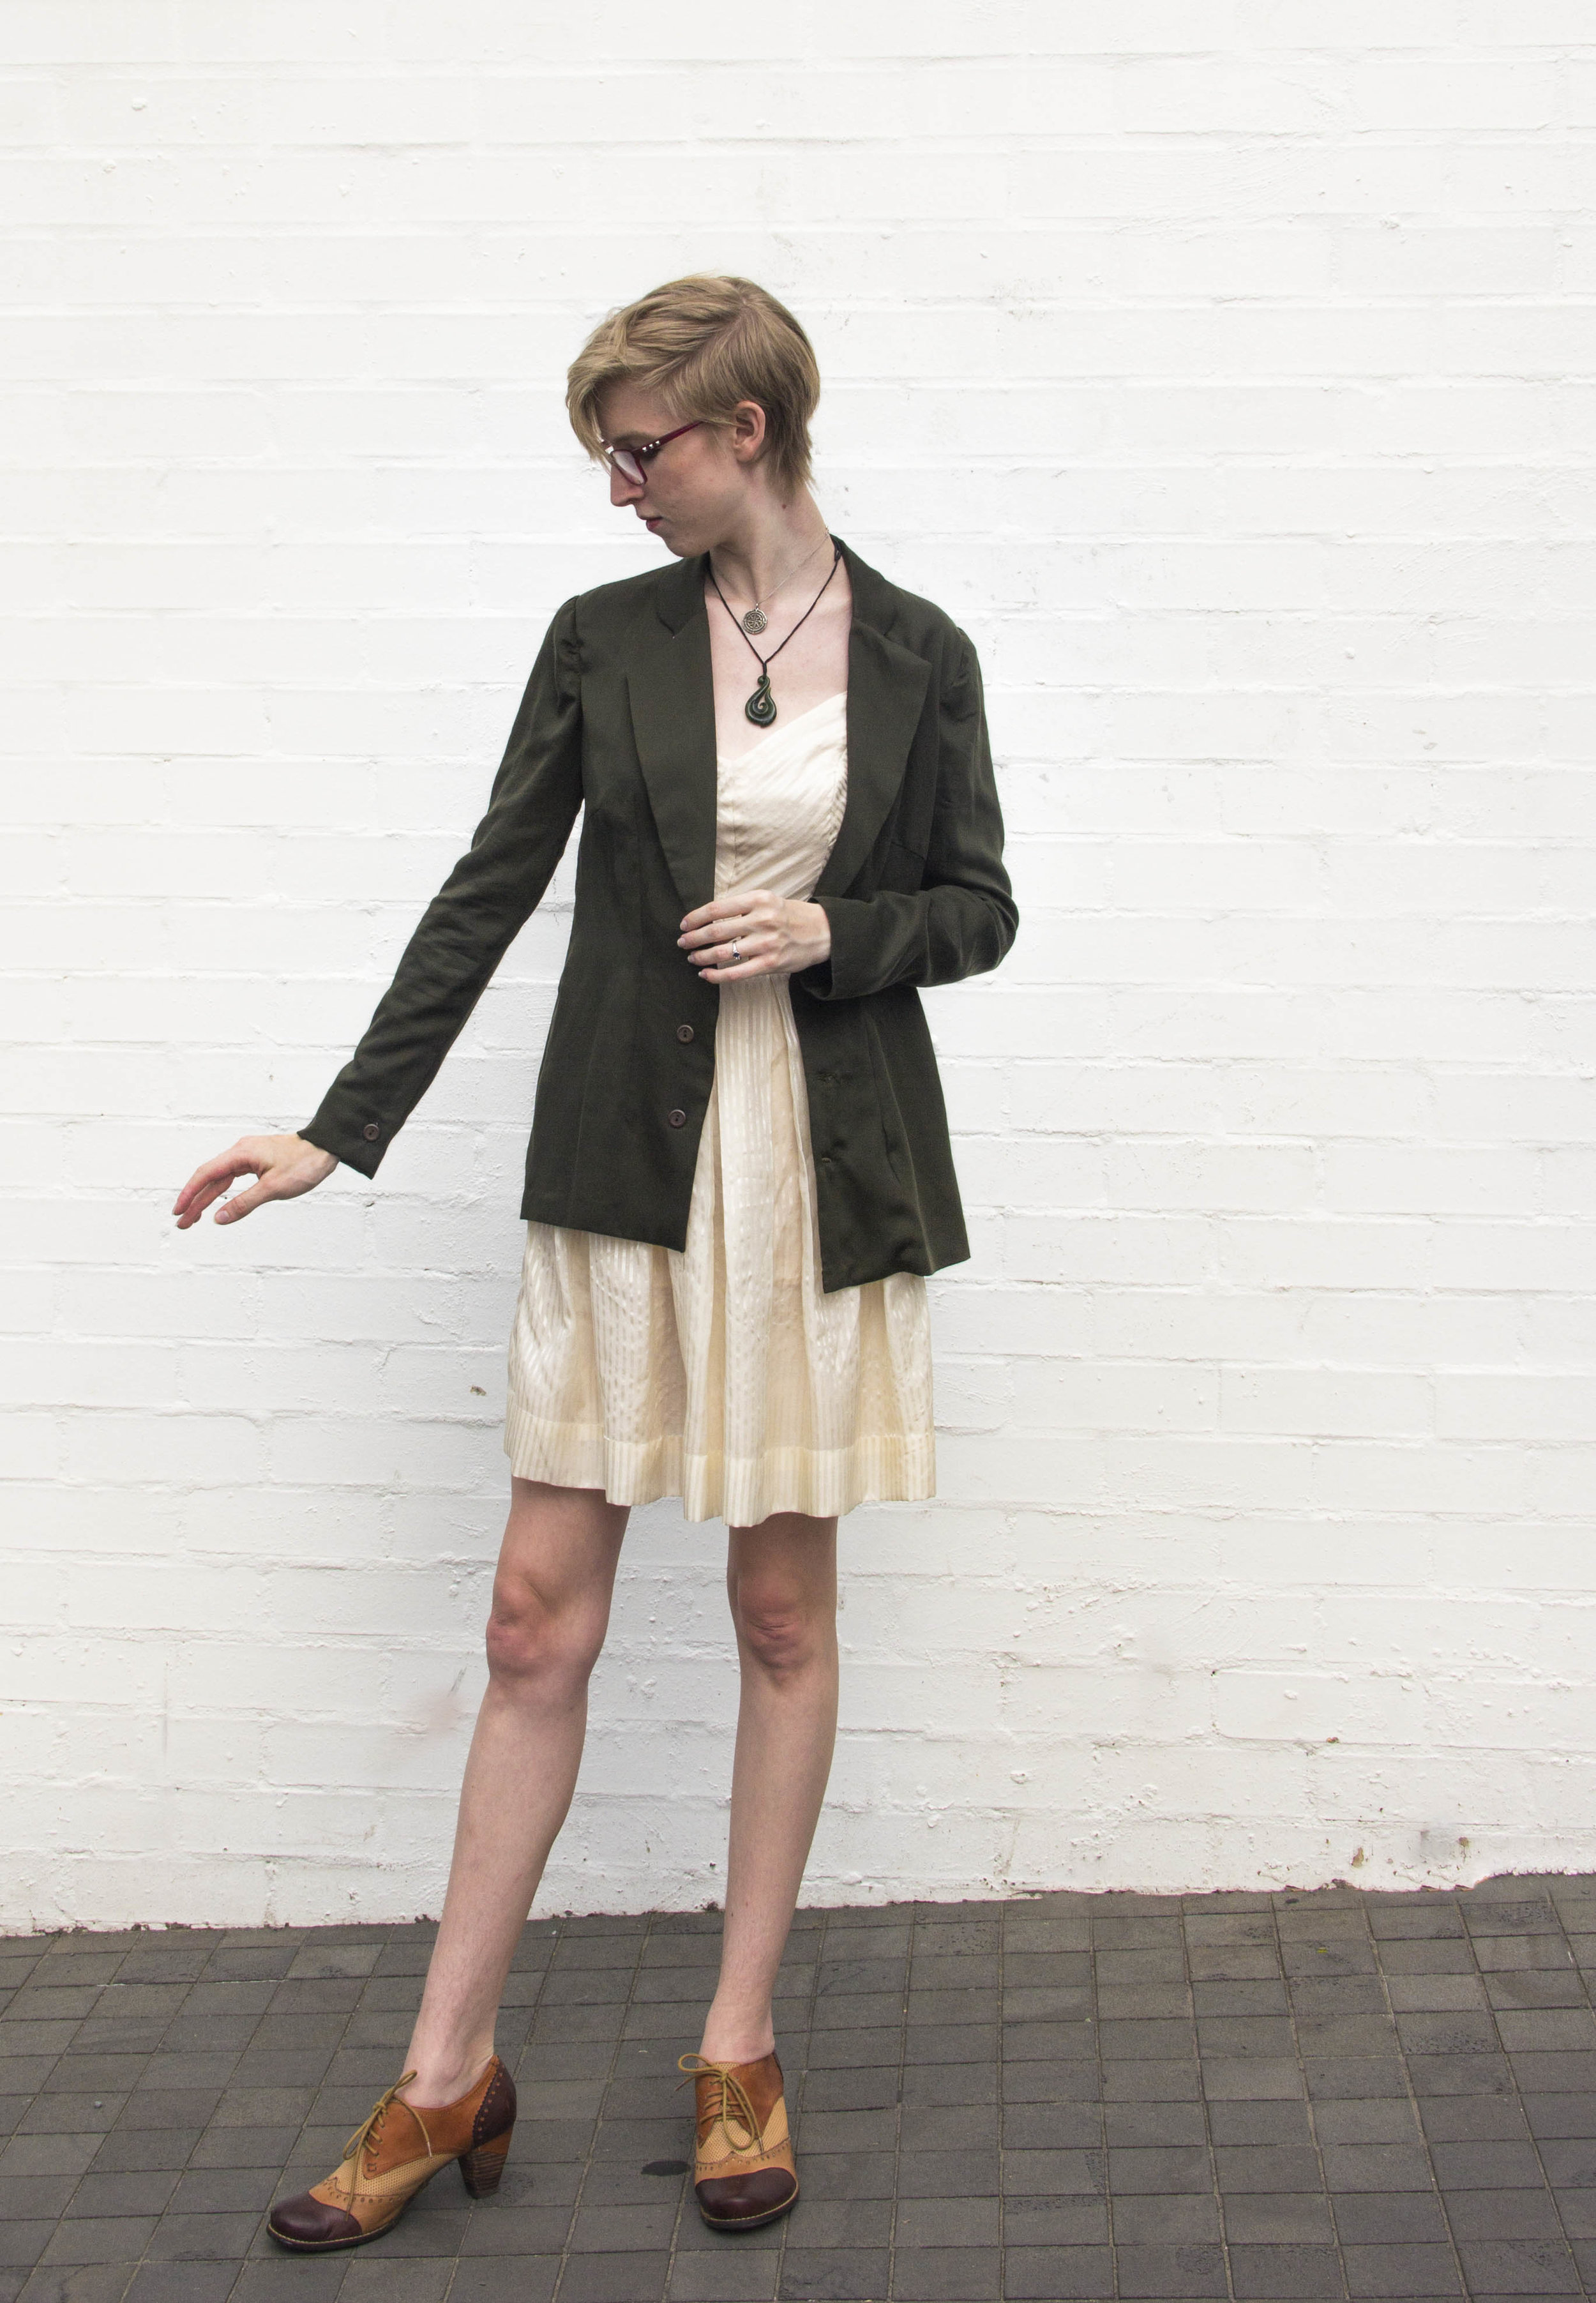
It might seem a little silly to make a sleeved, lined jacket and call it a summer garment, but a) I'm cold all the time, b) I work in a heavily air-conditioned office, and c) there's this thing called the sun and I'm that person who gets a sunburn if they park too far away from the grocery store entrance on a sunny day.
The jacket has a relaxed fit through the torso, and has lapels, facings, and sleeves with functional button cuffs to facilitate rolling if desired. It has a flippy back vent because I saw a man with a jacket that had a flippy back vent at a crosswalk a few weeks ago and this, for some reason, has stuck with me.

Drafting the Sundress
For the sundress, I wanted to let the stripes do all the talking, so I played with grain lines and a simple, princess-seamed strappy bodice. I once again started with the same block, and then took to my trusty bathroom mirror with a pen to decide on neckline shape along with slash marks for seams. If you're a hesitant hacker, here's a pro tip: Pilot Frixion pens. It's an erasable-ink gel pen that's useful for marking bust darts, seams, etc. because - get this - the heat of the iron and a bit of steam makes it disappear! Depending on your fabric it may ghost or reappear, so always spot-test before writing "FRONT" across your freshly cut white silk pattern pieces with a turquoise pen, but this is just a muslin so it's perfect. If you draw a neckline you don't like, you can just give it a quick iron and have another go!

Yes, of COURSE it has pockets!
Since the dress is princess seamed, I ended up rotating the bust dart out into the front/side piece, and since I wanted it to be so closely fitted, I made another muslin with my changes just to be sure I hadn't ended up with any unsightly wrinkles or stress points. After a couple of small tweaks, the sundress pattern is ready to be cut in my delicious fabric!
Sewing the Jacket
Now, I really wanted the jacket to have minimal structure, but I still wanted it to look a bit polished. To maintain the structure of the lapels as well as the rest of the coat, I used the leafy viscose as an 'underlining' (not to be confused with an actual lining) - this adds body and a bit of stability but doesn't feel like too many layers for a summer jacket (you'll see why I put 'underlining' in air quotes in a hot minute). I also did quite a lot of research on interfacing for this project, because I didn't want to over-structure it.

It's not a true underlining. I sewed the darts separately so they both face inwards - that's a lining treatment. I sewed the seams - shoulder, sides, center back - all together as though it was an underlining, finishing them with a turn and stitch. I also interfaced the leafy viscose before attaching it to the tencel, so the interfacing sits on the lower layer instead of on the body fabric.

In comparison to the struggle I had with drafting, this was a fairly quick project to construct. I was so happy the first time I tried it on! The fabrics behave like some kind of bouncy liquid, which I realize doesn't really make sense as a way to describe a textile but, well. There you have it. I did end up doing a lot of hand sewing - the cuffs and hem, the facings, and the collar are all blind stitched in place, but the result is clean, beautiful, and totally worth the extra effort!
Sewing the Dress
The more thought I put into this dress, the more complicated it got. Not in the bad way, though! The fabric is sheer, so I needed to underline it to add structure and opacity. The underlining pulled double duty for the bias cut bodice pieces as well, because I cut them on the straight grain. I ended up cutting out the underlining pieces with a hefty 1" seam allowance and then hand basting the striped fabric to the underlining before cutting out the pieces - it was too shifty to maintain otherwise!


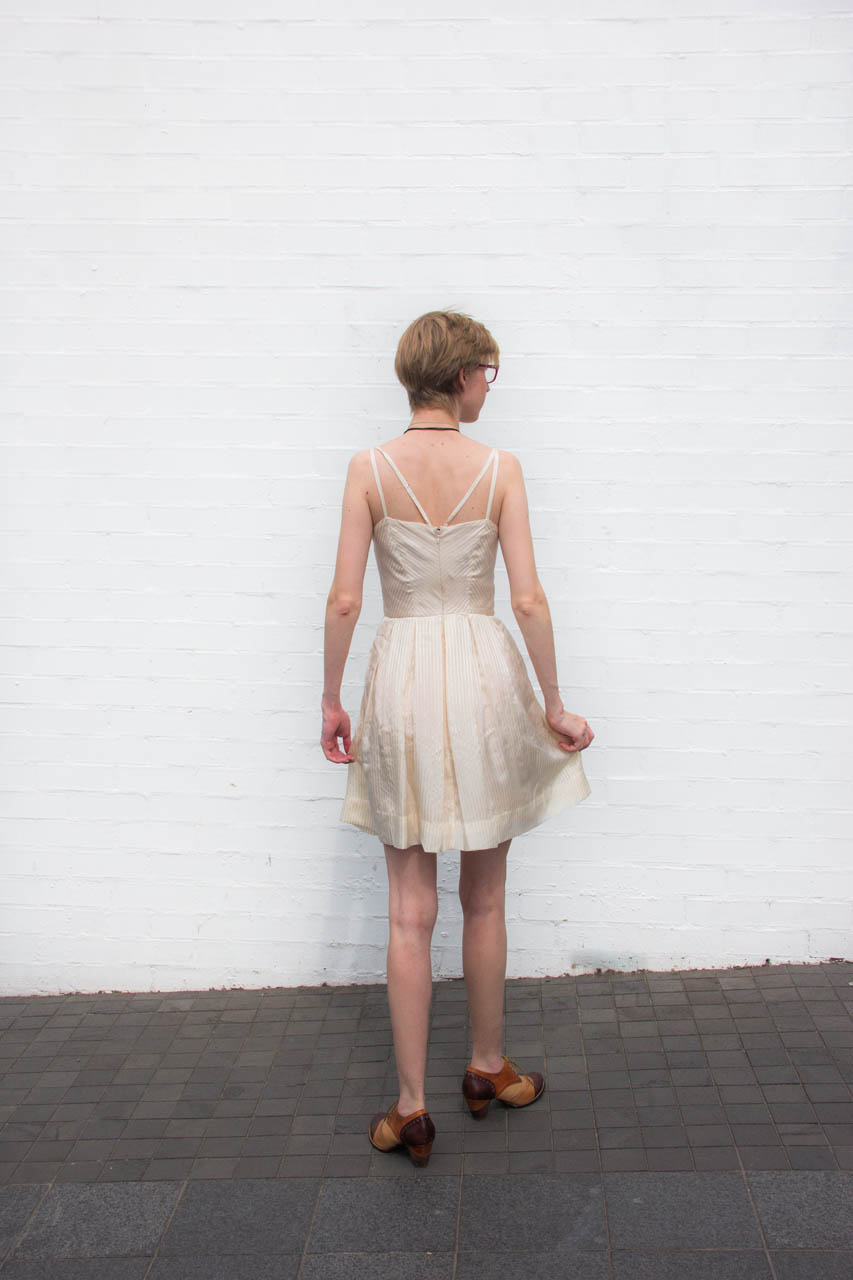
The whole process of cutting out, stripe matching, and hand basting the underlining for the bodice took about 3 hours, but by the end I could tell it was going to be amazing! After the bodice was sewn up, I tried it on to check the fit and ended up deepening the underbust curve of the front princess seams before grading, turning under, and finishing the raw edges on the inside. I cut a 1.25" strip along the selvedge for my straps (The selvedge was quite stable, and just the right width to make nice straps when turned inside out) and attached them to the bodice, then sewed a row of bias binding to the top hem, turned it under, and hand stitched it to the underlining (careful not to prick the outside fabric!) to neatly encase the top edge.

The next step is to attach the skirt, but first - since I used a grey chalk pen to mark my pieces for cutting I had some of it still ghosting around the seams. I'd done a wash test first to make sure it would come out, but I didn't really want to deal with washing ( and drying, and re-pleating) the whole dress once it was complete, so while I pleated the skirt and made the pockets, I ran the bodice a warm bath in the bathroom sink so that it could soak for a while. Complete with a quick spin cycle inside a lingerie bag, hang to mostly-dry before ironing, and it was ready to be attached to the skirt!

The skirt is box pleated and has hidden inseam pockets and a gathered lining. Pleated skirts are pretty easy to make - you just need to know the overall length of the waistline, and then multiply that number by 3 (because there are three layers of fabric in each pleat) to give you the length of the piece of fabric before pleating. Just leave a little extra for seam allowances and you're off to the races. Once the skirt was on, I encased the raw edge in bias tape for a neat finish on the inside, and then installed a zipper from my stash, as stripe-matched as it could be with a curved back seam. Then, I realized the zipper wouldn't zip because four of its teeth were deformed, so I ripped the whole thing out, took myself to the fabric store to buy another one, and started over. I was so happy when that zipper was finally in and working! I finished it with a (very) deep hand picked hem... looking at these photos it may be a bit short, but there's loads of room to let it out if I decide to.

I was so excited to wear both dress and jacket out into 'the wild' for the first time - and it's been a few times now for the jacket, as it happens! The dress definitely turned heads when we went to take photos (we needed the 'right wall' in the 'right light' with enough room to back up and photograph! it was an ordeal! PS thank you Hilary for being the best Blog Photographer in the southern hemisphere!). The dress floats like a cloud, and the fabric is as lovely to wear as it is to sew - perfect for a summer party dress, and I'm clearly going to have to crash (or plan?) some summer parties so that I have more excuses to wear it! The jacket is already a staple of an addition to my wardrobe rotation - the fabric is cool, breathable, and flows deliciously. Plus, I think deep green is my new favorite color to wear.
At the risk of sounding overly enthusiastic (okay, but you guys know me. I'm overly enthusiastic about everything) Drapers Fabrics has been, and continues to be, one of my go-to shops for fabric in Auckland. Everyone I've encountered there is friendly, knowledgeable, and perhaps best of all they're as overly enthusiastic about their fabrics as I am about my sewing projects! If you're in the neighborhood I'd definitely recommend dropping in (and you can come to my house for coffee and stash-petting after!) and now that their online shop is open, they're spreading the goodness even further!

Things nobody tells you about becoming a sewing blogger: You get really good at twirling in time for a photo!
Okay, Okay - I know - you're all thinking it. She mentioned a promo code, where is it? It's right here :) If you'd like to check out all the cool fabrics I spend my weekends petting, pop over to their website armed with the promo code KAT KLEBENOW, and get yourself 15% off all the regular priced fabrics! They've also got a new Laybuy program you can take advantage of: Laybuy lets you have your fabric immediately, but pay for it in six weekly, interest free installments. That, combined with the 15% you're saving with my code, and you'll be happily sewing away in no time!
Edited February 2018: Unfortunately, the coupon code is no longer valid, but Draper's regularly holds sales so keep an eye out!
15% off Full Price Fabrics with Promo Code 'KAT KLEBENOW'
They're always adding new fabrics to their website, so if you want to stay in touch, you can check out their Facebook and Instagram pages as well!
