
Life is just a big game of dress-up. This is not new information for you, I'm sure. We, as humans, use the controllable parts of our appearance to both arm ourselves against the world and also to give that world an impression of who we are. Clothes, hair, makeup - regardless of whether you want it to, these things say something about you to strangers, before you even open your mouth.
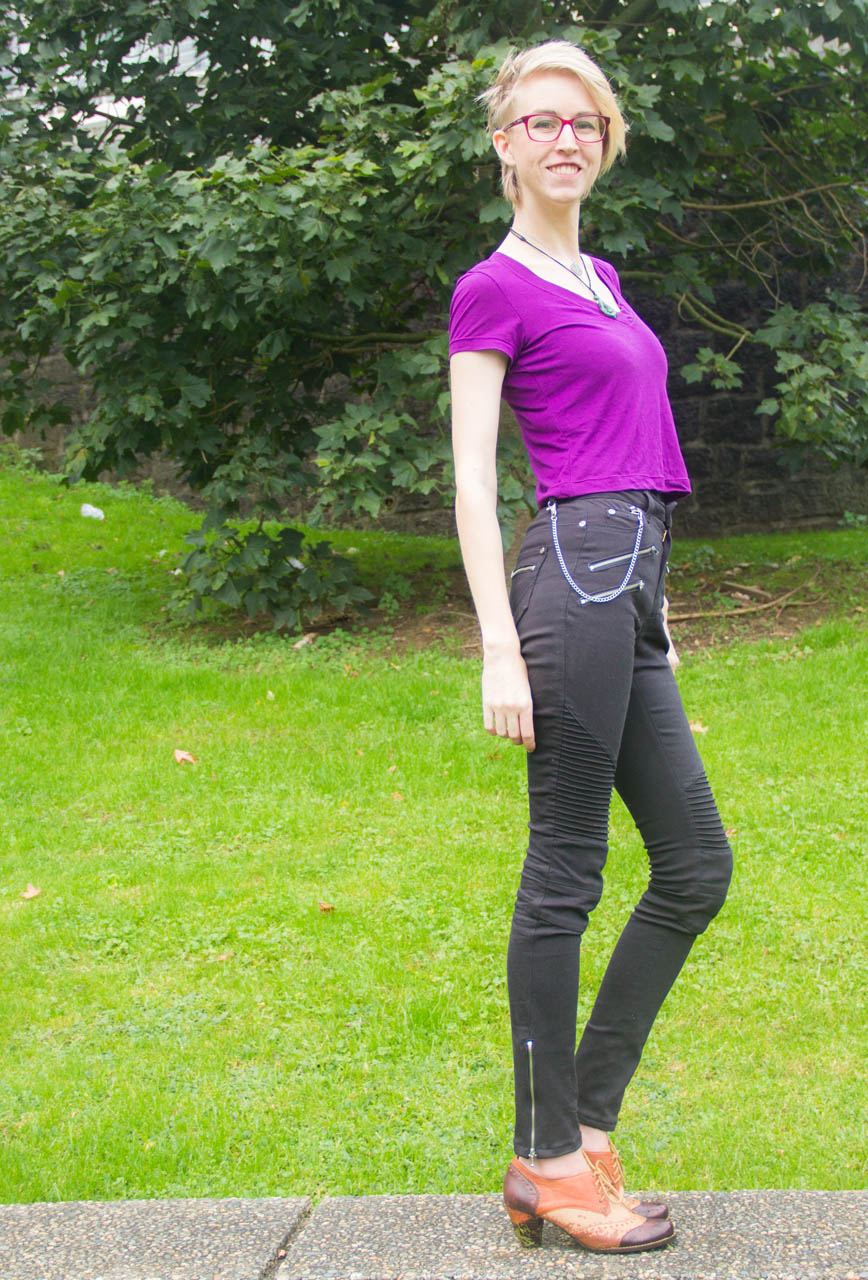
(I couldn’t resist the pocketwatch chain…)
Sorry. Was that maybe too deep? Have you had your coffee yet? I'm not going to go into any elaborate ~life changing~ tale about how changing your appearance can change your life or anything like that. I've only got my personal experience to back me up here. We sewists have a unique leg up in the world: We're limited by fabric access, of course, and everyone's limited by cost in some way - but overall we've got a higher level of control over first impressions than people who don't sew.
Have you formed some impressions about me? Maybe you're not a great person to ask, because by reading my blog (hi!) you're already a bit aware of me. You're reading my voice, sort of. In a certain kind of way, we've spoken already: I'm not a total stranger.

Please don’t mind me, bragging about my topstitching…
Maybe my ideal evening will give you a better idea: A bit of sewing or sewing-planning when I get home from work, then dinner (Jon cooks, I drink a well-appointed glass of wine), then we water all the plants, followed by either baking, a small project, or curling up and watching TV with a knitting project, scrolling through Instagram or Pinterest whenever my wrists need a break from the yarn.
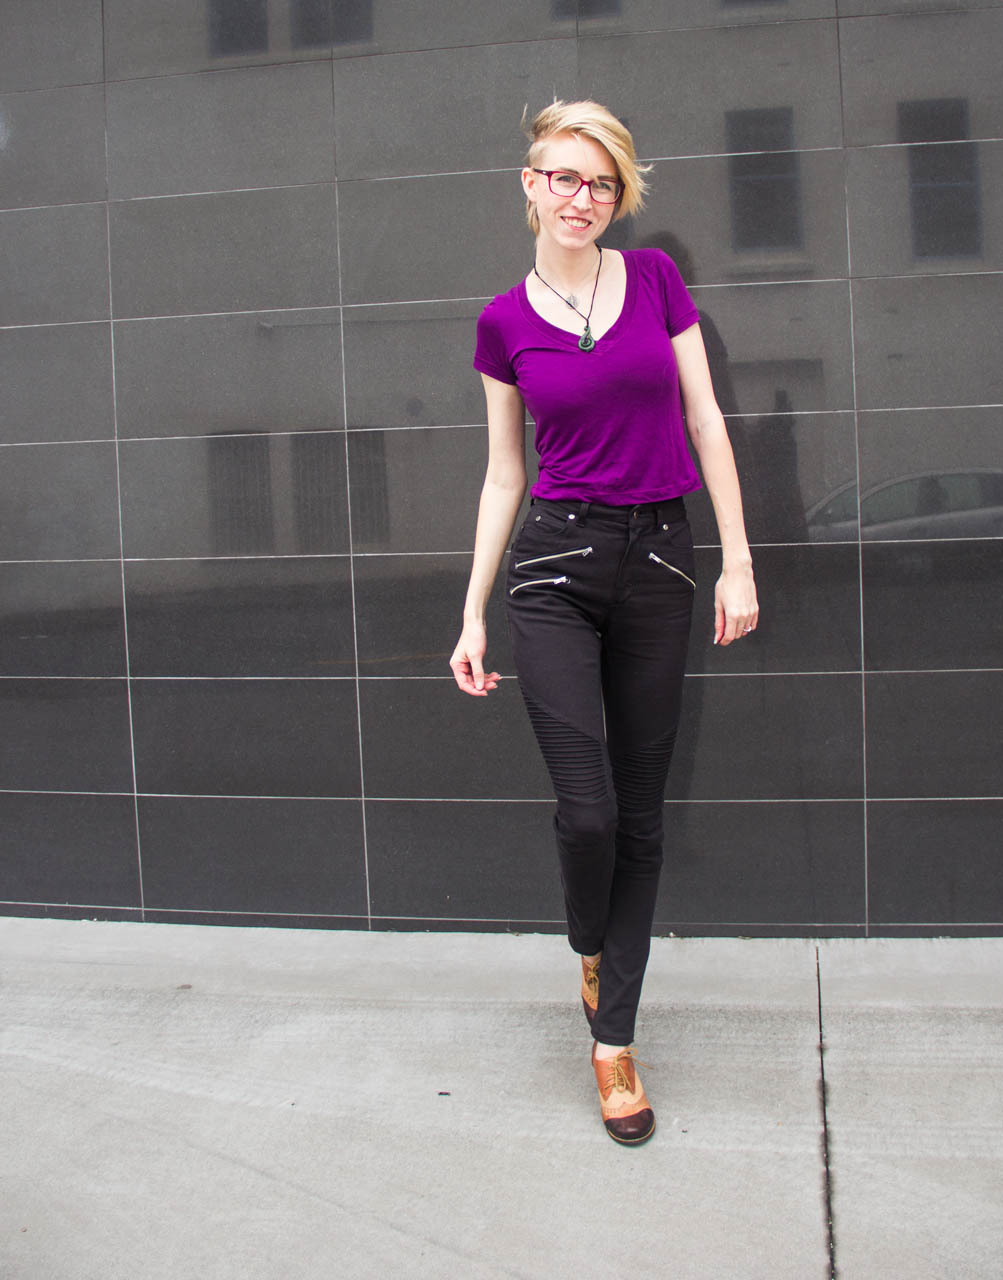
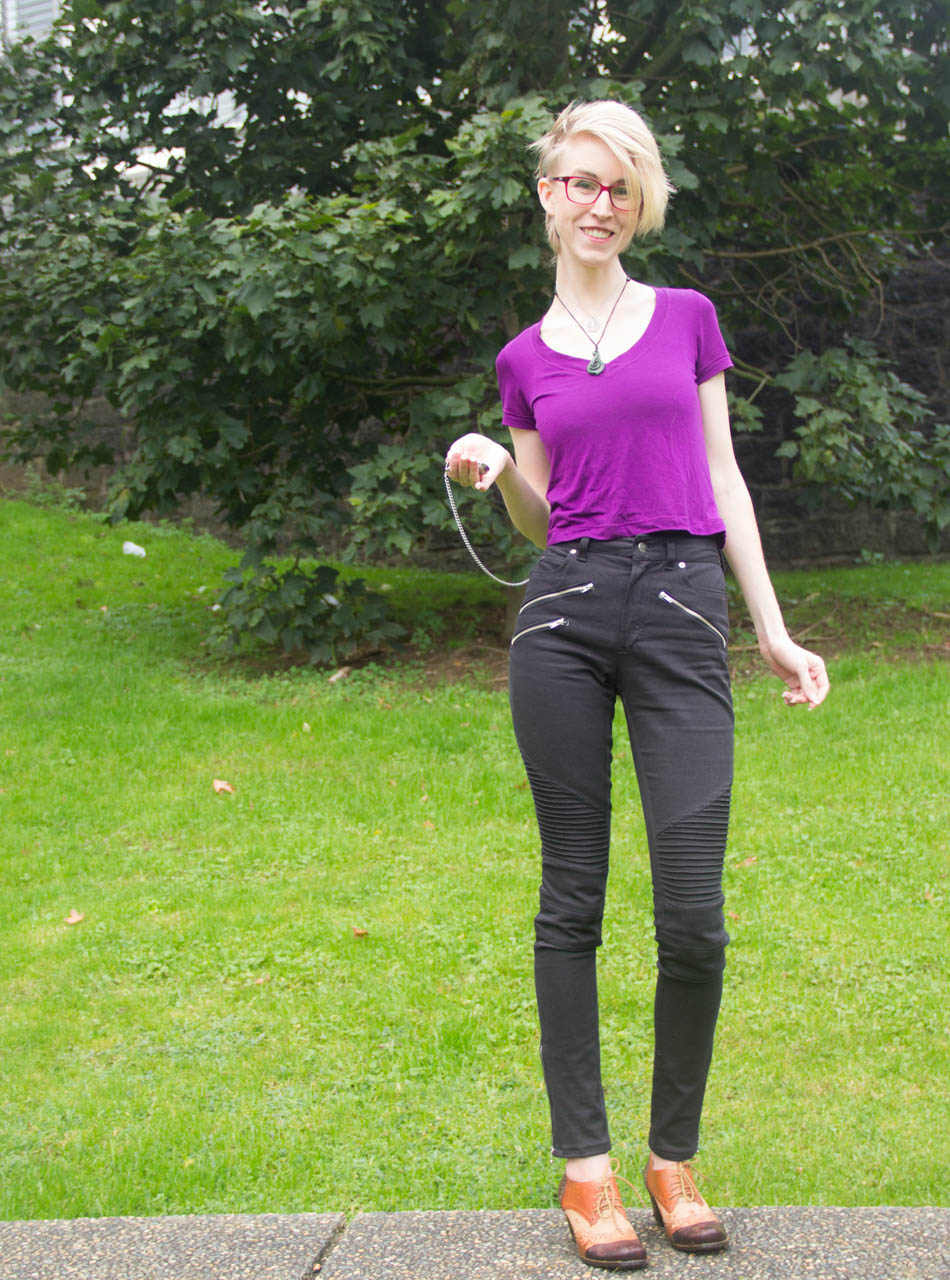
Jon and I drive matching Honda Fits. I am not someone you'd expect to see in motorcycle gear. I am a grandma.

That's what makes these jeans so amazing.


Since there are so many modifications, I think it makes the most sense for me to tell you about them in order of construction - so we'll start with the cutting. Armed with a chalk pencil, I tried on my Gingers and drew lines where I wanted the seam lines to be: Across the knee, above and below for the knee patches, and then diagonally up the thigh for the ridge patch. If you haven't made a previous pair of whatever jeans you're hacking, you can make a pretty close approximation by finding the knee point of your leg and measuring from there. I've seen an awful lot of moto jeans on Pinterest where the knee pads don't hit the poor models' legs anywhere near their actual knees... but we can fix that, because we sew!

Okay. So the front leg piece is split up into five sections: Upper leg, thigh insert, upper knee (cut two per leg), lower knee (cut two per leg), and lower leg. Don't forget to add seam allowances to all of these pieces! At this point, I also increased the pointiness of the bottom of the butt pocket (Inspired by a pair of vintage Levis I saw a while ago) and then got to cutting!

Here's a photo of my modification to the Ginger Jeans front leg pieces (posted with permission from Closet Case Patterns):

Next, the thigh insert: I struggled between quilting it with a harlequin pattern and actually sewing the ridges, and eventually landed on the ridges because they're more traditional, and because I was worried that the harlequin stitching would cause bubbling in the stretch denim.

This picture has been brightened for detail purposes. The lint situation is dire.
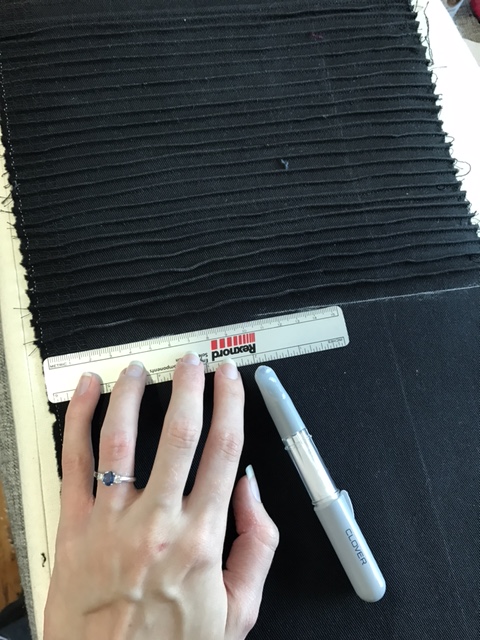
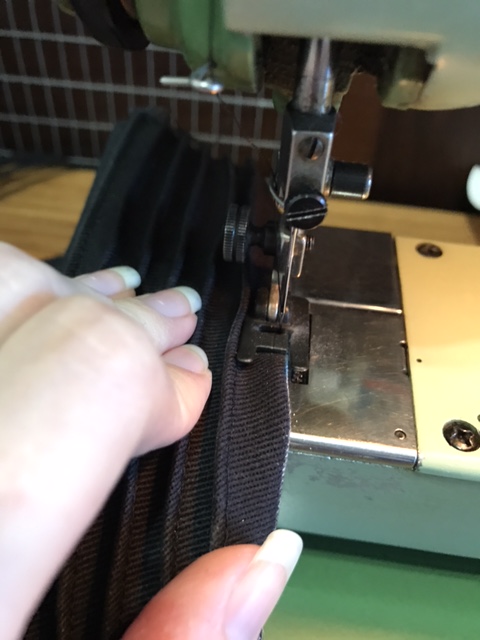
Maddie of Maddie Made This has a tutorial for adjusting the pattern pieces to sew the ridges she made for her moto leggings on her blog which is definitely a good option especially if you're nervous that you'll run out of fabric or you want to make multiples, but instead of creating a pattern piece to include them, I just cut a long rectangle from my denim, sewed the ridges, and cut them out using my regular pattern piece after the sewing was complete. That way you don't have to worry if you cut or sew something crooked. My ridges are 1/8" thick and each one is spaced 1cm apart. It's quite a time intensive process to sew, especially since I individually ironed each ridge down as I went, but the result was definitely worth it.
Here's a little grid of the steps: Measure, draw, stitch, and repeat until the pattern piece fits.


Okay. So at this point my ridge pieces are constructed and all my denim is cut out. The next step in our process is the welt zippers. I used leftover Liberty cotton from this dress for my pockets, and, after following the Ginger instructions for regular jeans pocket stay construction, I sewed regular old welt pockets on the bias. If your denim is quite stretchy I'd recommend interfacing, but I didn't interface anything except the back pockets.

The chalk marks are my pre-cutting grainline guidelines. This helps prevent leg twist, especially since the front is now cut in so many pieces!
I determined placement by pinning the zippers to my existing Gingers. I'm a size 2 and my long front zippers are 5" - if you're a larger size you could go for longer zippers, just make sure they don't interfere with zipper installation!

After all four welt zippers were installed (three on the front legs, one in the butt pocket) - I constructed the front leg. The knee patches are a double thickness, so they're up first. Sew four sets of knee patches at the center seam, topstitching the outer pads for each knee with the seam pressed up, and pressing the inner pad's seam down but not topstitching (in case it's scratchy) - this helps distribute the bulk. Next, sandwich the ridged thigh piece between the top edges of the inner and outer knee patches, sew and topstitch:
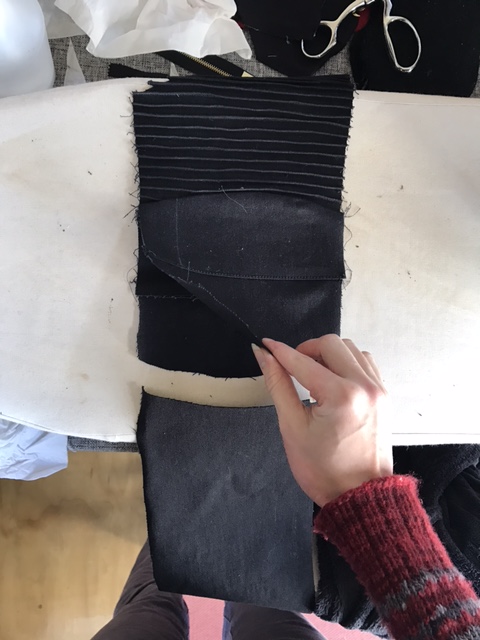
Enter: hastily snapped in-progress photos. At this stage, you can see the outer and inner knee pads, and I’ve stitched the curved tops to the thigh piece.
And then finally use the burrito method to roll up the constructed knee piece with the lower leg piece - stitch and topstitch. This makes sure all your knee seams are enclosed so nothing will rub when you walk.

Enter: hastily snapped in-progress photos. At this stage, you can see the outer and inner knee pads, and I’ve stitched the curved tops to the thigh piece.
The upper-leg is sewn and topstitched to the ridge piece, and serged for a neat edge finish (if you really wanted to, you could bias-bind this one but I was a bit nervous about adding bulk). In a nifty and unplanned turn of events, the ridged section has a good amount of vertical stretch, to counteract the lack of stretch in the knee pad sections that you get when you sew it in two layers - so they're pretty easy to move around in!

The inside of the leg once all the pieces have been constructed (I haven’t topstitched quite yet, but you get the idea.) See how there are no raw edges to irritate your knees?
From here, it's the home stretch. Construct the fly as you do normally, sew and topstitch the inner leg, and sew the outer leg. When you get about 8" from the bottom of the outer leg seam, backstitch and switch to a basting stitch to finish. This is because you're going to want to figure out your hem length before you install the zipper. At this point, I carried on with waistband construction and button installation so I could test the fit accurately. When that was done, I decided to send them through the washing machine, because sometimes denim shrinks a bit in the second wash, and it's very hard to lengthen a hem when there's a zipper involved.

Nearly there! After this mid-construction wash, all that was left was butt pocket placement and the ankle zippers. My butt pockets are sewn much higher and closer to center than the pattern asks for, but that is because I have all of the hips and none of the butt.

For the ankle zippers, I followed this tutorial from Closet Case Patterns, except my zipper pull hangs down past the hem instead of in line with it. Once that was taken care of, I set the rivets, wiggled into them (they're tight!) and proudly paraded around the house feeling like a badass, lookin' at my butt in every available mirror. As you do.

It has occurred to me at this point that I haven’t taken any ‘front, back, normal’ photos to show the fit and lack of wrinkles. There are wrinkles everywhere because of all the legs and movement and stuff!
The denim is 98% cotton, 2% Lycra from Draper's that they call 'Indiana', and it's ah-mazing. Soft, great to work with, and so far what seems like excellent recovery. It's got a firm, snug stretch that has yet to bag out, but a very soft hand that doesn't make any sense to me. I did have a mild panic when, on the first day of wearing, they felt borderline-too-tight for comfort, but I must've been having an overly critical day because I've worn them a few times since then and they've been delightful. I'd definitely use this denim again if I thought I needed another pair of black jeans.

These jeans are hard core. I am not, but I feel like I definitely pass as hard core out in 'the wild' when I'm wearing them. Just try not to think about the fact that you'll most often find me nerding out about fiber content and vintage sewing machines, or daydreaming about what types of succulents I want to add to my collection...
Pocketwatch shenanigans!
(ooh, this purple shirt is also new: it's a 100% Tencel remnant from The Fabric Store - it's so silky soft and delightful! Not bad for $7 either..)

This project took a little longer to complete, and I thoroughly enjoyed it! My current sewing queue has a really great distribution of bigger 'thinking' projects (sneak peek: garter belt, lined pencil skirt, wireless bras, and woolen trousers, all self-drafted. Plus, my birthday's a-coming and I see a fancy dress in my future...) along with the occasional quick one (long sleeved tees and cardis!), and I'm so looking forward to the variety!
