

In July of last year, I joined the Vintage Pledge - a choose-your-goal challenge to sew more vintage throughout the year. One of the things I added to my list was to sew a vintage pattern. The problem was at the time, I didn't have any vintage patterns. I think most people who sew have at least a little bit of a fascination concerning clothes from past decades, and I'm no exception. In addition to that, though - I wanted to see what level of competence was expected of me as far as things included (and not included) in the instructions.

Because she is the best, my Mom read that blog post and took it upon herself to hunt for vintage patterns for me to use. She found a few from her own stash, she was given a pile by one of her high school friends who used to sew, and she also managed to find an antique store in rural Illinois which had boxes and boxes of vintage patterns for $1.50 each (after seriously considering asking her to just buy everything, I told her to look for patterns from the 40's, interesting sleeves, wedding dresses, and separates) - I ended up with about 30 to choose from!
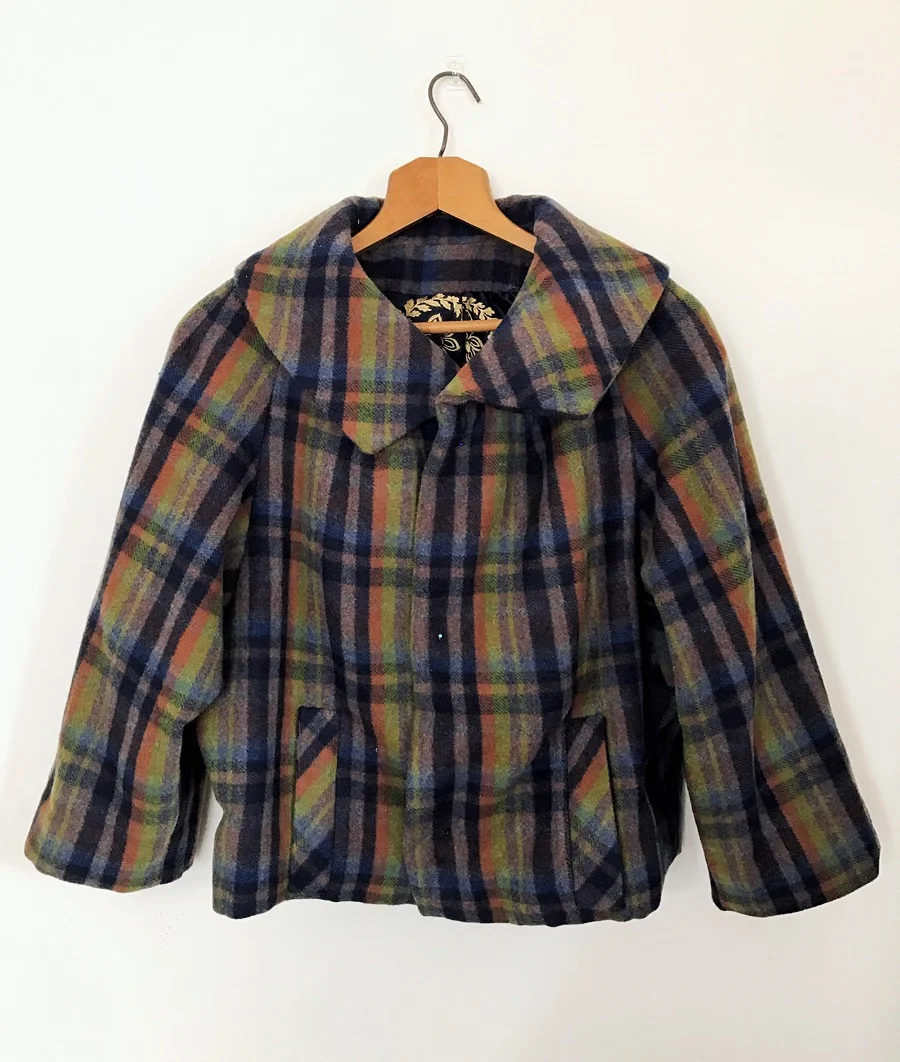
I've got a few shortlisted that I'm hoping to make this year - one already has fabric allocated and buttons chosen - but the one that shouted "Make Me!" the loudest was Vogue 9566. This one turned out to be a pattern from my Mom's stash - she'd already started tracing the pieces to make the coat for my little sister. It's a single sized pattern for a 34" bust - the correct size for me and a very forgiving design, but I decided to make a quick muslin regardless.

(I sent my Mom this picture and asked her to help me decide between the 3/4 and full length sleeve, and the first thing she said was "Your legs are so WHITE!")

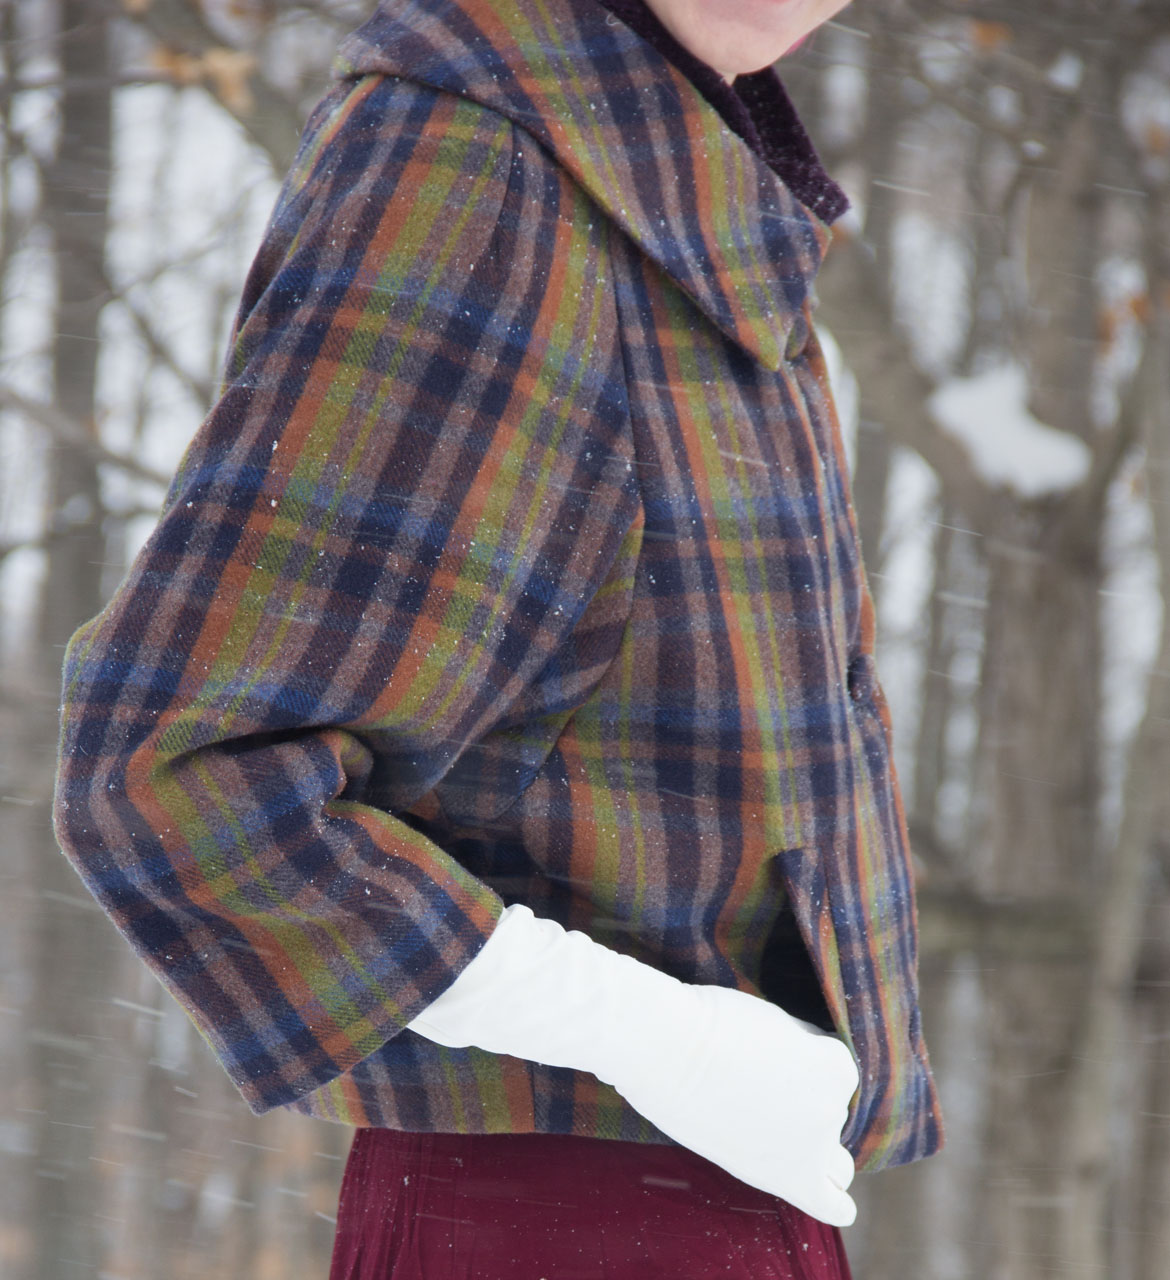
I struggled initially with whether to make the pattern as drafted with the 3/4 sleeve or to extend it to full length. I'm pretty vehemently anti-3/4 sleeves because I spent such a big chunk of my childhood wearing RTW "long sleeved' shirts that ended 3" shy of my wristbone, not to mention my hands are cold all the time (why would you make a coat without long sleeves?)... In the end, I caved. The design of the coat really suits the 3/4 sleeves, New Zealand winters are pretty mild, and this coat was never going to be a parka-level garment. Besides, the ladies in the pattern illustration are wearing delightful long gloves, and although I know myself well enough not to make a white pair, long gloves to match my new coat seemed like a fun project for later!

You know that saying, it takes a village to raise a child? Here's a slightly more obscure sewing-related sister saying I totally just made up: It takes a city to make a coat. Seriously. To get all the supplies you need for a coat, you've got to go everywhere. I definitely would have needed to resort to online shopping if I didn't live in a city that's such a hub for apparel creation, but as it was, sourcing all of these supplies took several Saturdays.
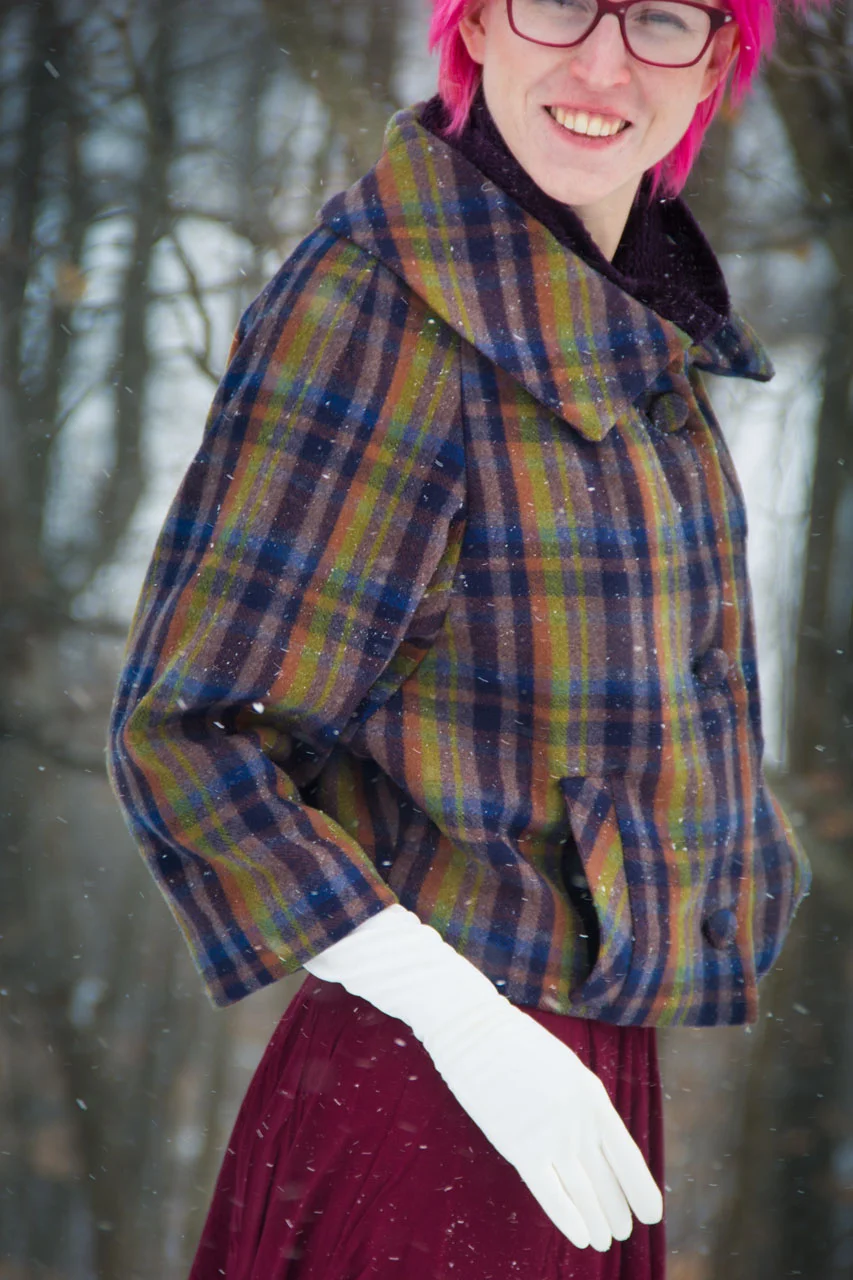
The main coating fabric came from Draper's Fabrics - a beautiful brushed wool plaid in all of my favorite colors that's positively delicious to cuddle.
The coat is interlined with cotton flannel from the Fabric Shop Otara, and the button blanks are from there as well.
The interfacing and hair canvas I've used for structure came from Hawes and Freer in Auckland (for the record, it was my first time using hair canvas as well as this particular interfacing, and both are really incredible quality - definitely not going back). The rayon bemberg I used to line the sleeves was also from Hawes and Freer.
The silk thread I used for all the hand stitching came from Spotlight - I don't enjoy shopping at Spotlight, but they have the cheapest Gutermann silk thread in Auckland so I go in to stock up occasionally.
The lining is a 100% silk brocade panel I found at The Fabric Store - although it was a bit on the expensive side, ($51, but I had a 15% off offer they emailed) it was too perfect to pass up, and in case there was any doubt I'm a firm believer that your lining should be as elaborate and wild as you can possibly make it.
The silk buttonhole twist and gimp are from the Ribbon Rose - a patchwork and needlecraft shop in Auckland that's really the only place to go for any kind of specialty thread.
There you go: five fabric stores to get the supplies for this coat! It took longer to source everything than the actual sewing process! Speaking of the sewing process - After making the muslin, the only other thing I decided to change was to decrease the length of the front neck/bust darts so that they end under the collar instead of extending past it. This had the potential to give the coat a little less overall bust shaping, but I didn't like the way those darts would cut the plaid right at the neckline.
It took the better part of a day to plaid-match and cut all of the pieces for the outer coat. The plaid is unbalanced, which ate a fair bit of extra fabric and also meant I needed to make decisions in a couple of places about whether to mirror it or carry it across in the same direction. I ended up choosing not to mirror, but that meant that the sleeves ended up not matching up at the front and back seams as well as they could have.

I cut identical pieces of cotton flannel for interlining, although since both fabrics had a pretty significant texture I didn't bother with hand basting them together at the seam allowances as you'd normally treat an interlining. Instead, I just lined them up and attacked them with some large basting stitches before constructing the shell. After the darts were sewn and the sleeves attached, I inserted hair canvas chest panels by catch stitching them in to the seam allowances and then basting them with vertical running stitches - an idea I got from Gertie's jacket sewalong. It's not the padstitching that a fully tailored jacket calls for, but it offers exactly the amount of structure I wanted for this particular coat. Without it, the front sort of collapsed in under the weight of the sleeves instead of sitting flat against my upper chest. It really makes a huge difference!
Another thing that the hair canvas helped with was the bust shaping. I reduced the length of the bust/neck dart to hide it under the collar, but I didn't reduce it with the hair canvas. I used the basting stitches and a heavy dose of steam to shape the bust of the coat around the hair canvas so that it holds a nice curve even though there's no visible dart in the fabric. The hair canvas wasn't mentioned in the pattern instructions, but I don't think I'd have gotten the front to sit so well without it. Speaking of pattern instructions - talk about super vague mixed with sections of 'oddly specific'.... the pocket instruction is basically 'make welt pocket' and the entirety of the lining instruction is 'sew as for jacket' even though the pieces are different... but then the bit about attaching the collar takes three whole sentences worth of steps (and doesn't mention rolling or steaming it into shape even though that is desperately required)? I really wanted to learn what was expected of me as a 1950s sewist and I'm pretty sure "Know Everything Already" is the answer, based on this pattern. Not to mention there's nothing about structure like my canvas... I feel like any ill-prepared 1950s seamstress probably would have come out of this project with a limp, lifeless coat with a collar that stuck out kinda funny.
Once the hair canvas was in, I attached the collar and facings and catch stitched all the seam and hem allowances down. Interestingly, catch stitching the seam allowances at the neckline also made a pretty incredible change in the stability of the coat, so I'm really glad I took the time to do that, even though squeezing in under the collar was a bit of an adventure.

Ok, we're going to take a small detour away from this coat to rant for a moment about pockets and women's fashion. This is the pocket piece, as drafted, for Vogue 9566:
At first glance it looks like a decently sized (if oddly shaped) patch pocket, until you realize that what you're actually supposed to do is sew the welt opening over the rectangle in the middle of the piece, and then fold the pocket over on itself and stitch the sides together. Now, I know my fingers are kind of long, and I know we're not making cargo pants here, but once that pocket piece is folded over on itself and stitched down, I can only fit about three fingers inside that pocket. What, pray tell, can anyone fit in a pocket this size? I thought it had to be a mistake, but then I remembered the illustration on the pattern envelope. The yellow coated lady only has three of her gloved fingers inside that pocket. That's not a fashion pose, friends, that's actually as many fingers as she has pocket for. The atrocity. What is even the point of spending the time to create a pocket that turns out so small that even a mouse would feel cramped? If I'm going to sew a pocket - especially a welt like this one which involves actually slashing a hole right down the middle of your coat front, I want reward for my efforts! A place to put my stuff! And my hands! I need to investigate some more vintage patterns to see if this small-pocketed thing was a social norm before pattern designers felt that women should actually have things larger than a tube of lipstick and a hanky that they might need to carry, or if it's a problem unique to this coat. For a pattern that seems overall to be pretty well thought out (strange instructions aside), I have a hard time believing it's the latter.

I suppose you've figured out after that rant that I didn't stick with the pocket design as drafted. My nice, roomy pocket goes all the way to the center of the coat, and yes, there is room for my phone in there. And my hands. And a travel pack of tissues. And my car keys. One side had to have a buttonhole through it, but there's still room in there.

The instructions have you hand sew the lining in place, and although I was originally planning on bagging the lining I was having so much fun with all the hand sewing that I decided to just keep going. The lining was a panel print - a 1/4 circle shape with the larger motif along the outer edge. In order to get the large motif to line up with the lining hem, I cut the pieces with a pretty complete disregard for grainlines. It's a very stable fabric and the lining isn't structurally important to the coat, so I don't think it's going to cause any problems that the two front pieces are essentially cut on the bias, but time will tell. Instead of using the same silk for the sleeve lining, I used a rayon bemberg - actually, the first time I've used it for a lining. I don't think I'd put it in a dress, but it is so perfect for a coat lining! I have heard tell before that rayon bemberg frays like crazy, so I was prepared for the worst - but it really didn't give me that much trouble at all. I did serge around the edges of all my lining pieces immediately after cutting them out (just the edges of the individual pieces as an edge finish - they're actually constructed with a regular straight stitch) so there wasn't much of a chance for fraying, but it behaved pretty well for that process. Hopefully the serged edges of the lining will be added protection against potential blowouts later on in my coat's life.

As I was sewing the lining, I was suddenly struck with the idea that what my coat really, really wanted was a little sewn in label. Something like "Kat made this and it took f***ing AGES" or a similarly sassy phrase... or even just a little "KatMakes"... I've never wanted to put labels in anything I've made before (I know what it is, it doesn't need a tag) until now. Maybe eventually I'll get (or make??) some labels and put one in this coat.

At this point, the coat sat unfinished for a few weeks because the place where the silk buttonhole twist was closed for Christmas, and I ended up hand sewing the buttonholes and attaching the buttons in the back of the car while my family was driving up to Wisconsin to find some snow for our winter holiday! The coat, as it turns out, was ready just in time for winter after all. She's definitely better suited to a milder winter (those sleeves are so wide, the wind goes up one and out the other, which is quite an experience) but I really wanted photos of it in the snow, and I got them! Now, she's back in the closet for a few more months until the weather cools off a bit here.

I don't think Marie is running the Vintage Pledge again this year, but I'm still going to make an effort to sew more vintage from my newly enhanced pattern stash - I never would have drafted something like this, so sewing it was an awesome experience, as well as a good first step before I tackle a fully tailored coat.