
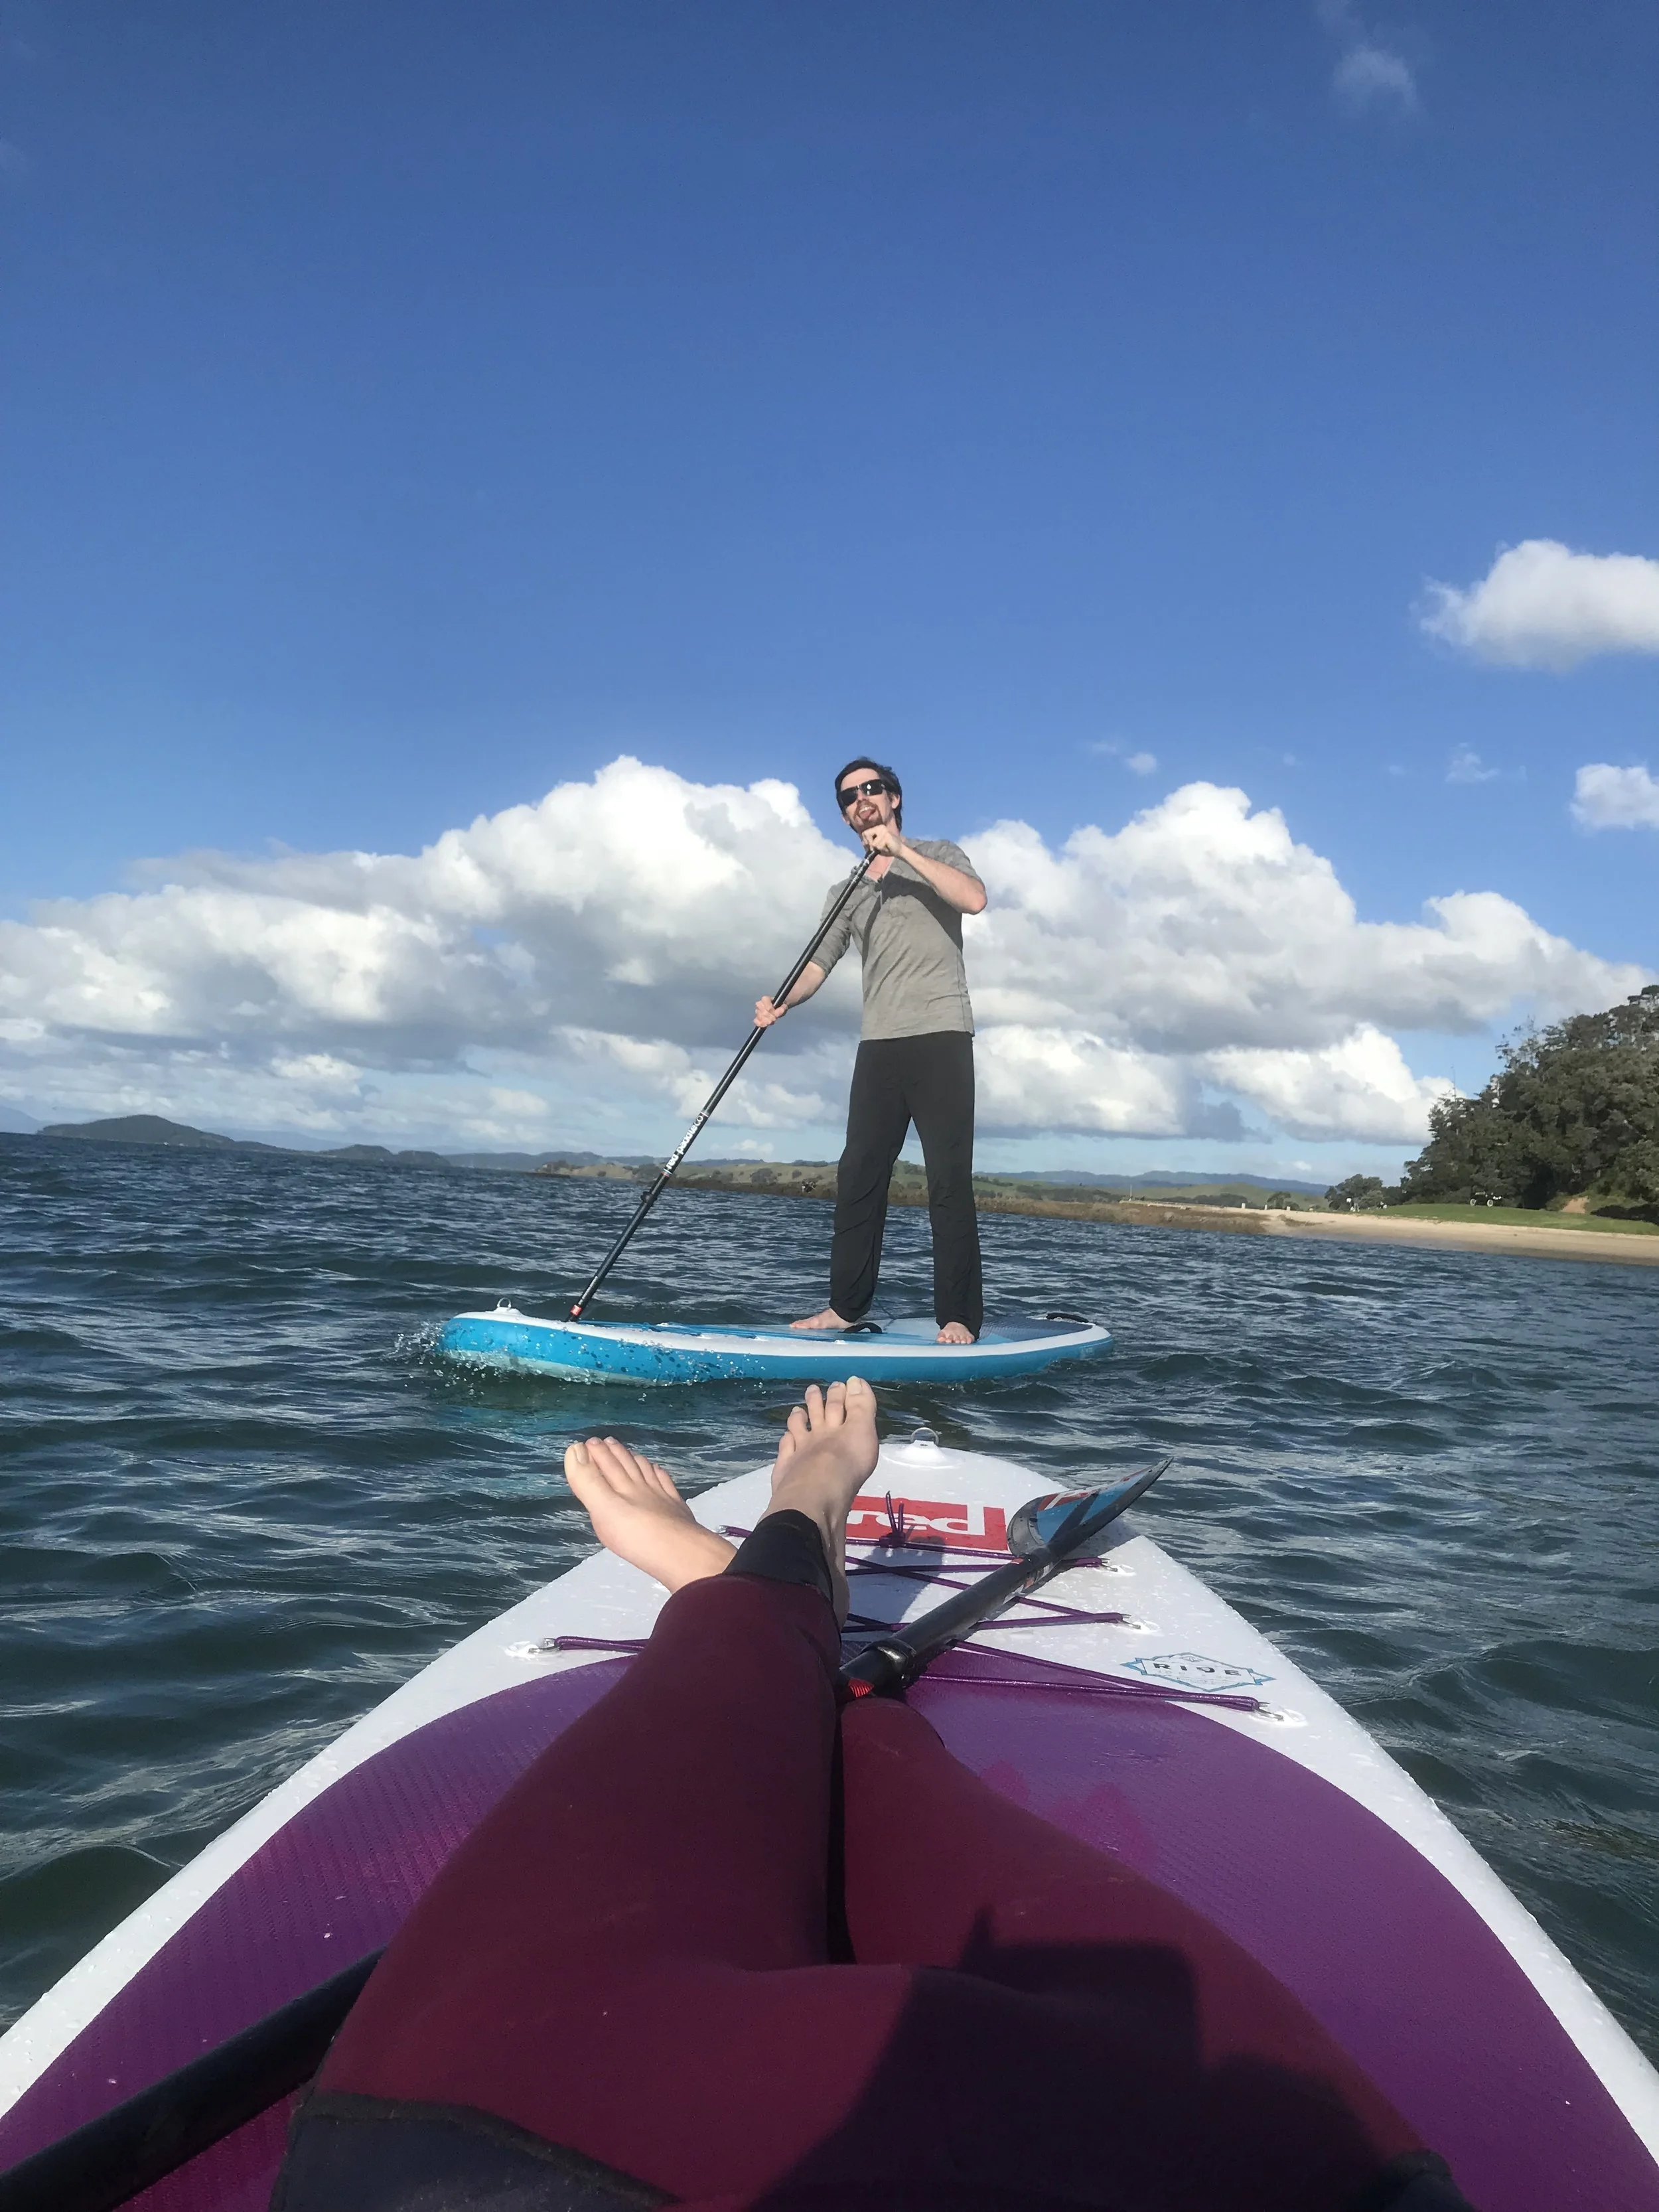
Last month, Jon and I finally did something we'd been talking about for years. We bought Stand Up Paddleboards! We had sort of only planned to visit the shop to see some of our options in person, but we stumbled across an offer we couldn't refuse, as they say, and took home a pair of inflatable Red Paddle Company boards that morning.
As soon as we got home, Jon sat down at his computer and started searching for places to take the SUPs, and I sat down at mine and started researching technical fabrics appropriate for SUP wear. Interestingly, there's not a wealth of information available on the topic. It's autumn-coming-winter here in New Zealand at the moment so it's a bit too cool for just a swimsuit, but definitely not too cold to avoid the water entirely. After reading in a few places that wetsuits can actually be a bad idea (they're hard to remove if you get hot from paddling while you're out on the water, and their insulating properties are stunted when the body they're trying to insulate is wet but not underwater) I decided to start by tackling the bare legged situation because that was the area most lacking in my current water wardrobe, and then I'd work on building the rest of an outfit to include a long sleeved rashguard, neoprene short sleeved jacket, and eventually two new swim tops (for 'sport' and 'leisure') plus new bottoms to match.
You'll recall that I'm currently participating in Goodbye Valentino's RTW Fast, which means purchasing new paddling clothes was right out. This, combined with the fact that our first paddleboard excursion was set for exactly one week after purchase, seemed like a good opportunity for a challenge! I had to do a lot of hunting for information on the right types of fabric to use for this project: Neoprene is a flat negative for SUP legwear at the water temperatures New Zealand experiences (that's a range 60 to 70 degrees Fahrenheit or 15 to 22 Celsius, if you're curious), but you still want to provide a layer of protection from sun and sand, plus a bit of extra warmth on chilly and windy days.
"Swim leggings" and "surf leggings" exist aplenty online, so once I realized I wasn't getting anywhere researching fabrics, I shopped around for leggings to get an idea of fiber contents and used that as a guide. As a rule, I learned that poly-spandex and nylon-lycra are the two main blends for water sport activewear. Poly-spandex blends (it's usually around a 70-30 split) are very highly rated in the performance category - they withstand salt water and chlorine spectacularly, they've got great recovery, dry the quickest, and they take and hold print and dye colors with good saturation plus wash- and lightfast qualities. By comparison, the nylon-lycra blends (keeping in mind that lycra and spandex are different brand names for the same thing, so it's really just nylon vs. poly here) can be slightly less rugged when it comes to chlorine (which doesn't matter for me anyways), have similarly great recovery, and generally don't hold on to printed colors (they're more readily available in solid colors) and prints you do find are more likely to fade over time. Nylon, though slower drying, is more breathable and insulating. Overall, they are incredibly similar in performance, but the factor that tipped me over the edge to choose nylon was how much more environmentally friendly it is. No petroleum products, significantly less water usage to manufacture, and the particular fabric I found is made from recycled fibers as well. One of the reasons I choose not to wear synthetic fibers in general is the environmental effect, so I was happy to find a good, sustainable alternative for my activewear as well.

I chose two different colors of nylon-lycra fabric from Dance Fabrics New Zealand so I could have a bit of fun with color blocking, and I also ordered some wooly nylon thread from Sewing Depot to take care of the seams. My fabric offers a sun protection rating of UPF 50+, and the 70% nylon content is entirely recycled from pre- and post-consumer waste product. The Lycra is also a special formulation that is chlorine and salt resistant, so recovery and longevity shouldn't be an issue. (I, however, with my chlorine allergy, am not very chlorine resistant at all, so I won't be testing that theory...)
Now, onwards to pattern choice! Instead of drafting my own leggings, I bought the Avery Leggings pattern from Helen's Closet. I've heard exactly zero bad things about this pattern, and I love Helen's style as a pattern designer, so I was happy to finally have a specific need that could result in trying one of her patterns (I seem to draft things that resemble her patterns...does that mean we think alike?). It was super quick to tape together (the leg is only one pattern piece as drafted!) and this one was the first layered PDF I'd had from a designer which was awesome as well. I taped the whole thing together in about 20 minutes. Of course, after I taped it together I proceeded to hack it apart so I could make the color-blocked paddleboard leggings of my dreams... but hey. It started simple!

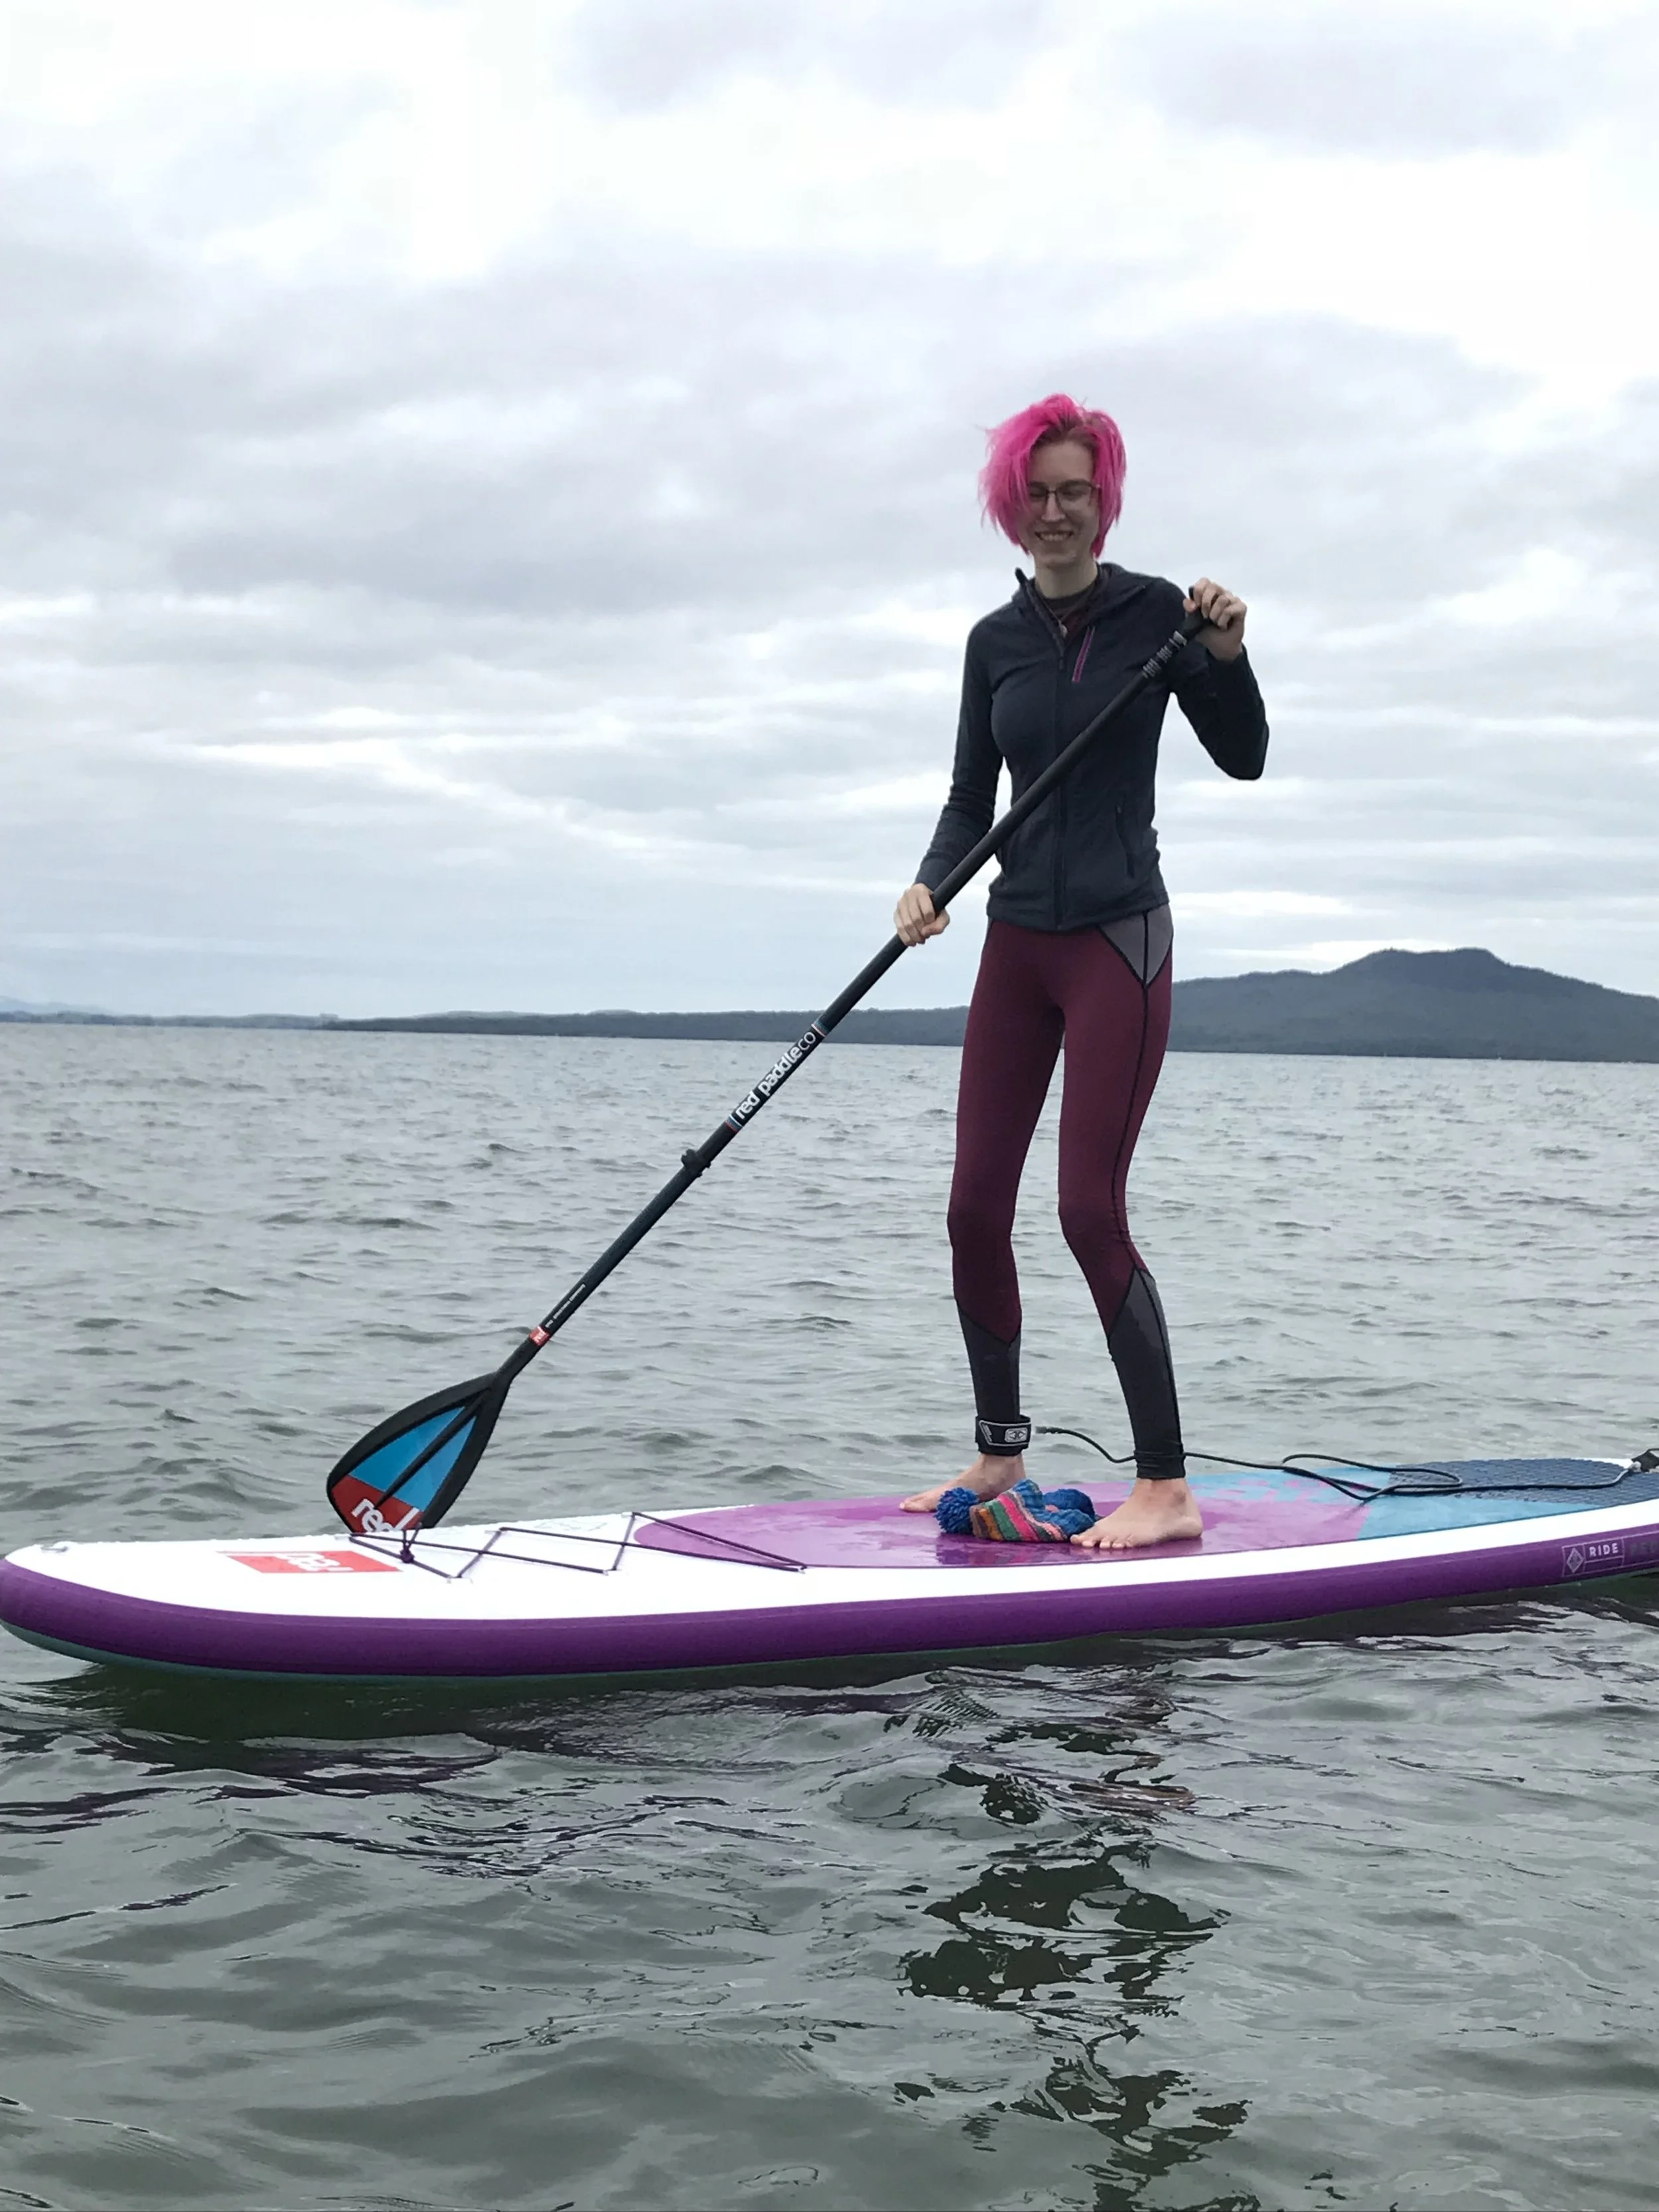
There's a neat color blocking tutorial for the Avery Leggings on the La Mercerie blog, but I wanted to go a bit further. The Avery is designed without an outer leg seam for a smooth fit under clothes, but I didn't care about wearing these leggings under clothes, so I created a side seam which allowed me to add angular panels of contrasting fabric at the calves and hips. I wanted pointy points! I loved the other features of the pattern - the gusset for mobility, and the enclosed elastic at the waistband - both are perfect for leggings, and especially for mine. My fabric has a firm stretch, so they fit tight against my skin and are easy to swim and move around in.

I cut a diagonal line 14" from the hem going down to 10" to make a calf-crossing color block at the bottom of the leg, and I cut two trapezoidal shapes from the front and back hip to make triangular blocks of color at the hips. These, of course, serve no purpose other than to look awesome, but I have been referring to them as my 'go-faster stripes' whenever possible.
Someday, in the grand scheme of things, when I have a sewing room and a cat and a house with a proper garden, I'll have a coverstitch machine, but I currently live in a house where the kitchen, living room, dining room, and sewing room are all, in fact, one room - so that'll have to wait. I desperately wanted to have exposed, flat seams in my leggings though, so the obvious answer was to use a flatlock.
I've tried flatlock once before but never really loved it (It's not really something I require all that often to begin with, and using it with bulky fabrics like fleece is a recipe for disaster) - but with a tight garment like leggings, I knew if I used a regular overlocker seam I'd end up with lines pressed into my legs, so I set to work experimenting. I managed - with some tension fiddling - to get a really nice looking (and flat!) flatlock seam using wooly nylon at a very short stitch length, so that's what I went with. I love how the contrasting black thread pulls everything together! Construction was pretty straightforward - I stitched all the colorblocking first and then once my leg pieces were fully assembled, I finished the leggings off with Helen's instructions. We went paddleboarding on Sunday (and I went on a fabric shopping bus tour on Saturday, so I couldn't sew any then!) - so I was operating under a Friday night time crunch of a deadline.
I hit Struggle Town around 8:30PM - the light in my serger went out, the wooly nylon kept snagging on an imperceptible burr in the cone - thus throwing out my tension - and it seemed for a while that I was sewing every seam twice. I should've stopped right then, but I didn't - that is, until I ended up sewing the waistband on, realizing it was too small to get over my hips, taking it off, re-cutting it a size larger, and then sewing THAT one on backwards. Then I put the whole thing down and went to bed. Fortunately, the next morning the serger light started working again, the tension was fine, and I removed and reattached my waistband the right way around, hemmed the leggings, and was finished before my coffee was even cool enough to drink!

The leggings worked perfectly for our inagural SUP adventures on Sunday. I wore my leggings, a sports bra (alas, an old RTW holdout that I'll eventually need to replace with a me-made), and one of my merino t-shirts. The weather cooperated beautifully, aside from a stiff wind that pushed us around and tired us out quicker. The forecast originally predicted rain though, and there wasn't even a rain cloud in sight. My leggings were perfectly quick to dry, warm enough even in the wind, and didn't do anything wonky when they got wet, so I count that all as a win! I did go back and reinforce the points of my flatlock seams because one of them pulled out a bit at the end (I cut my threads too short) but let's just say I'm definitely glad I bought enough of my nylon lycra to make a top and a swimsuit as well! Also, the Avery leggings are so comfortable, I'm already planning two additional pairs! Another nylon lycra pair without the color blocking, and also a merino pair to wear as a layer with my everyday clothes when it's cold.
A few pattern notes of the in-general variety: I cut the extra small, but I ended up adding 2cm to the front and back waistband and easing it on to the legs, so I'm thinking I may have been better off cutting a small and grading to xs in the legs, since the leg fit is spot-on. Also, I cut an extra 2" at the hem because Helen notes that the Avery leggings are drafted for a 5' 6" person and I have six inches on that particular fit model - I figured two inches, plus the fact that the leggings are meant to scrunch up around the ankle, would be perfect - and I was right. Definitely would've been too short as drafted without the 2" though. Lastly, the waist does come up pretty high. I love it, but I can see how some people might not. They do seem to settle about 1/2" below where I pull them up to, so I may shorten them by 1/2" in the next version. To give you an idea, I spent the whole day in my Averies - we drove out, we pumped up our boards, we paddled, we lounged on the beach, we paddled some more, I took a knitting break on the beach before paddling some more, we hiked up a hill to look at the view... and I didn't adjust them once all day long.

I realized when I finished them that they looked like one half of a superhero outfit - I've made a matching rashguard in the leftover fabric and it definitely plays up the superhero look a bit - I'm waiting for warmer weather to take photos of it though!
I had quite a lot of fun making these leggings, and interestingly, also quite a lot of fun researching the type of fabric that was best to use. I've made a long list of other items I'd like to make for SUPing, including some windbreakers for Jon and I (YES. He asked me to make him something! I have to tread very delicately here...) - plus, I rather fortuitously stumbled upon some fabric that will be perfect for a rugged pair of quick dry hiking pants, so those are on the list now as well. This, of course, should be taking second priority after some wedding dress progress is made - I'm almost ready to show you guys the next video!