
We’re back for part two! Part two, unfortunately, is probably going to come up pretty odd in some Google search results, but hey.. the things we do for sewing, right?
If you missed it (or you’re here from a search result) earlier in part 1 I covered off patterns and construction for a set of traditional tailor’s ham and seam rolls, so pop over there to get an idea of the construction method, since I’m glossing over that in this post. Also, if you haven’t already, check out the free PDF download of the pattern pieces in my shop.

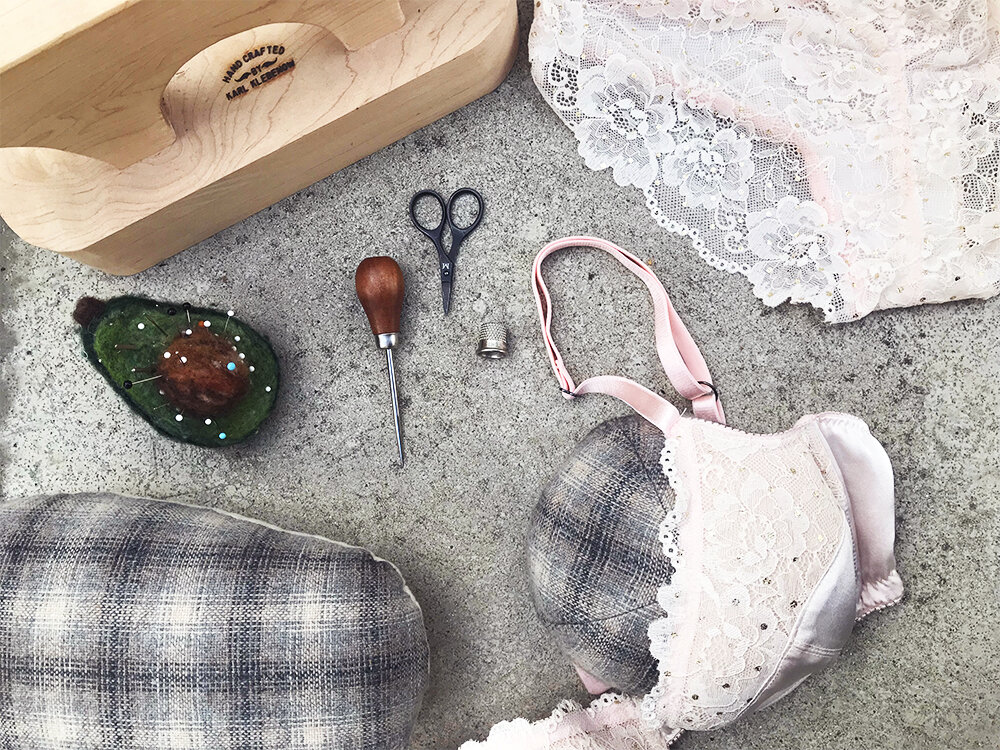
This post is all about this object. I’m calling it a ‘boom ham’ but other names like breast form and bust pressing curve have been suggested…call it whatever you like! It’s a pressing tool specifically designed to imitate the curve of the bust, and while I had the idea based on my bramaking experiences, I’ve realised since finishing the boob ham that it’s actually useful in a pretty infinite variety of sewing applications. Basically, anything with bust shaping - shirts, dresses, jackets, etc. will benefit from the boob ham. It’s shaped the way I’m shaped, I can press around it, and its flat bottom keeps it from running away as you try to use it.
There’s a popular item recommended in bramaking called a ‘pressing knob’ (ugh the search results are getting weirder..) which is basically just a wooden ball that serves the same purpose (imagine the object that’s attached to the end of the railing of a fancy winding staircase in an old house - it’s just one of those.)

A pressing knob! Click through to visit Bra-makers Supply if you’d just prefer to have one of these! This one’s attached to a stand which is kind of nice.
I do not like pressing knobs. They’re usually too small (about a 4” diameter) so whatever you’re pressing has to be moved around a lot, and since they’re wooden they don’t have any cushion - the contact surface between the knob and the iron (with the fabric in between) is VERY small, which makes it very easy to scar your fabric. It’s just not my jam. I know a lot of people who use them and that’s cool if it works for you - you can pick them up at your friendly neighbourhood home improvement store for a couple bucks - or you can get that proper one by clicking on the photo above - but I don’t like them. This is my solution to that problem.
The thing about a boob ham is that it’s really only going to be useful to you if it approximates the size of your boob. It basically IS an iron-able version of your boob, so if you’re going to use it to mould bras and jackets and such, it has to be the right size! I’ve given you the pattern pieces I used (in my size) in that PDF download, but if you’re not the same size as me it won’t work all that well - so that’s why I’m telling you how I drafted my own so that you can make yours the size it needs to be! Okay - enough of the chatter, let’s get to sewing!
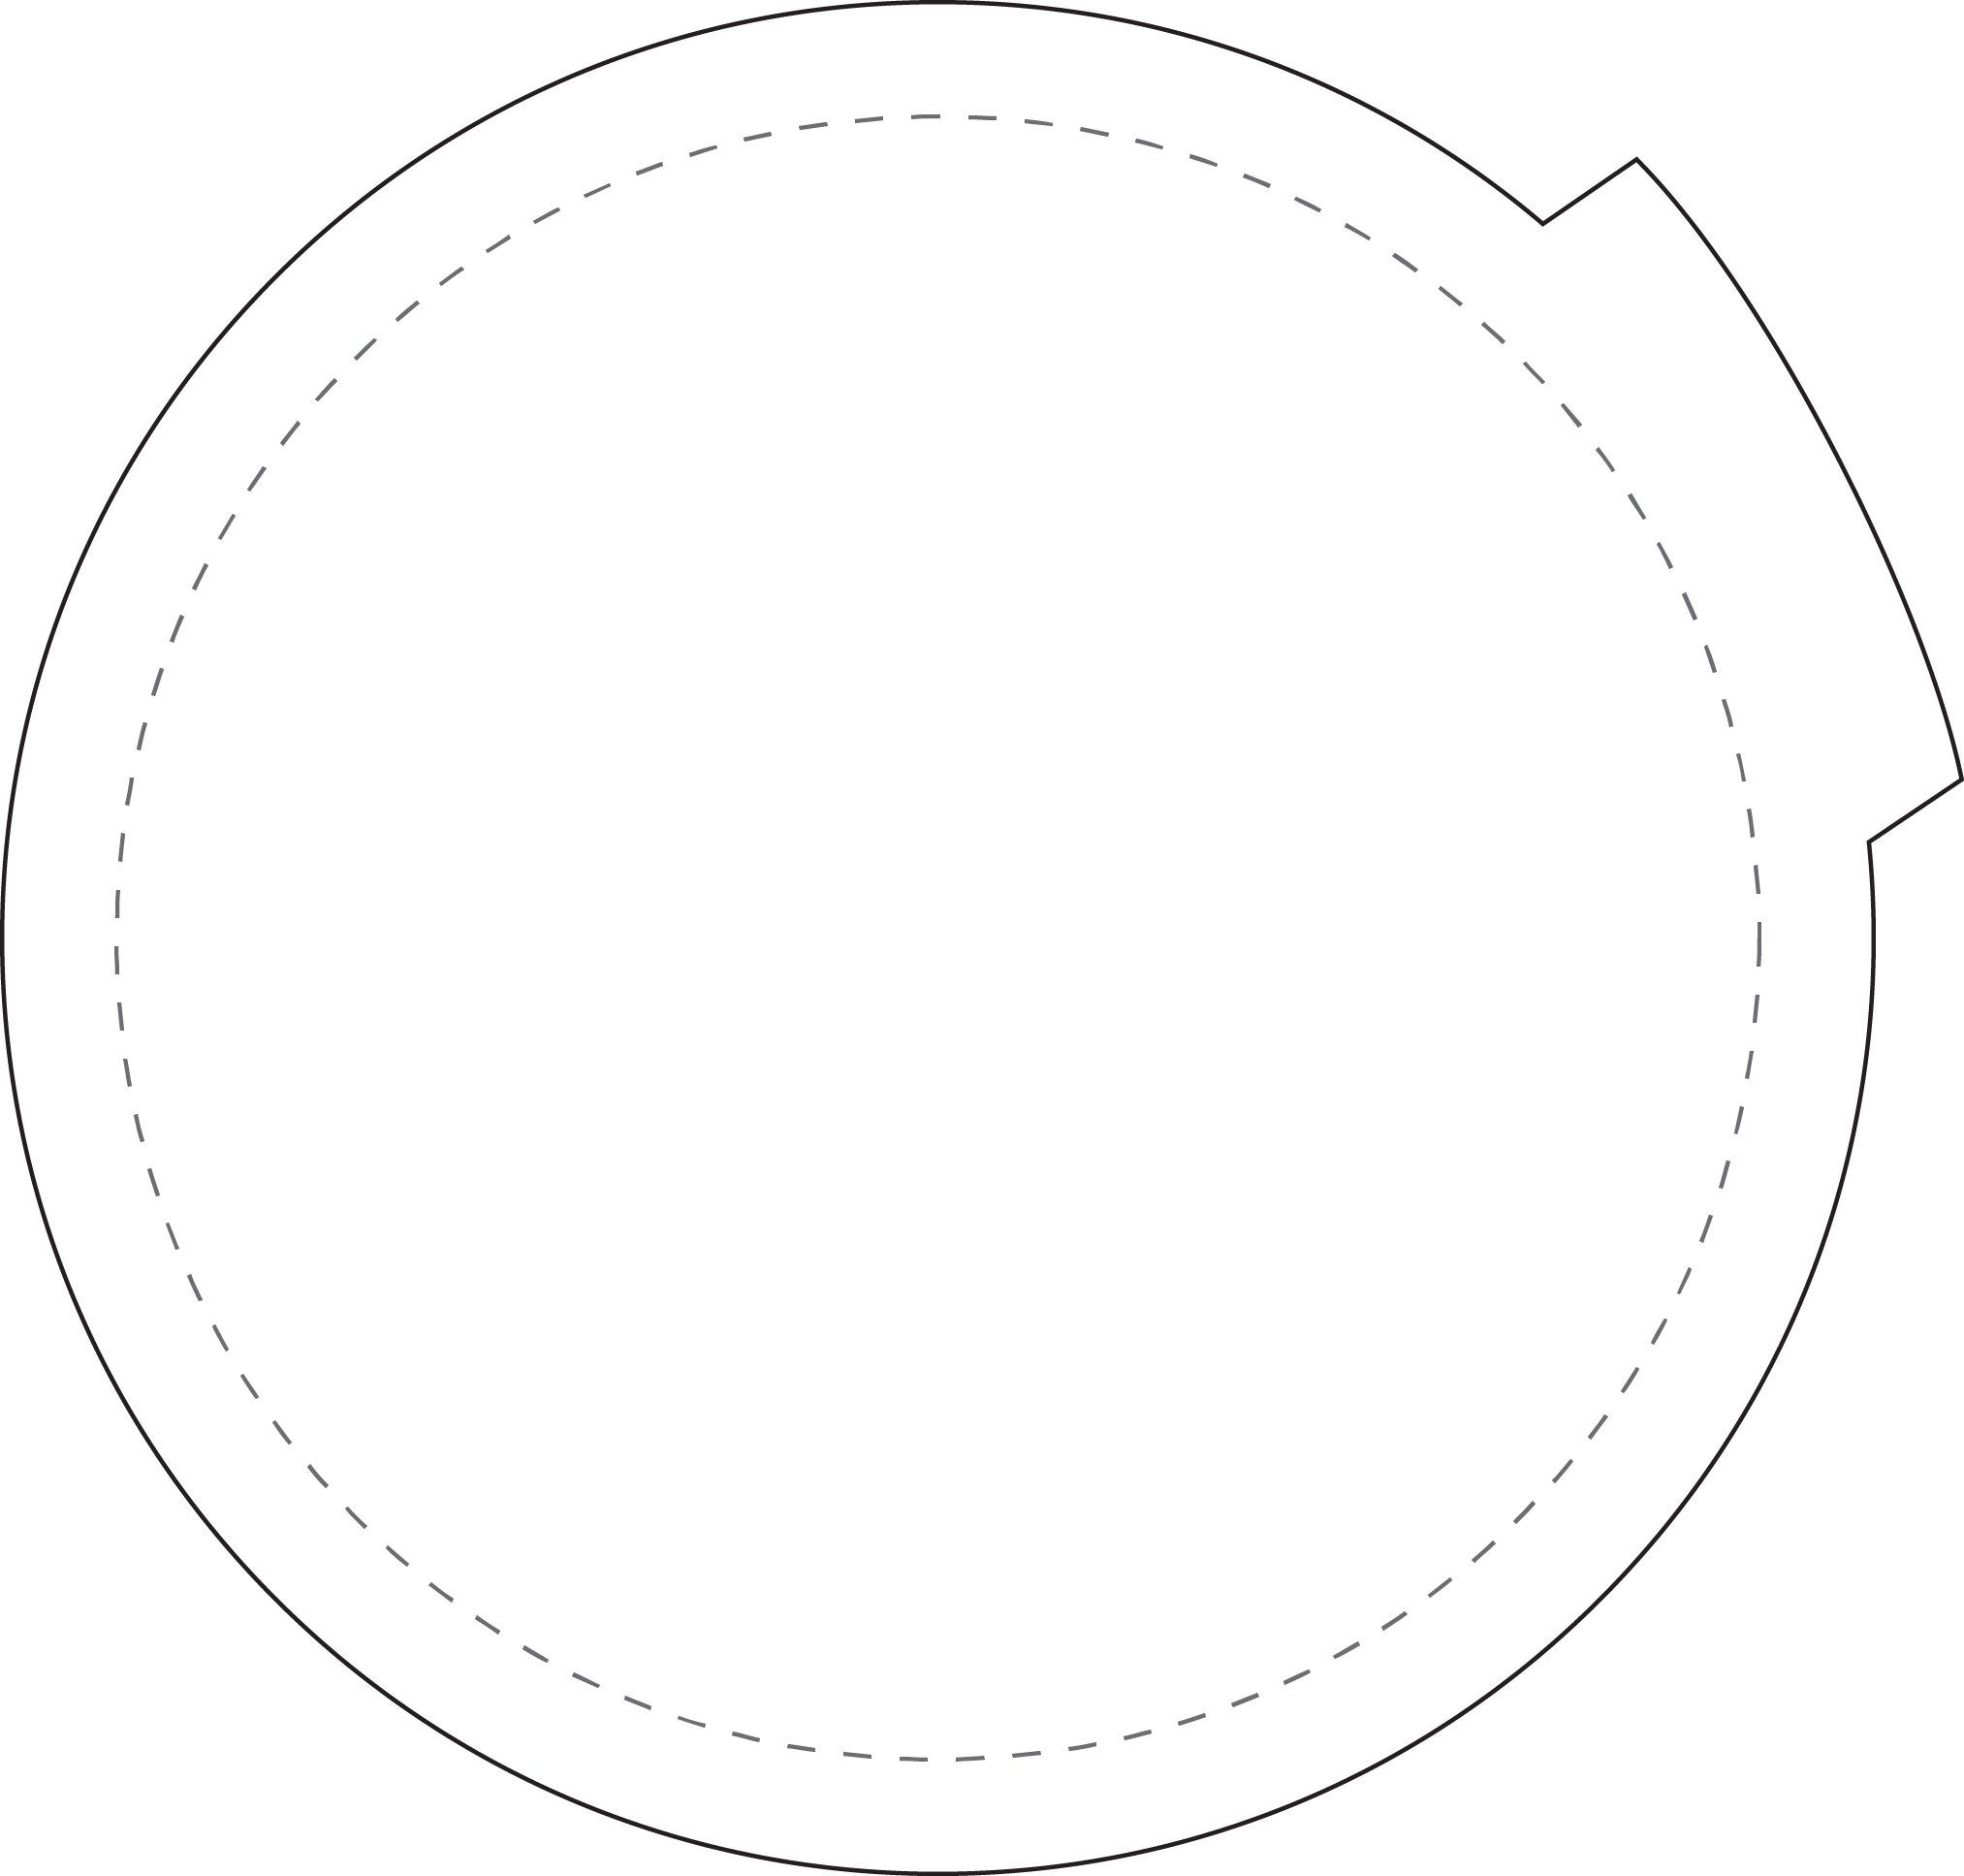
What we’re making, basically, is a half-sphere, with a set diameter and an additional 1cm cylindrical projection. The diameter of your ham will be the balanced distance of a well fitting bra’s underwire (With a regular underwire, the distance horizontally from the middle tip to the opposite point on the outer edge - you’ll want to try to balance your underwire here, which is hard for me to explain because there are so many different styles. If you’re not sure, you can take a couple of different measurements and average them. Note that a severely plunging bra may give you a measurement that’s slightly off)

In other news, the only underwire I had on hand to take this photo was one I accidentally ordered in the wrong size - it’s too small for me! You can also measure an underwire that is inside an actual bra.
Draw a circle with this diameter and cut it out as-is. Draw a copy of the circle, and add a preferred seam allowance (I used 1 cm) with an additional allowance (about 3”) for the stuffing opening to make it easier to fold under. You’ll use the circle without the seam allowance to cut some cardboard out for your base later.
My diameter (without seam allowance) was - 14.3cm.
Next, we need the circumference of our circle, divided by four*. If you have a flexible ruler, you can fold your circle (the one without the seam allowance) into quarters and measure along the edge, or you can use a (small and manageable, I promise) bit of math: The circumference is Pi times the diameter: so
C= π*D
In my example, π x 14.3 = ~45 :divided by four*, and my number is 11.2cm
Draw a horizontal line of that length - this is the base of your wedge.
*I say four. You can use as many wedges as you’d like to construct your ham. My ham is not perfectly half-spherical because four’s not really enough, but I chose four because that way the biases all meet up in a more predictable way at the top of the ham and the seams of the wedges reinforce the biases - but they’ll do this regardless. Do five, or do eight, if you like!
The next step is to determine the height of the wedge. We know the diameter of the circle already, and the height is just the radius (7.15cm). Draw a line equalling the radius (diameter divided by 2) plus about 1cm at a right angle, starting in the center of the base line. It should look like an inverted ‘T’. The extra centimetre is so that the ham, and whatever object you’re pressing, stands up off the surface of the ironing board thus giving a bit more maneuverability.


Here’s where the fussy part comes in. I’ve read somewhere that pattern drafting is 90% math and 10% art, and you’re about to use your art. We need to connect the top of our inverted T to the two edges of the wedge, but we need to connect them with a curve. How you choose to draw your curve will change the shape of the finished ham, and I can’t really tell you exactly how to do it. I can, however, show you my piece and give you some guidelines.
At no point should any part of your curve result in a width wider than the base of the wedge
the curved lines should connect to the base of the wedge at a right angle, and to the top of the wedge at as close as possible to a right angle as well (depending on your ham’s size, you may not get all the way to a right angle, but the closer you get, the flatter the top of your ham will be. Unless you’re making bullet bras, the flatter the better!


If it helps, you can start by connecting the base to the top with a straight line, or you can just go for it - I find a french curve helps a lot here! Draw your line with pencil and fuss about with it until it looks right to you. The grain line should go up through the point of the piece: cutting the straight of grain this way and using four wedges means that the seams in the wedges will stabilise the bias.

When you’re happy with this pattern, add seam allowances and you’re good to go! The fabrics are the same as they were for the rest of our set of hams - cotton muslin, batting, and wool. The top of your ham is a layer of wool, then muslin, then batting, and the base is muslin plus batting. Cut all these, sew the wedges together first (If you’ve done four, then sew two pair together, and then sew the halves together - pressing after each seam) followed by the base, backstitching and leaving about three inches open for stuffing. Trim and turn through this hole.
Cut a piece of cardboard or a few sheets of heavy card stock that are the size of your base, minus seam allowance. These, unfortunately, will need to be folded or rolled to fit through the stuffing hole, but you’ll be able to open them out once they’re inside. If you use multiple layers, you can shift them around so that the folds are perpendicular to increase strength, but I found with one layer of regular corrugated cardboard that it was plenty stable and flat enough. Stuff this in your ham before you start adding wood shavings.

Stuff like you did for your hams, and finish your boob ham off by closing up the stuffing hole, and you’re done!

I have been incredibly surprised by the versatility of this object - it is by far my most reached for of the set. I use it for anything at all with a bust dart (shirts, jackets, coats) as well as all of my bra making. I’m so glad I had a bit of leftover fabric and decided to try this, it’s been so helpful! I do so love that our favourite tools are often the ones we didn’t even know we needed.
If you make a boob ham, a regular ham, or a seam roll of your own using my pattern, I would LOVE to see it! Tag me on Instagram (I’m @kat.makes !), or just email me a photo of your ham! The fact that all of you fantastic readers find everything that I spill out into the void useful really does keep me going, so you know - a little encouragement is nice :) If you’d like to support future pattern development (or just show a little love) you could also consider buying me a ko-fi.