
Hey! Happy New Year, and happy summer from the houthern Hemisphere! I’ve been slowly working on a top-secret machine embroidery project (I’m allowed to tell you it’s my sister’s wedding veil, but no other details are permitted, unless you’d like to join my Patreon and peek behind the proverbial curtain!). Since I’ve been sworn to secrecy, you’d be forgiven for thinking that not much is going on around here, as other projects have really slowed down. I do have something to show you, though - and they’re truly gorgeous!
I’d like you to meet my latest and greatest shoemaking project. They’re my very first pair using patent leather (and they’re not without their flaws, certainly) and by far my wildest shoes to date! I’ve been holding on to this piece of embossed hot-pink patent leather since right around the time I made my first pair of shoes, but I was so terrified of working with patent that I kept putting off the project. I actually ended up deciding to bite the bullet and start the project because I came across some absolutely gorgeous Diane Von Furstenburg deadstock fabric in a Fabric Store sale that happened to exactly match the pink and plum leathers that I’d been contemplating for these boots. I made it into this top and skirt combo, and desperately wanted the boots to wear with it! The deal seemed signed, sealed, and delivered - I just needed to face my patent fears and start!

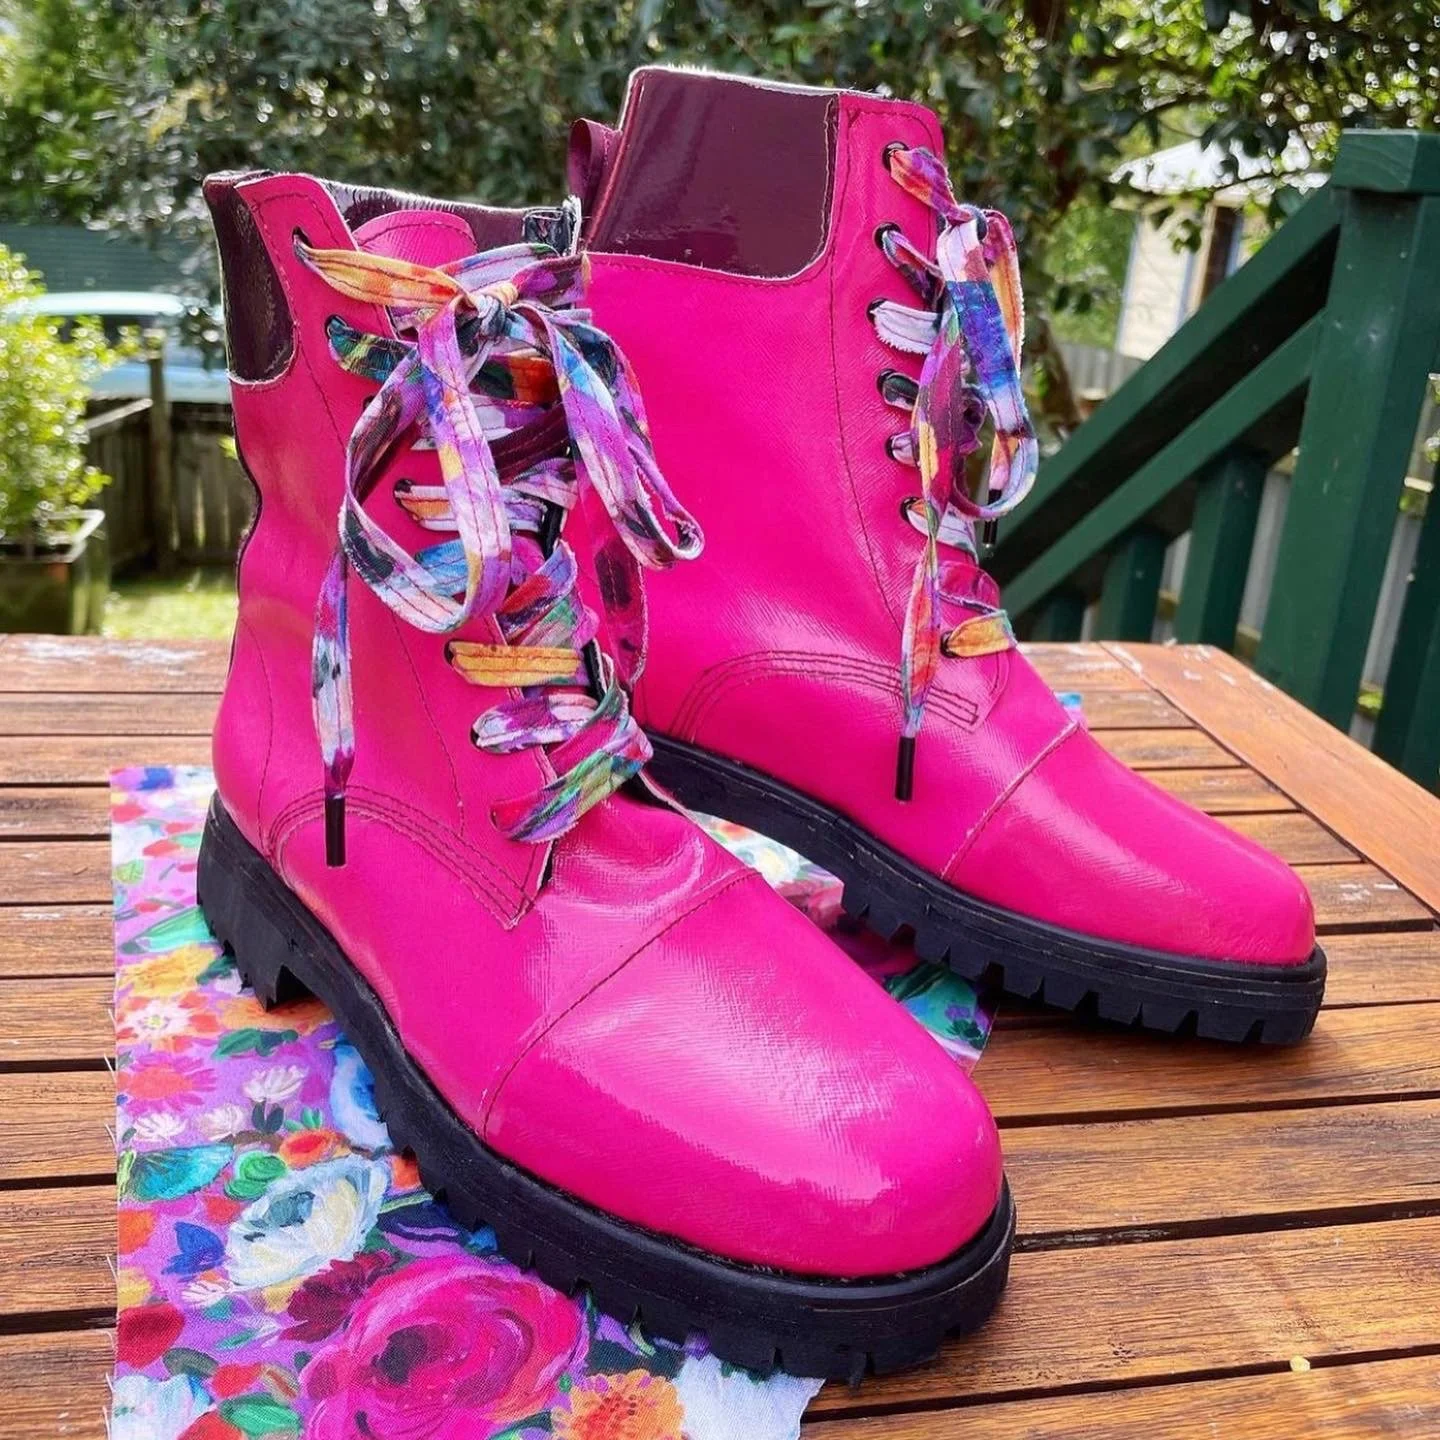
The design for the shoe is - I’m sure you’ve noticed- heavily inspired by Doc Martens. I went a little higher than the standard doc and added a puffed cuff (It’s even lined with EVA foam!) and I ended up separating the toe piece which isn’t true to the doc style, but it’s a feature I find quite visually appealing. I kept the signature three rows of topstitching on the vamps, and that super-cute heel strip ending in a little tag! Finished off with a chunky rubber unit sole (another first for me) along with some clever bias tape shoelaces, I really love being able to pull my favourite aspects of a style and make it uniquely me. They’re perfectly imperfect, as it should be!
But you’re here for more details, aren’t you? Of course you are.
The Uppers

I started this project with the usual method of taping up my lasts - the same ones I used for these grey boots. To extend the boot height, I taped some scraps of paper on to the ankle area to extend it above the last. Next, following a couple of reference photos of Doc Martens, I drew design lines on the taped lasts, marked connection points, and labelled my pieces. Then I peeled the tape off the lasts and added allowances - my preferred underlay allowance is 5mm, and I used a lasting allowance of 2cm. I made the vamp seam allowances a centimetre instead of 5mm to allow for the three rows of topstitching (I’ve made that mistake before) and it worked really well. I also used tissue paper to sew all of the topstitching on the uppers, since I had some major issues with the patent sticking to the bottom of my machine’s foot. The tissue paper was a solid solution to the problem, but I think I’ll look into getting either a teflon foot or a roller foot, since we only ever have tissue paper in this house if I’ve hoarded it from a package - it’s not something we ever buy!

The most confusing part for these uppers was figuring out the construction order for the padded cuff insert. The insert is a folded piece that finishes the top line of the boot, encases a layer of soft EVA foam, and also connects the lining to the outer along the bottom of the cuff edge - that’s asking a lot of one pattern piece! I’m not certain I did this the “correct” way, especially since I don’t have any cuffed boots with a similar construction to reference for ideas - but I did manage to make it happen with minimal fussing which I’m quite proud of! I stitched as much of the outer upper together first, and also constructed the lining before I attached the cuff. I did the lower cuff seam in a single pass (stressful!!) which meant I had to white-glue the lining to the inside of the cuff, and then white-glue the outer shoe to the other side - keeping everything aligned for one line of stitching through all the layers. It’s definitely not the prettiest on the inside of the shoe, but that’s a secret between you and me, dear reader. I added the heel tab right in the middle of that line of stitching, but that little design feature deserves a paragraph all her own!

The heel tab was a serendipitous addition. One of the design features I loved about Doc’s is the little “Doc Marten ribbon tab on every boot. I loved this fun addition, and was considering ordering some custom labels, or perhaps just finding a fun scrap of fabric or leather to sew in - but then as I was digging through my ribbon and elastic bin for another project, I discovered a length of gorgeous plum ribbon that matched my plum leather perfectly - I was thrilled! On a whim, I decided to go even further with the personalisation. My Bernette B78 comes with a couple of alphabets that can be programmed so the machine can ‘write’ - I love using this feature to leave small notes inside clothes, or to label kids’ clothes in a permanent way - but I’d never sewn on ribbon before! The first pass was a bit of a mess - the ribbon bunched up under the stitching, but - and I swear this was all my brilliant investigative ideas used up for that week - I tried a little scrap of the water-soluble embroidery stabiliser that I’d been up to my eyeballs in while working on Lill’s wedding veil. It worked perfectly! The ribbon stayed flat, and I dunked it in a quick water bath after stitching to dissolve the stabiliser so you’d never know it was there! My ribbon tabs say “Kat Makes” which I think is delightfully appropriate.
Lasting the boots was the part I was most nervous about. Patent leather introduces a new set of variables where leather behaviour is concerned, and I’ve read a lot about how unforgiving it is. My lasting job definitely wasn’t perfect, and I learned that the heat gun will indeed melt the patent coating - but overall it wasn’t nearly as bad as I was making it out to be! My biggest issue was that when I folded the shoe upper back on the last to heat the thermoplastic heel counters, I over-heated the creased edge of the upper and ended up with a melted wrinkle which you can see in the finished boot. That said - it’s the sort of thing you can only see if you’re less than two feet away from the shoe, only if it’s tilted a certain way to catch the light, and now that I’ve worn them a bit, it blends in reasonably well with the natural creases around the ankle of the boot. So. If anybody points out that particular flaw in my shoes, I’d say we have some other problems to address as a priority. It was also a really good learning experience! I’m planning to use some kind of heat shield for this step on future shoes to protect the uppers a bit better,

Last- the soles. Honestly, I hit a bit of a mental block and left these shoes sitting - lasted but sole-less (a metaphor for 2021?) for about three months. It wasn’t anything to do with the shoes, I just didn’t have the mental capacity to do anything unfamiliar there for a while, and I was nervous about the distinct possibility that I’d irreparably ruin them somehow in the process of putting the soles on. I did finally get there (of course, or you and I wouldn’t be sitting here having this chat) a few weekends ago, and honestly I’m so impressed with the finish! The sole is comprised of - in order: black rubber rand, two full layers of high-density EVA foam (for platform-y height), one half-layer of EVA to balance the heel, and then a rubber unit sole from Texon. The sizing of the unit sole was unfamiliar to me, so it’s bigger than it needed to be which did create extra work for me, but we managed. Once all of that was glued (with the usual contact cement, which I’m also almost out of- I bought it when I made my very first pair!) I got to use my brand new belt sander for the very first time!


I flipped the belt sander upside down (belt facing up), clamped it to my table, and loaded in some coarse 80 grit sandpaper. Doc’s have that signature delineation around the edges of the sole which I knew I wasn’t going to be able to duplicate, but honestly I got pretty darn close, all things considered. This was hot, sweaty work that I had to do outside (oh, for a workshop with HVAC!) and I ended up covered in a thin layer of black rubber dust, made worse to get off because it was sticking to my sweat. Gross, but SO worth it. I sort of held the shoes gently against the belt and shuffled them back and forth, keeping an eye on the angle, but the sander did most of the work. I wouldn’t have been able to finish these shoes without the sander because I’m not strong enough to cut through the rubber unit soles with my utility knife, so this project truly was brought to you by Black and Decker (I’m not sponsored, but boy howdy that’d be fun!).

I did scuff the inner toe of one of the shoes with the sander - deep enough to go through the patent and expose the white leather underneath - which, given my fragile mental state over the last few months really did a number on me for a while, until I came up with a plan to fix it. I’m going to run over it with some matching pink nail polish and maybe a bit of acrylic to fill the gap, and I think it - like the melted crease at the ankle - won’t be too noticeable as long as viewers remain at a respectable distance. Besides, it’s a story - and a lesson on protecting my uppers better next time.
I really struggled to find laces long enough in a not-boring colour (though black at least matches the soles) - until a friend on Instagram suggested I try bias tape, at least as an interim solution until I find better laces. I made a strip of bias tape out of a colourful fat quarter of quilting cotton, folded it in on itself, and stitched down both edges. It’s a tri-fold bias tape so there is one exposed raw edge which I wouldn’t do next time, but overall this option is way better than anything else I’ve found, so I’m keeping them until they wear out! I think the colourful laces are the perfect frosting on this absolutely nutty pair of shoes!
Next time, I’m thinking…. I might make those platforms even taller!