
I know what you're thinking. She's gone off the deep end. She's totally, completely, and utterly mad. Bonkers, even. Why did she make that wild thing? Does she really think she'll wear it?

It just kind of happened.
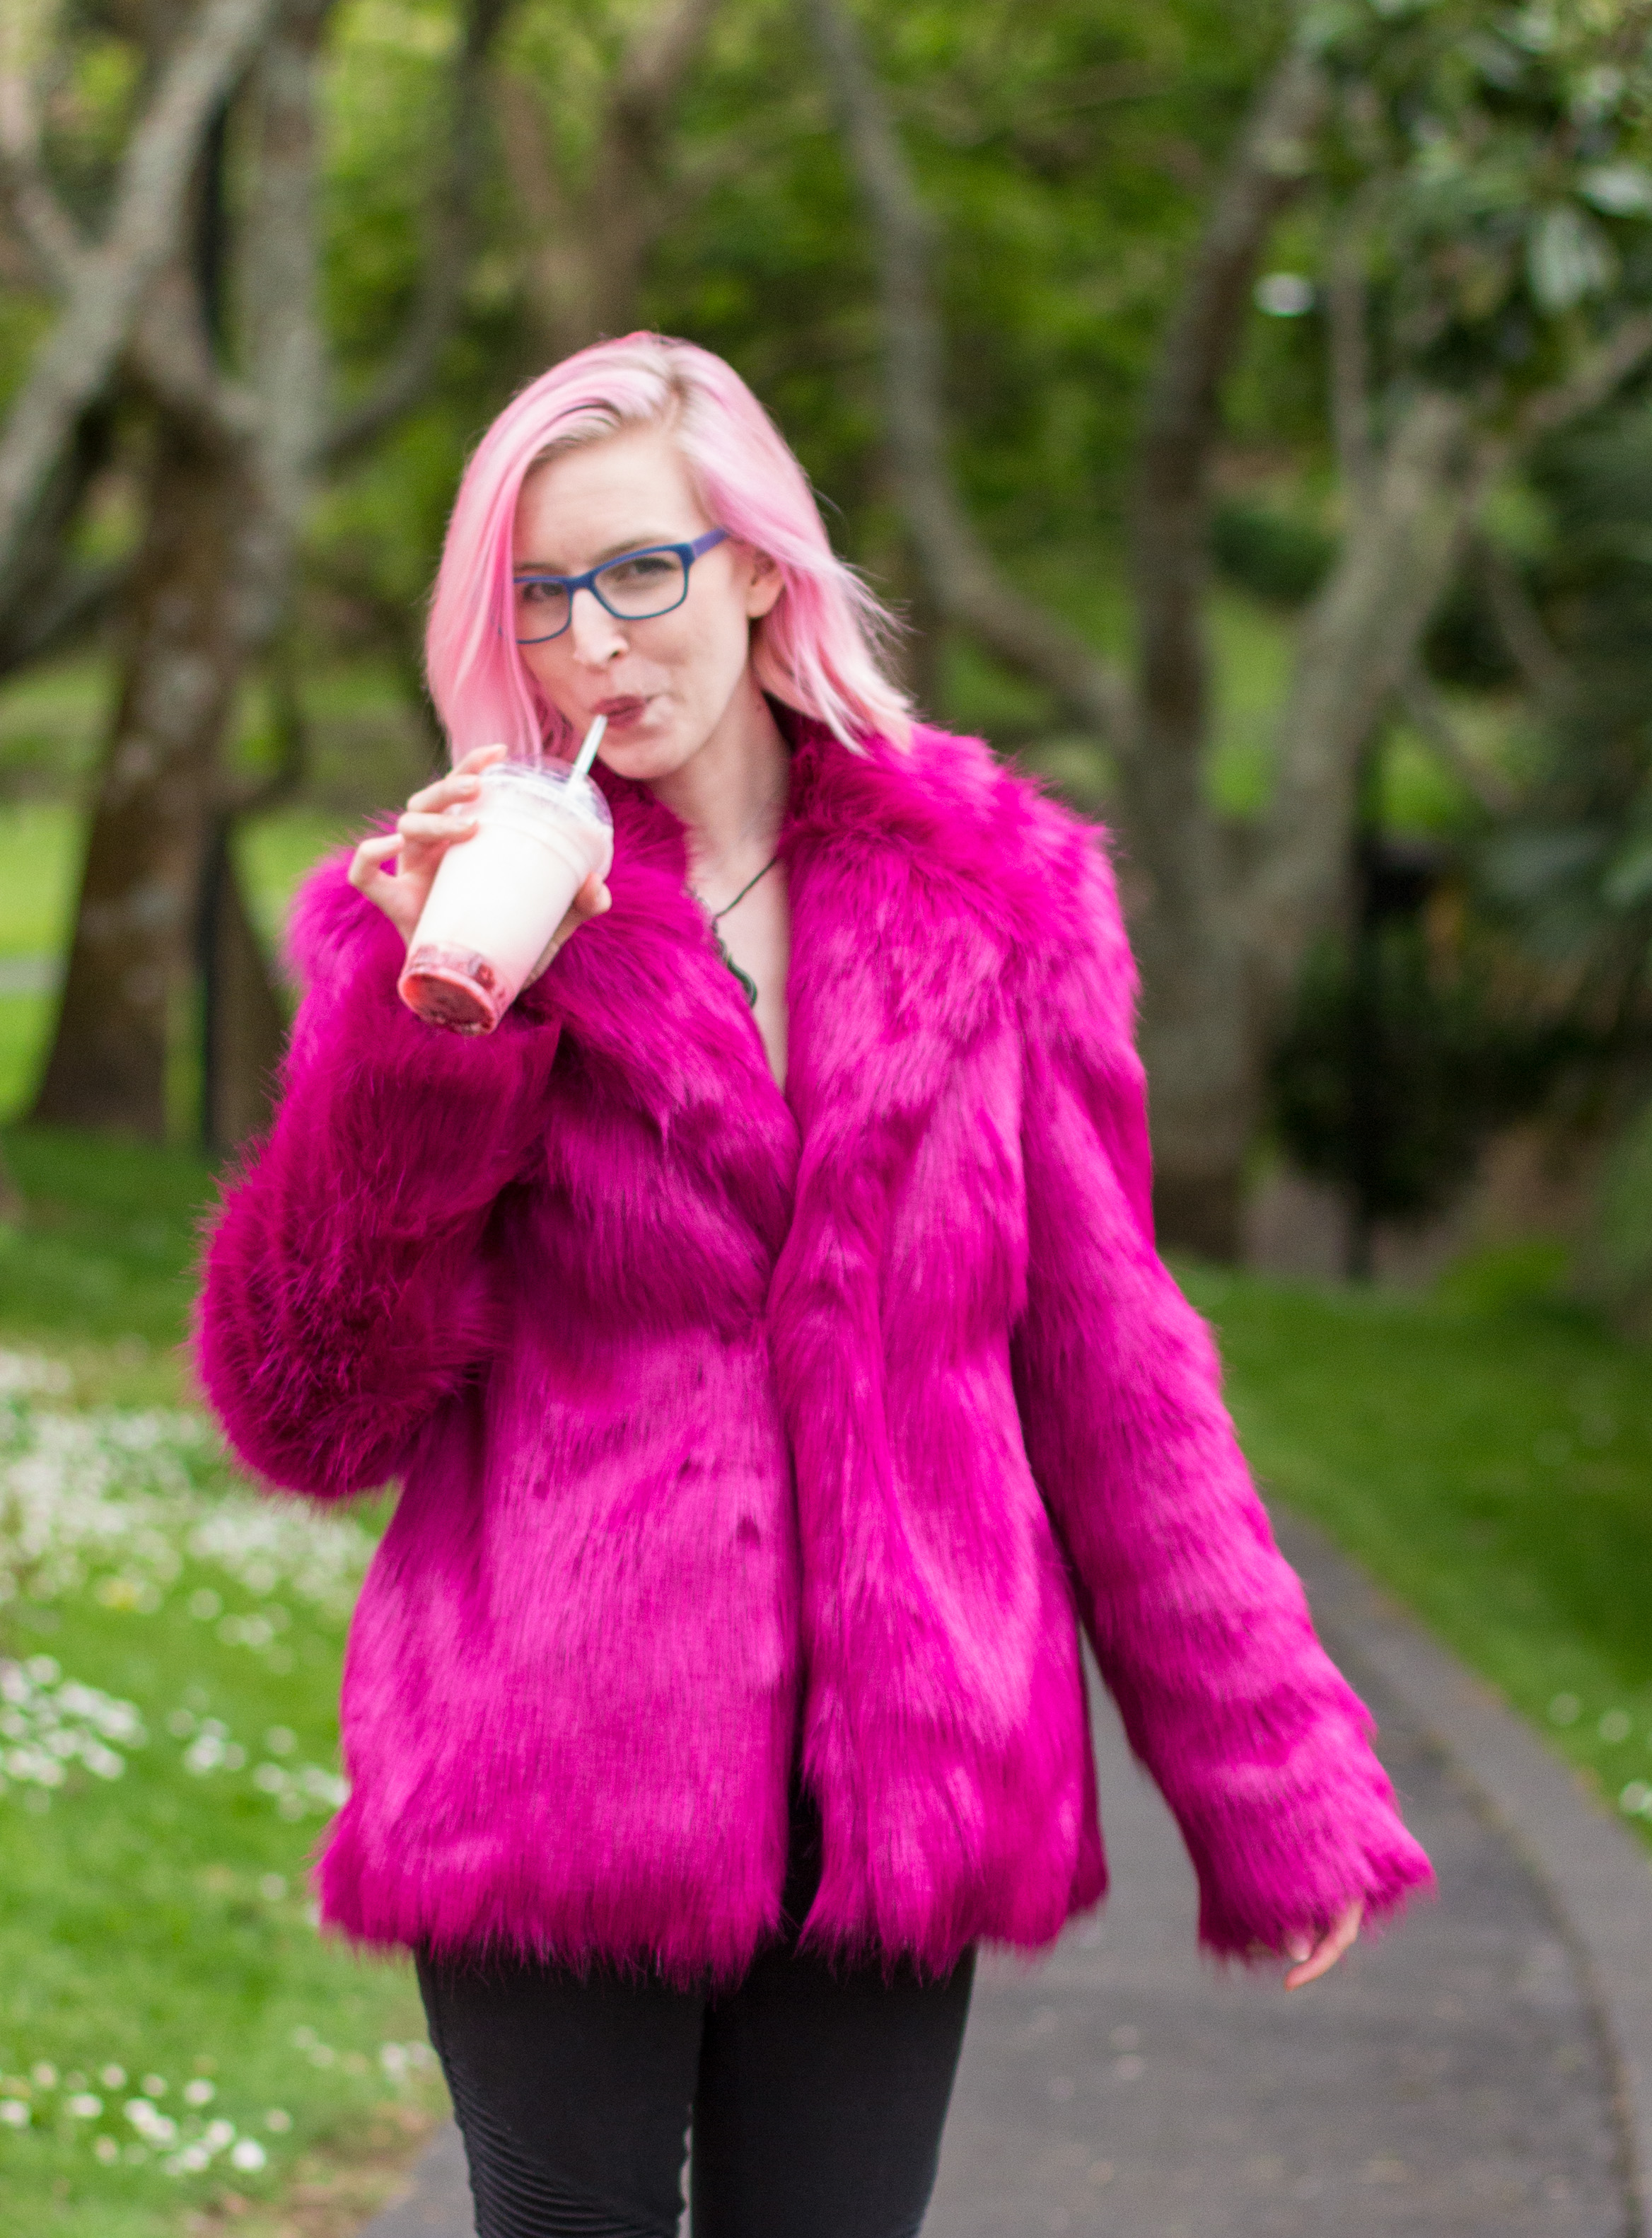
Blog, meet Wild Thing.
The scene: It was the end of January - the hottest part of a New Zealand summer. I was at Geoff's Emporium in Mt Eden, looking for something inexpensive to make reusable shopping bags with, as our local shop was going plastic free - and something sparkled in the corner of my eye. I have a kind of radar for this color; I can pick it out of a crowded room faster than an introvert can find the exits (though that is also me). There it was - a huge, thick, fluffy roll of hot pink long haired fur, just chilling out next to the upholstery fabrics. I stroked it for a full three minutes, contemplating its purpose in life, and even posted a quick photo of it in my Instagram stories before leaving with the supplies I'd come for.

A week later, I was still thinking about the fur. I was still fairly convinced that I wouldn't buy it (a hot pink faux fur coat just wouldn't be practical! It was too hot outside to even consider pants, let alone a coat!) but I needed some buttons to finish off a project so I went back to Geoff's Emporium. While I was there, I went over to 'visit' the fur. (this, dear reader, is the point at which we can all recognize that I was sunk. The matter had been decided, unbeknownst to me.) I was shocked to realize that my (now precious) roll of fur was much smaller than I'd seen it last time! A sense of urgency was quickly established, and I decided that there was no more important thing in my life right at that moment than taking home enough fur to make the coat of my (newly realized) dreams. I took it up to the counter, asked for 2 metres, and she gave me the rest of the roll at about 2.6 for no extra charge. Even though it’s nearly 10 months later now, I can still remember the look on her face when I told her I was going to make a coat with it.

I tried to sort of hide the purchase from Jon, but Lill spilled the beans on Instagram (she'd taken that picture of me clinging to the roll for dear life, stroking it gleefully) and besides, there's really no hiding that big of a hot pink elephant in our house. He didn't understand, but I think also at this point he knows better than to ask questions he doesn't want to hear the answer to.
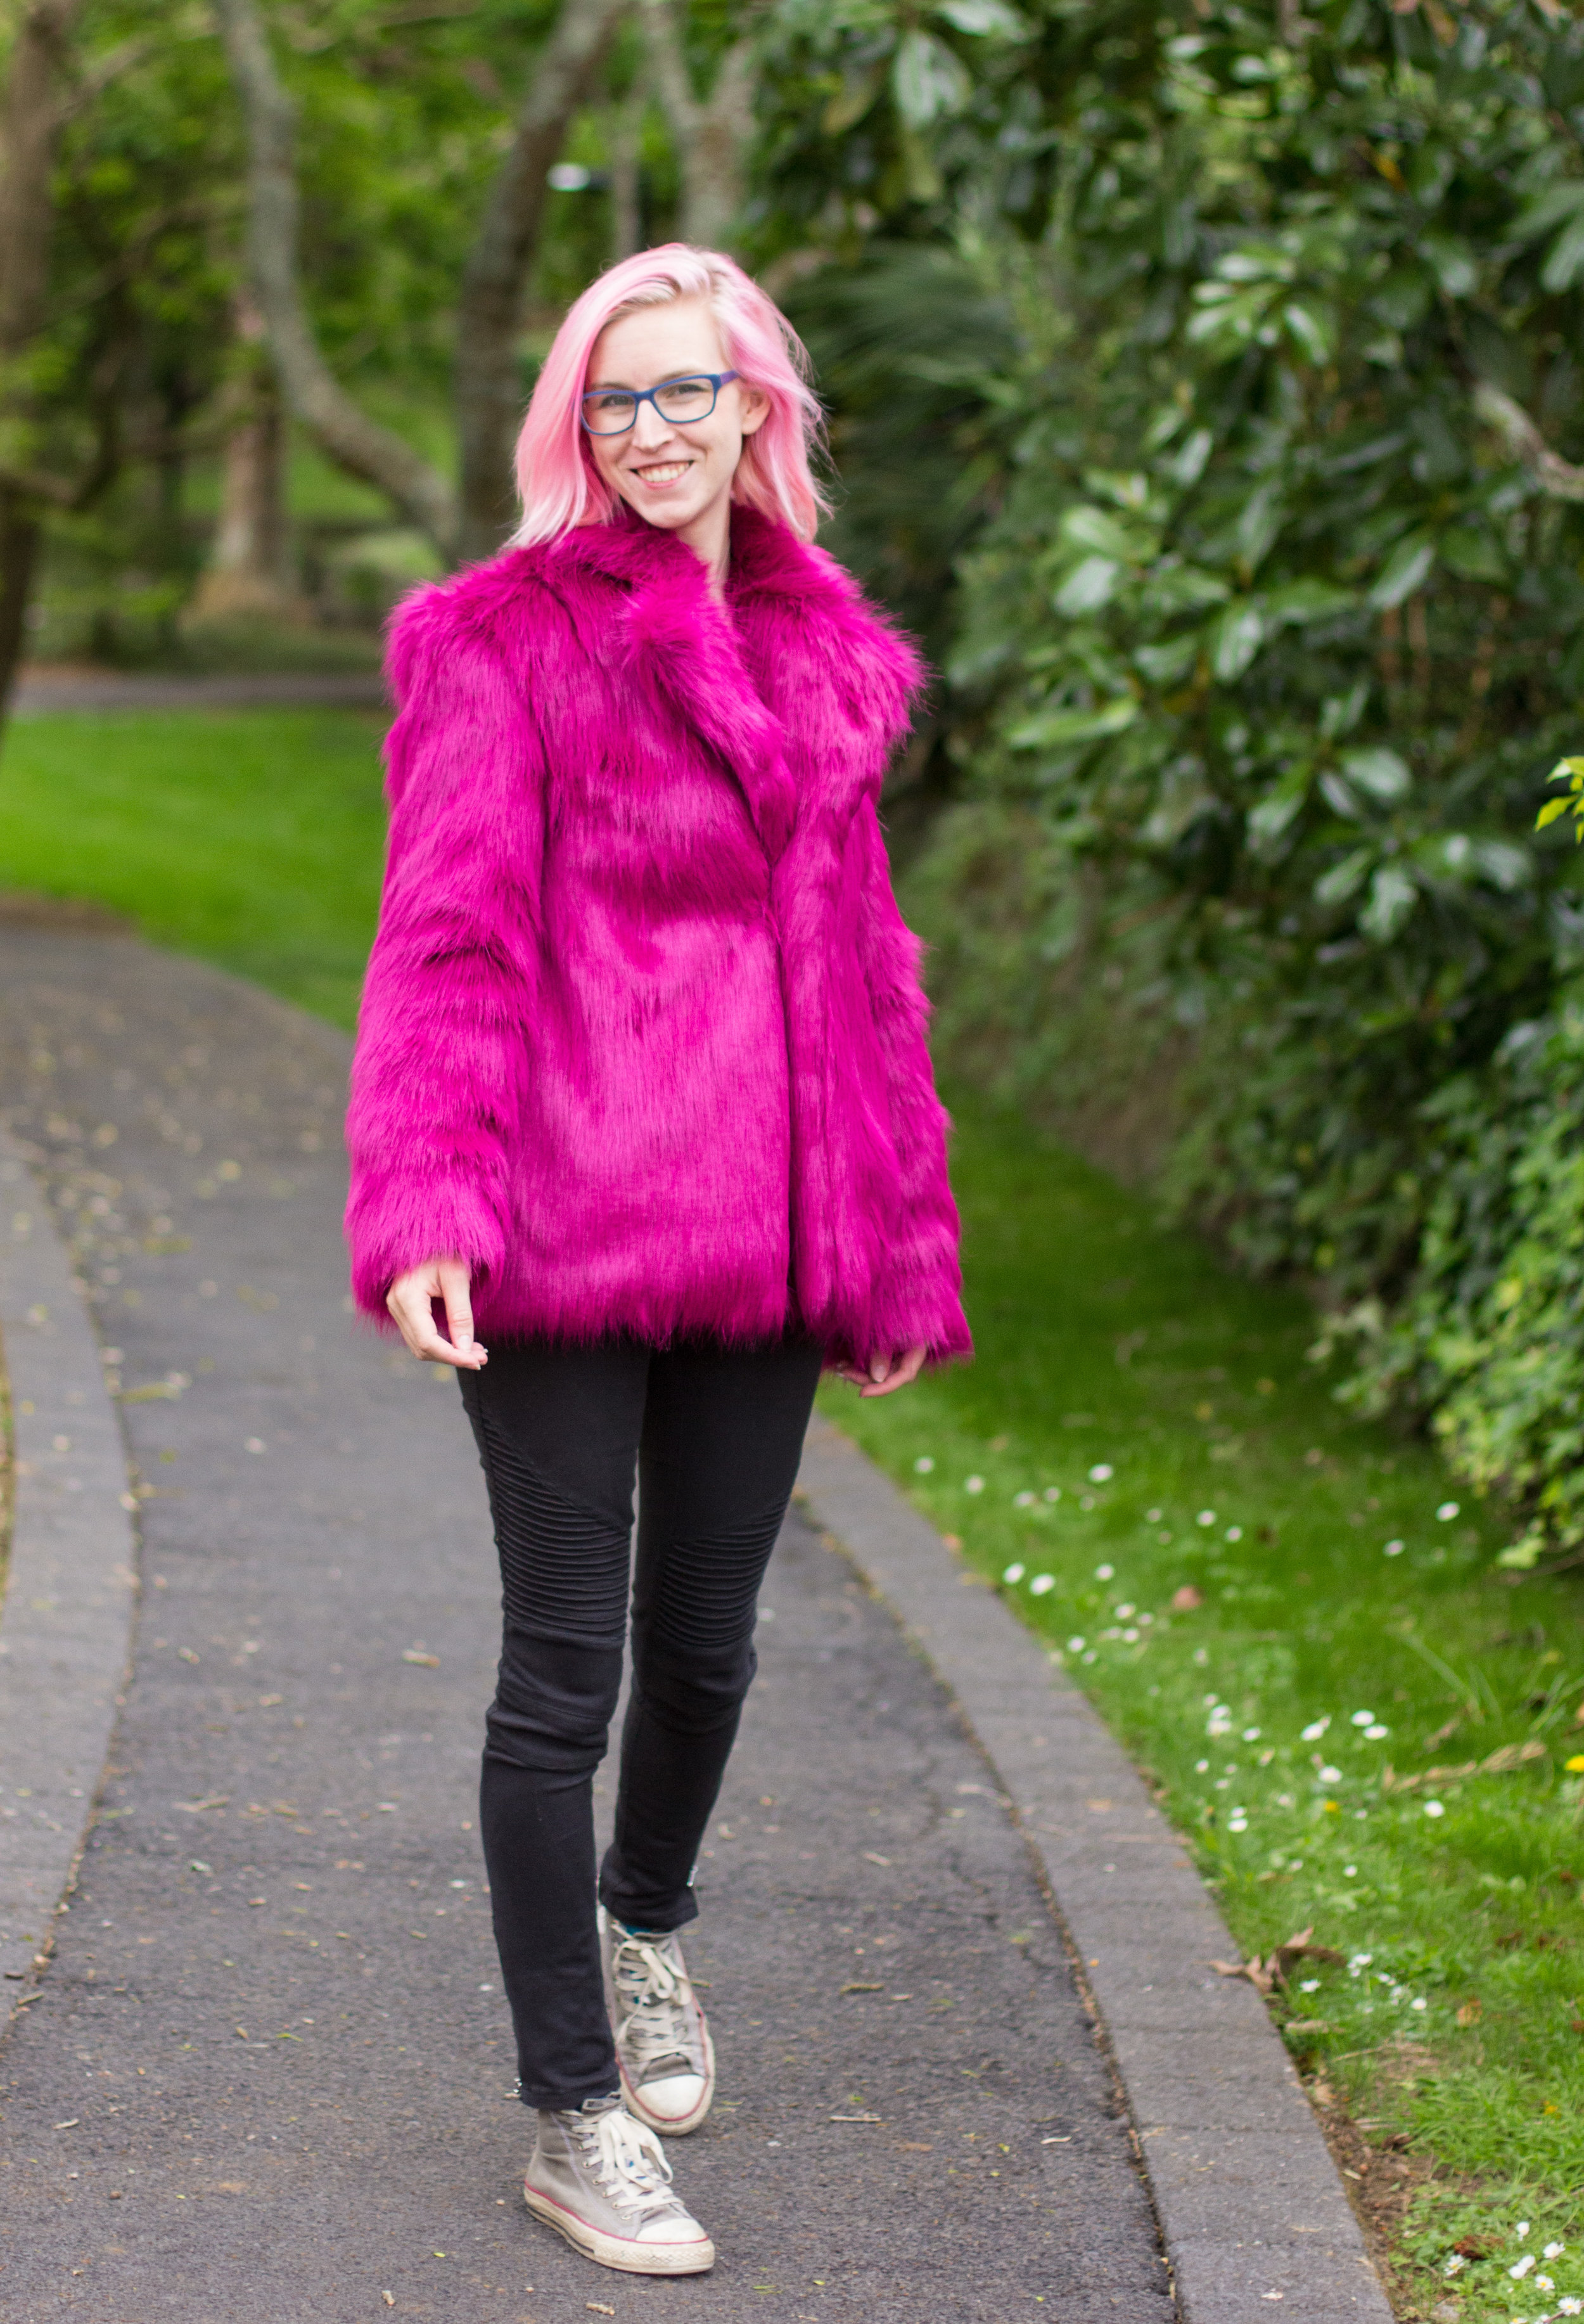
Fast forward several months - I'd been on-and-off thinking about my future coat. I was hung up on the lapels - part of me didn't want the style to be too overwhelming and another part of me kept saying 'but it's a hot pink faux fur coat. it's never not going to be overwhelming' so I was a bit stuck. Pinterest had a distracting selection of lovely looking longhaired coats (that constantly wanted to autocorrect to 'longhaired cats') both with and without lapels and collars, so that wasn't helpful. Eventually, I decided I'd better stick to my guns and go all-out with a collar I could pop tall enough to cover my neck. I had a suspicion that a wide lapel would sort of blend in with the rest of the fur but still break up the expanse of the chest, so I went forth and drafted my pattern.

If you believe it, this pattern is based on the draft I used for my collared shirt draft. Modified drastically of course, but the building blocks are there. I raised the shoulder slope by 1cm, dropped the armhole by 2cm, added a total of 4cm to the side seam (2cm each to front and back), eliminated the waist dart, created a large, shaped shoulder dart to keep the thing firmly planted, shrunk the bust dart to 1", and drafted a massive 4.5" collar and a lapel straight outta the 80's. I made a quick muslin to check everything out, and then decided to spread the hip area out by a further 4" (this is what happens when you grow up imperial and live in metric. I draft in both inches and centimeters now. Sorry.)

Then, I drew up a new sleeve, fussed with the ease a bit (easing a faux fur sleeve is exactly as fun as it sounds, but still important because a coat's sleeve cap needs a nice rolled head, even if it is disguised under fur), drafted some facings and linings, and got to cutting!
People tell you that faux fur gets everywhere, but I don't think I really understood what that meant at first. I figured I'd be sweeping little tufts of it off the floor after I finished cutting - that I'd find it in my sewing machine when I cleaned it out, or that the place where I keep my cut pieces would need a bit of a vacuum - and this has all been true, but there's a catch. It's pretty easy to keep large clumps of fur at bay by cutting only through the fabric backing rather than the fur itself, but inevitably a few pieces escape here and there.

Instead of large clumps, it would be a single strand here and there. Often, they were easily mistaken for my own hairs, which was probably for the best. The first one, I found in my tissue after I sneezed. Then, Jon found one in his fruit salad, and another stuck to the cling film as he wrapped his sandwich for lunch. I found one stuck to my keyboard, and another had made its way into the bathroom and stuck itself to the sink basin. There were a few on the walls of the shower as well. I fished one out of my breakfast smoothie, and a few found themselves stuck to my computer screen. I'm getting that strands of faux fur are a bit like sequins and glitter. I may never be rid of the remnants of this coat. As I worked, I just focused on getting all of my raw edges enclosed as quickly as possible - but a fairly complicated project requiring a fair bit of hand sewing meant that those raw edges were definitely exposed for a while.
So- cutting. I won't be the first to tell you to only cut the backing of the fur - that keeps cut furry ends to a minimum, and also helps things look more seamless, with the least amount of fur disruption. Some posts I've seen suggest trimming fur from the seam allowances as well but I didn't like that idea because a) shaving Wild Thing sounded like an awful job, and b) I was worried it would disrupt the 'fur flow' near the seams. The trade off, of course, is super bulky seams that your machine has to get through, but with a leather needle and a bit of coaxing I eventually managed to make it work. It was suggested after I’d done all my cutting (through the backing with only the tips of a pair of sharp shears) that perhaps a scalpel or other knife would be a good way to go, and I’d like to try that but I haven’t done it yet. It does make sense in theory.

I knew I wouldn't be able to iron the fur at all, which is kind of critical for a coat - especially one with lapels like the ones I was hoping to achieve. Instead of pressing, I had to aggressively tailor the insides to tame the beast, as it were. I used hair canvas chest shields on both sides to give the shoulders a good structure, and padstitched the lapels to help them keep their shape. I also underlined Wild Thing with a fairly inexpensive but still mostly-wool coating, because I thought it would help the fabric behave more predictably, but also because I wanted my giant fur coat to actually be as warm as it looked. As in - borderline too warm to actually wear in this climate. There are side seam pockets which are catch-stitched to the coat front, and all of the seam allowances are catch stitched down to keep them flat against the body. I spent hours and hours just hand stitching, but I'm so pleased at how well my efforts paid off! It has great structure and looks like a proper fur coat, rather than a giant shapeless, hairy sack. Speaking of shapeless, do you want to see those darts up close?

I didn't come across a lot of information on sewing darts in faux fur - I can't imagine it's a skill that a lot of people need to use regularly! Originally I was going to completely eliminate all darts from the draft, but I realized that a few were going to be critical for the shape I was trying to achieve. After some thought, I decided that the best way to make the darts would be to cut them out with no seam allowance, butt the two 'legs' of the dart together, and whip stitch them closed. I did the same thing to the underlining and hair canvas as well, which provides stability to the cut edges. I was feeling pretty nervous about cutting giant slices out of my coat front pieces, but thankfully the darts came together beautifully, and the shape of the coat front worked out really well!

I ended up easing and basting the sleeve caps in by hand because that was the only thing that would keep all those thick layers of fur and wool under control - I then went and machine stitched the seams after I was sure the sleeves were set correctly. The whole process took a solid couple of hours, but I couldn't be happier with how the sleeves turned out! If you look carefully through the fur, you can see the little roll of the sleeve cap, and that just makes me so happy!

After the sleeves, the collar went on. Instead of using fur for both pieces, I decided to use my lining silk for the undercollar. My decision was purely superficial - I wanted that little flash of something different when I popped the collar up - but man am I glad I didn't go for fur on fur! The neck area is aggressively snug (I really don't have a better way to explain it than like a cat that thinks it’s a boa constrictor) already, and the collar has to be rolled down into place quite forcefully. I'm pretty certain that having the bulk of a second layer of fur would have made it impossible to roll the collar down at all. I decided to underline the silk with lightweight hair canvas because I was worried it would be distorted by the fur, and I think all of those fairly uninformed decisions came together quite nicely in this case.

All of the hand tailoring work with this project has really made me want to have a go at a proper woolen coat with a full understructure. My vintage vogue coat shared a lot of the same techniques, but it's a nontraditional coat shape so some of the hand tailoring techniques (like padstitching the lapels, for example) didn't really apply. I suppose I'll have to put a woolen winter coat on my list for next winter. It's already dangerously approaching summer, so I fear my precious Wild Thing will only get a few more wears before it's too hot for fur!
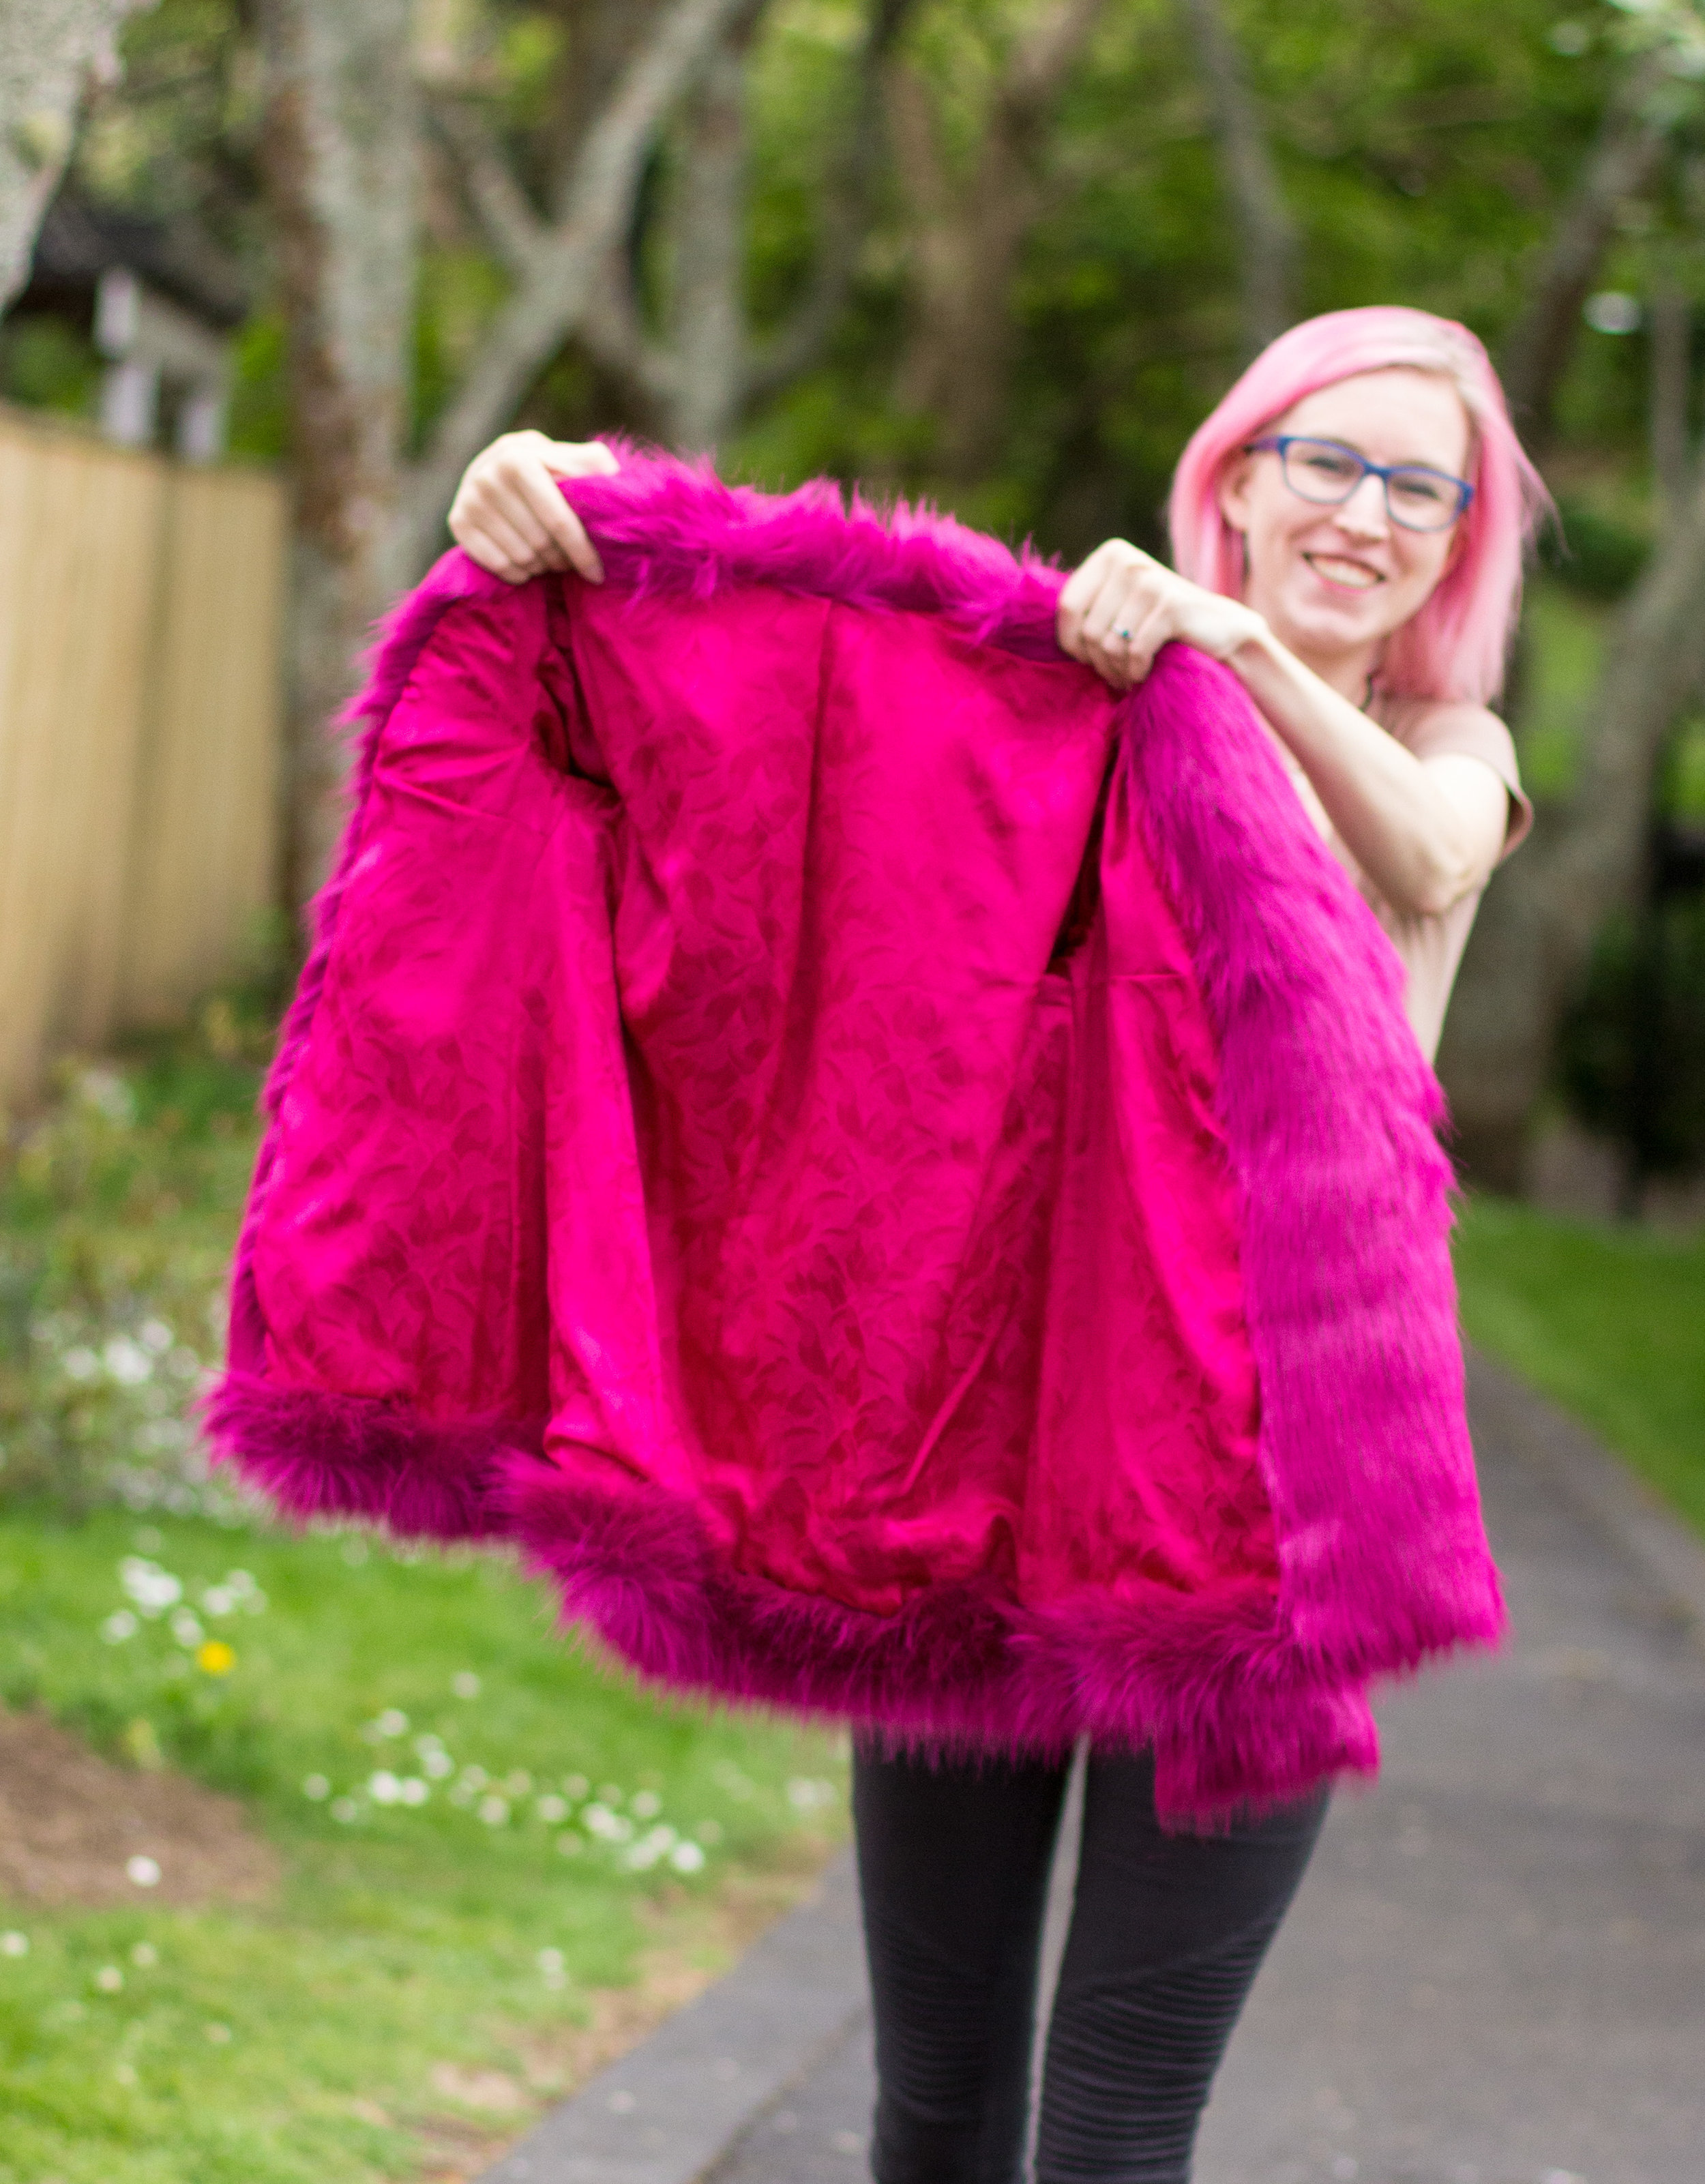
The lining was the last to go in. It's hand-stitched (I know, bagging linings is a lot more popular and a lot quicker these days - but hear me out.) because I wanted to catch-stitch the hems to the inside of the coat. The logic here is that this will keep them from pulling down on the lining, which is particularly important given that the very dense fur could very easily tug on the silk enough to do a bit of damage if I wasn't careful in the process of taking the coat off. I sewed the lining in by hand which took a few hours but the result is exactly as I’d hoped. You just can’t beat the level of control and accuracy you can achieve with hand sewing.
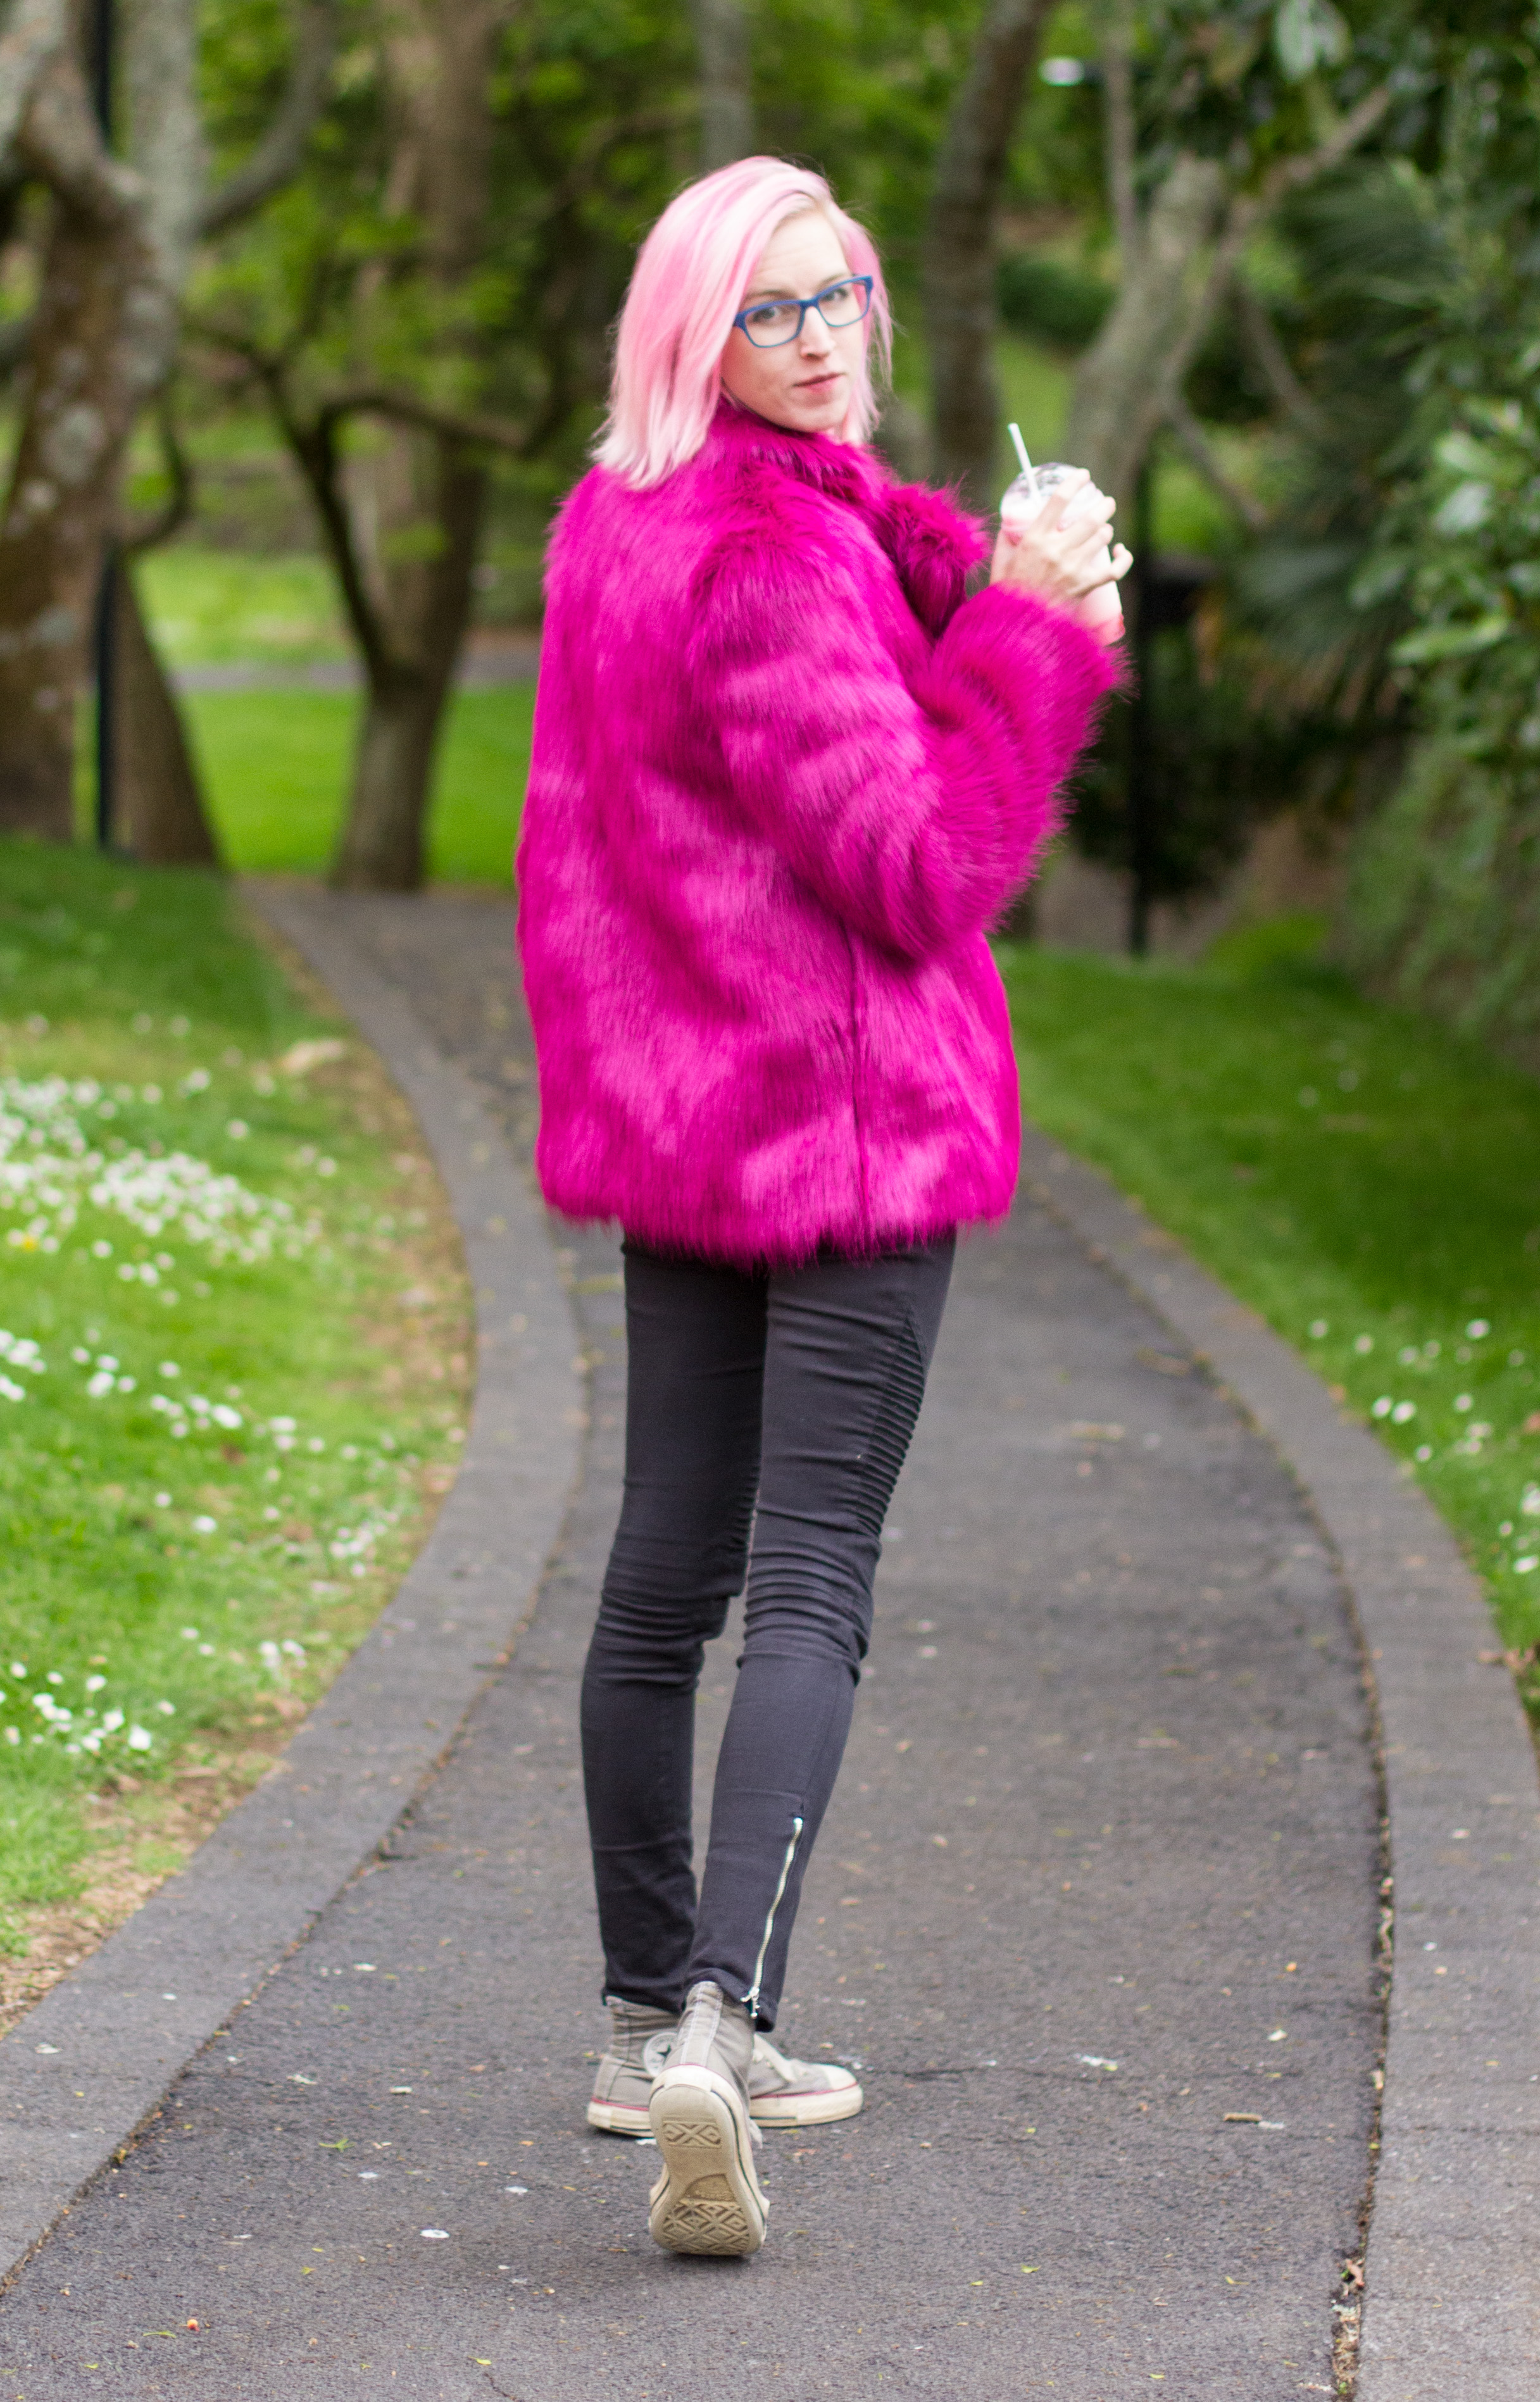
So. Final thoughts? SO WORTH IT. So good. This lady turns heads every time I go out with her. She has been whistled at, honked at, complimented, stared at, and petted by strangers - all in the same night, and also on various other occasions. I have learned that I have to be in the mood for human interaction when I wear this coat, but the “thanks, I made it!’ response is still pretty priceless, so I don’t mind. Jon, bless him, is insisting that he won’t be seen in public with me in ‘that thing’ but I feel like it’s only a matter of weeks before we wear him down. I say we, on account of the coat being her own entity.

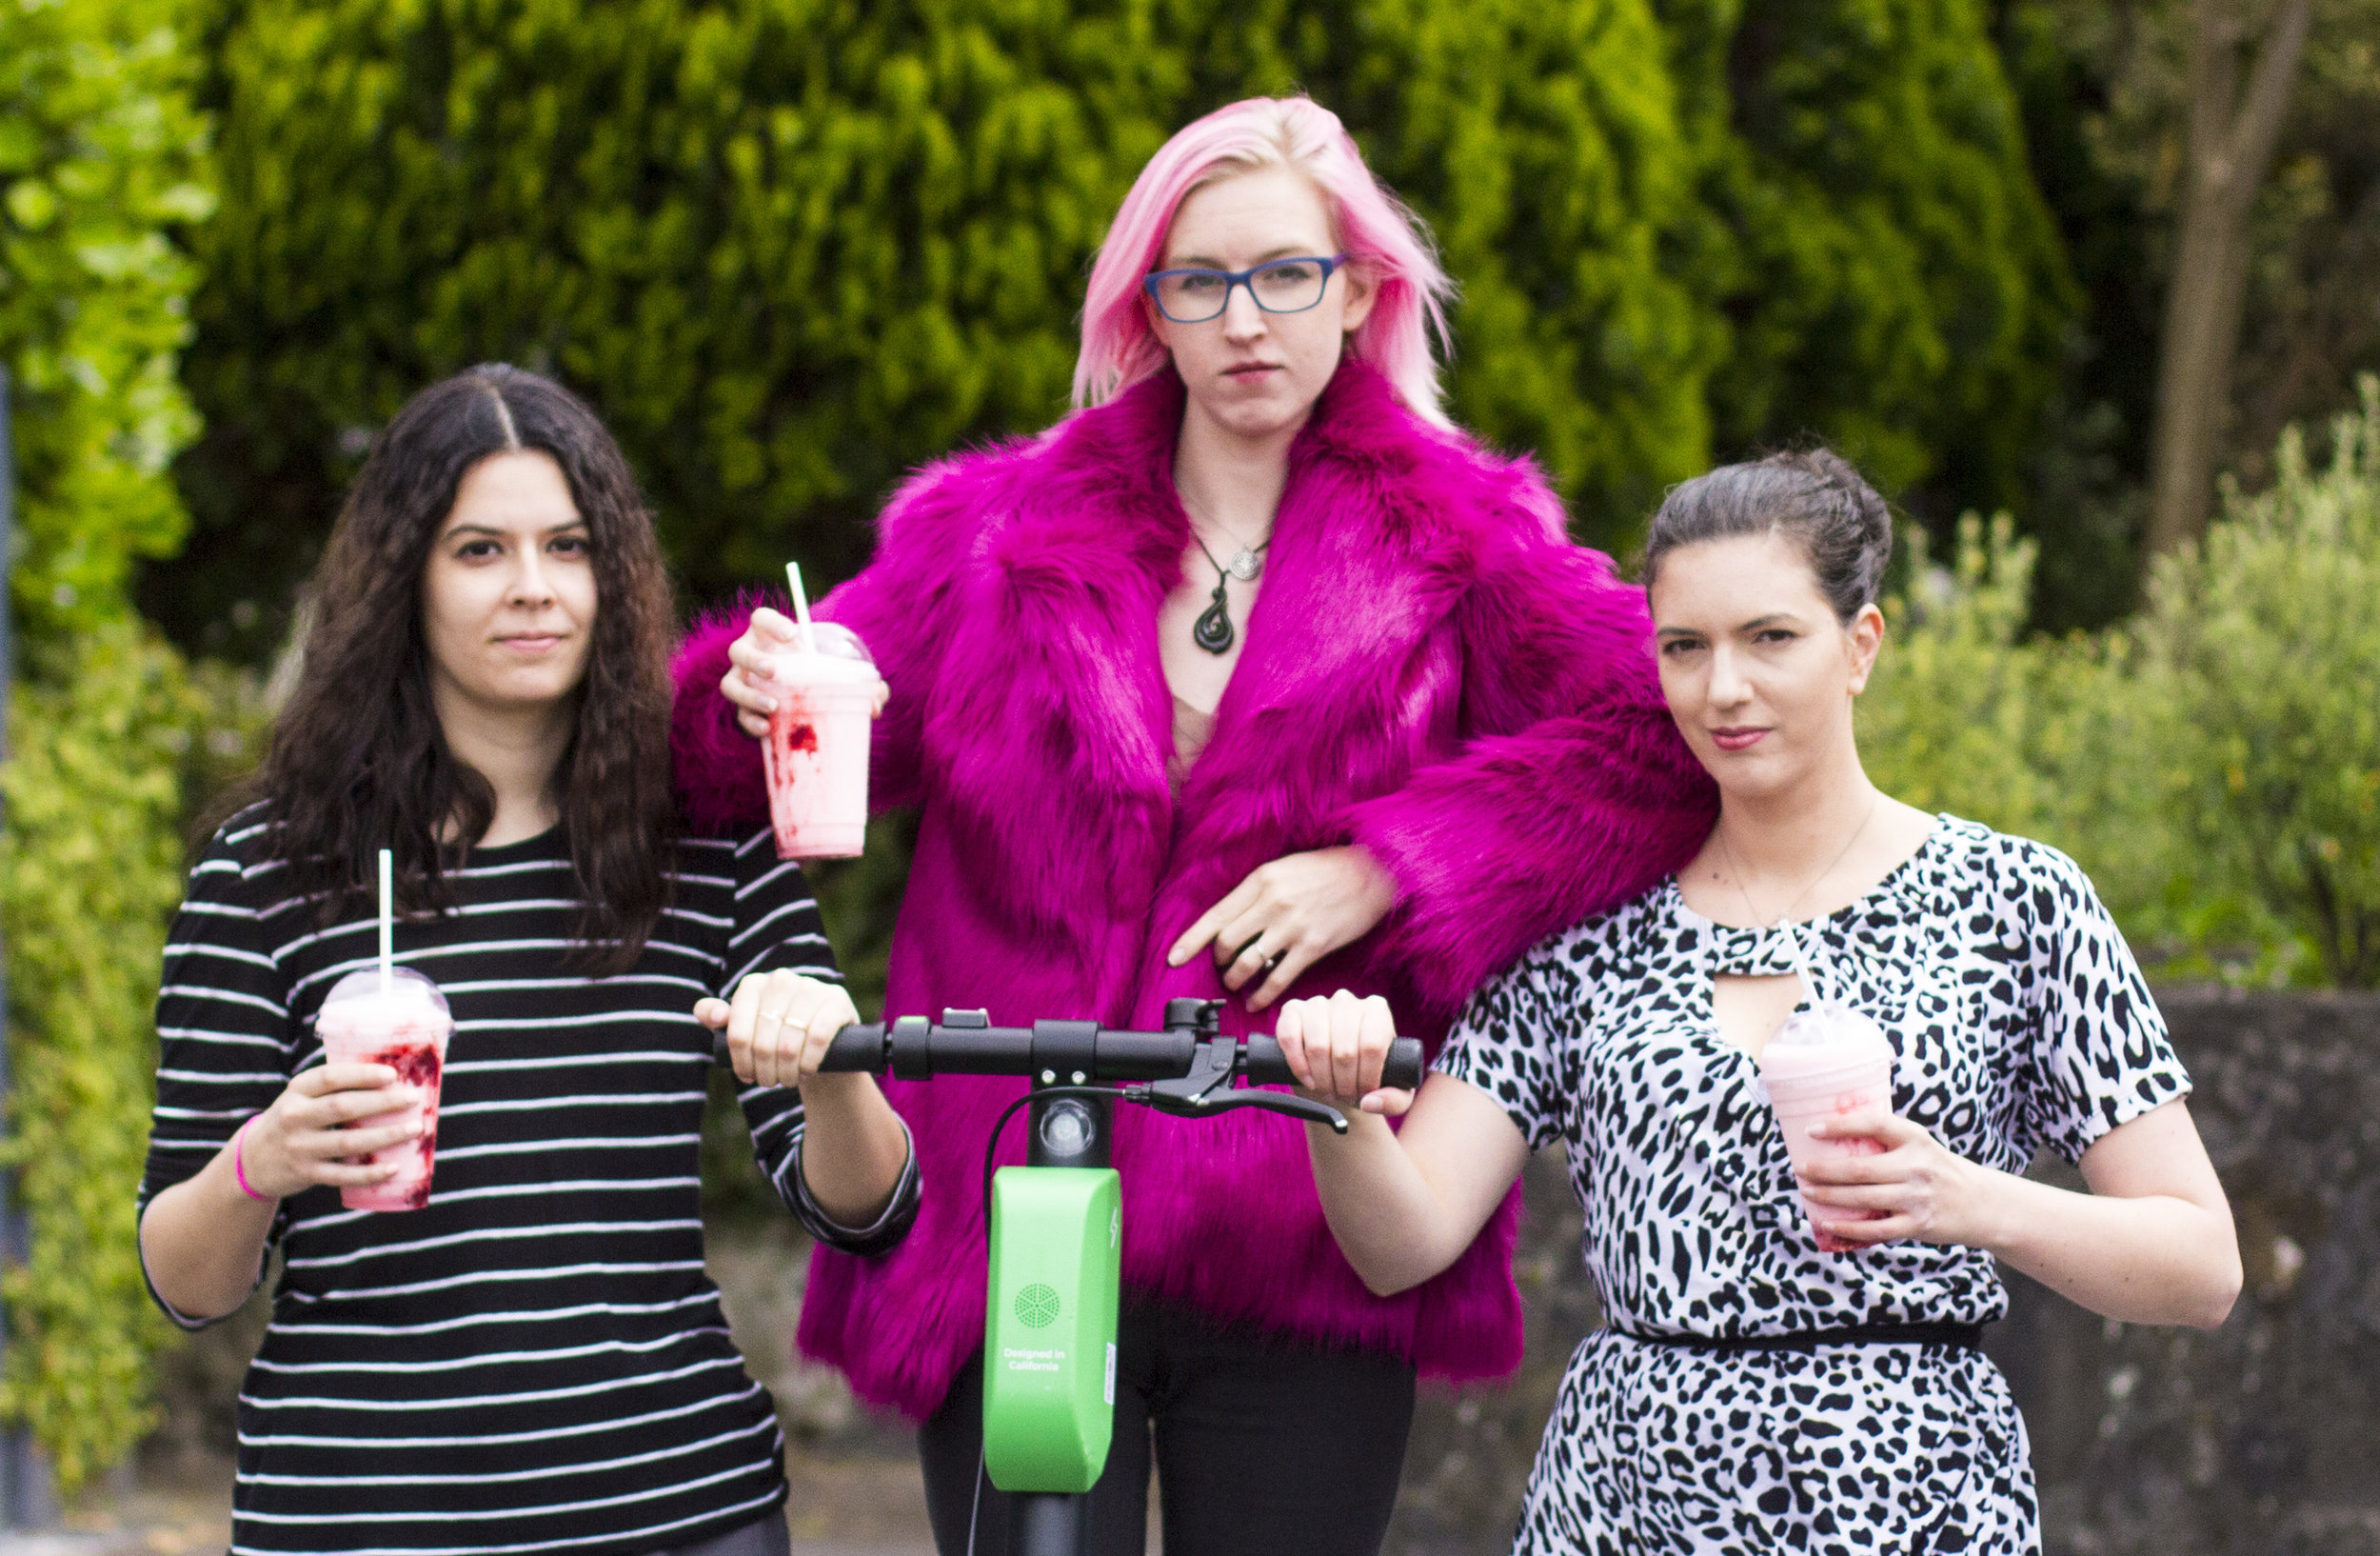
I want to give Janie, Jay, and Robiyne a quick shoutout for helping me give Pink Thing a photoshoot deserving of her glory, we had such an entertaining morning! I feel like I’ve been signing off all my posts the same way lately, but I really am making progress on the wedding dress! I’ll catch you up soon, promise.