
(Why yes, I did consult a '70's slang phrases' website for the title of this post. Sorry, Dad.)
Listen, guys. I did Wardrobe Architect at the beginning of this year, came up with my capsule wardrobe, and it was a very valuable experience that left me with a very high percentage of clothes I do actually wear - but if there's one thing I've learned as a sewist, it's that if your little creative brain gets 'hold of an idea that you just can't shake, there's no more valuable thing you can do than listen to it. No matter how wild it seems.

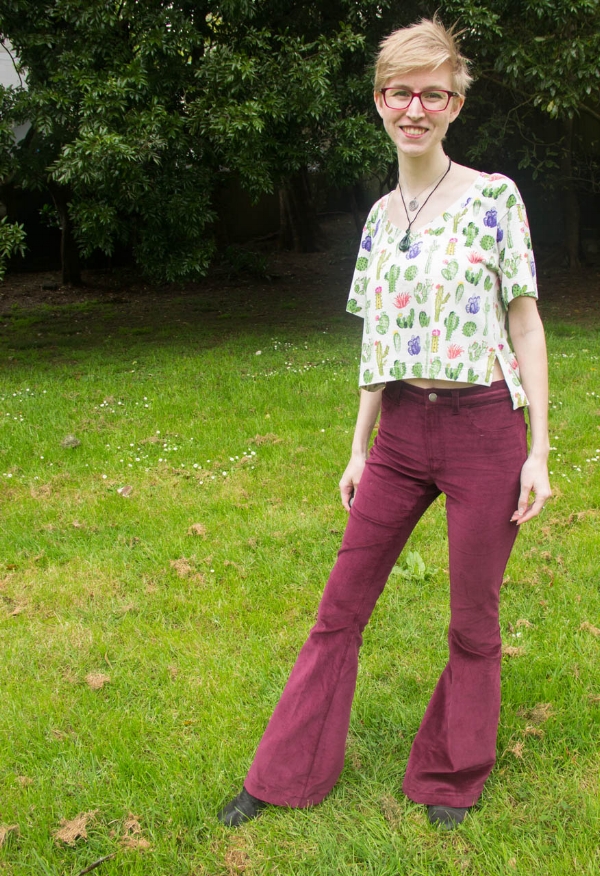
Here's how it happened. I was at Draper's, buying very practical denim, and I saw it. Beautiful, soft, merlot-cranberry-plum-cabernet-maroon-burgundy colored corduroy that lept up and practically begged to be a pair of very impractical high waisted Ginger flares. I wasn't really sure if I could justify such an odd pair of pants in my wardrobe, and I didn't buy the fabric - but I spent the whole week thinking about it and eventually decided that if I was still daydreaming about it then the pants probably were, in fact, necessary.
I headed back to Draper's the next weekend, had a lovely chat about how awesome it is to be able to live in different places in the world with the fellow who was working that day, brought home the corduroy, and daydreamed for another week before I had a chance to prewash it and start sewing. To be fair, that gave me a chance to decide what color topstitching I wanted to do (gnarly!), work out a pocket stitching design (nifty!), and wear my denim pair for an analysis day to decide what (if any) changes I wanted to make for the sister pair. (Slightly narrower upper leg. Fix twist at inseam. Better zipper, flatter pull. Narrower hem treatment. Idea for adjusted waistband. Rivets...optional???).
The fabric, if you've always wanted to be dressed in velvety soft cotton/elastane corduroy that looks like it's been dyed with the blood of your enemies - is called "Theo" and as of the time of this post's publishing, there's still some left. It's 98% Cotton, 2% Elastane (the perfect Ginger Jeans recipe!) and it's 145cm wide, which means my six foot self was able to get an entire pair of flared pants out of 1.8 meters.
I was slightly thwarted by the weather on Saturday (we don't have the luxury of a clothes dryer here. When it rains, the laundry just stays damp) and only had time to cut out my pieces, but having started on Sunday at 12:30 I had all but the hem and pocket placement finished by dinner time, and wrapped them up in the evening with enough time that I could wear them to work on Monday!

It's that time of year again when even on an overcast day, the sun makes my pale self glow like a vampire at a disco...
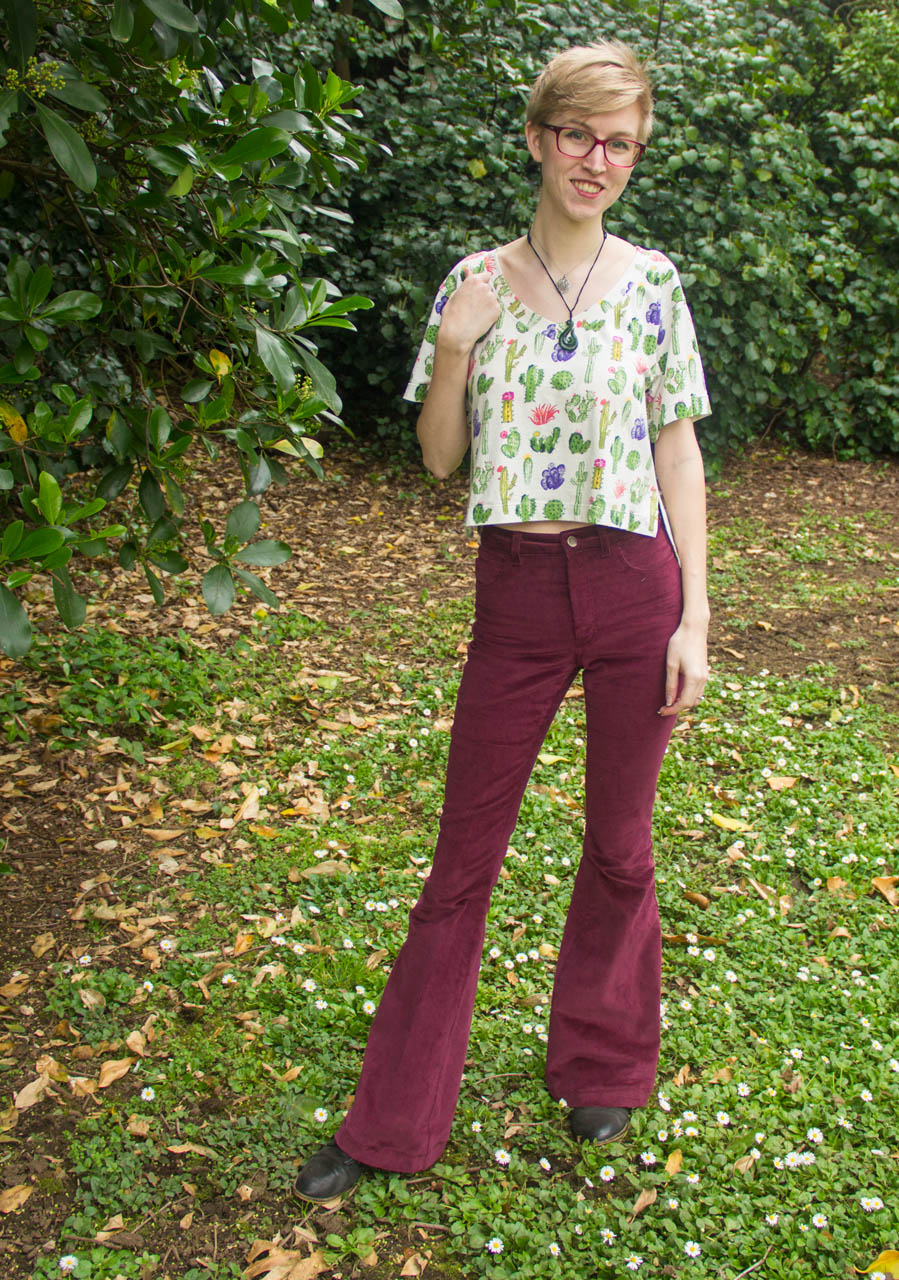
This is my fifth pair of Ginger Jeans, and my second pair using the flare extension. (see the Very Wearable Muslin, the Mid Rise, the Denim Flares, and the Black Moto Skinnies). I only made the first pair of flares because I ended up with extra fabric because of a flaw in the denim I chose, and I wear them as much as (if not more than) is socially acceptable for a slightly out-there pair of pants. That said, and also considering that this deep reddish wine color is one that blends into the rest of my wardrobe pretty seamlessly, I'm pretty sure these are going to be feeling the love far beyond the point at which everyone else has switched to shorts for the summer.
But! As much as we care about my pants-related feelings, I know you want to Know Things about the construction. This version, interestingly, is the first version for which I've felt totally, 100%, completely happy with the fit. The wearable muslin was a fantastic start so nearly all of my changes have been minor - there are only two that I've struggled with over multiple pairs:
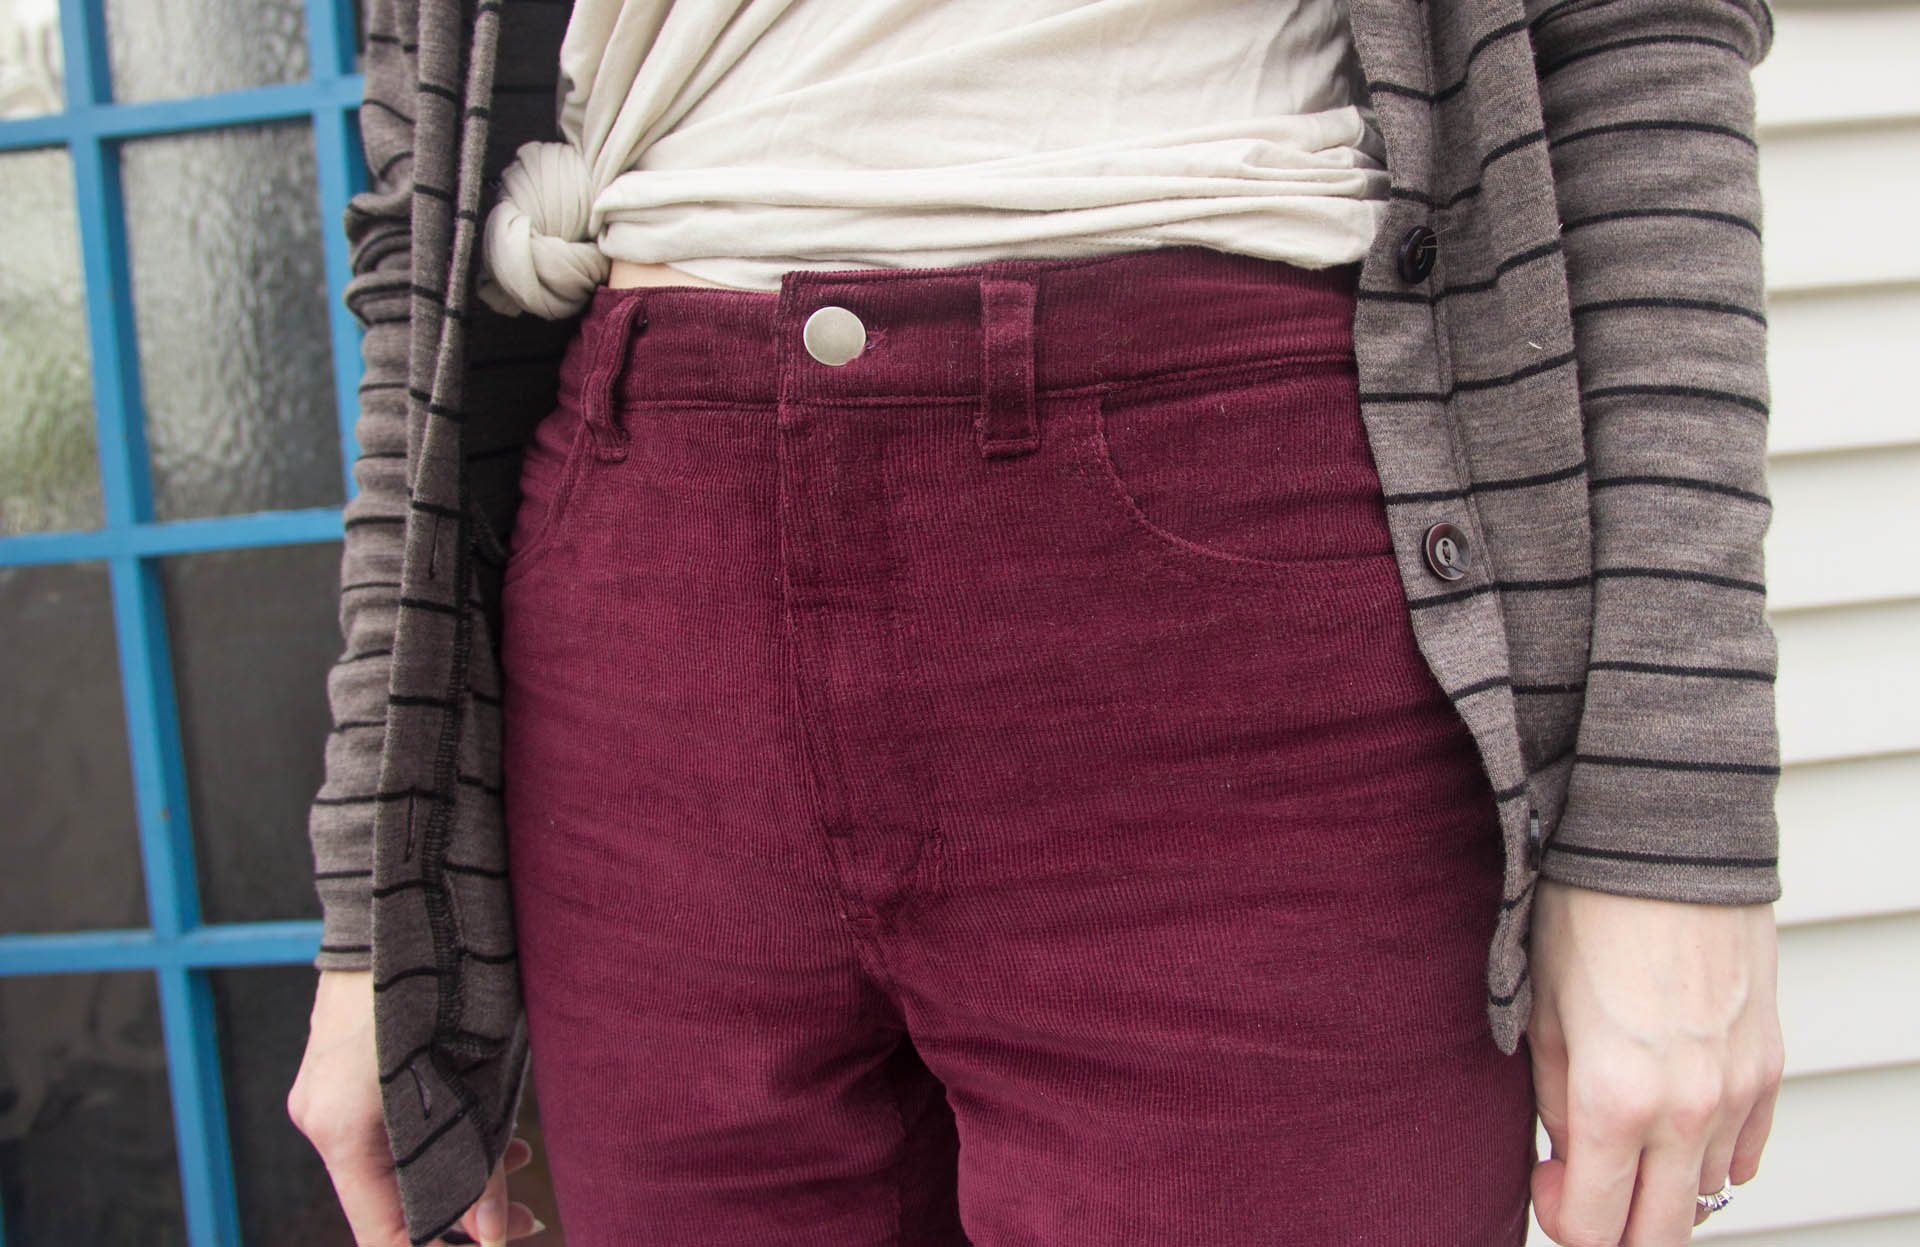
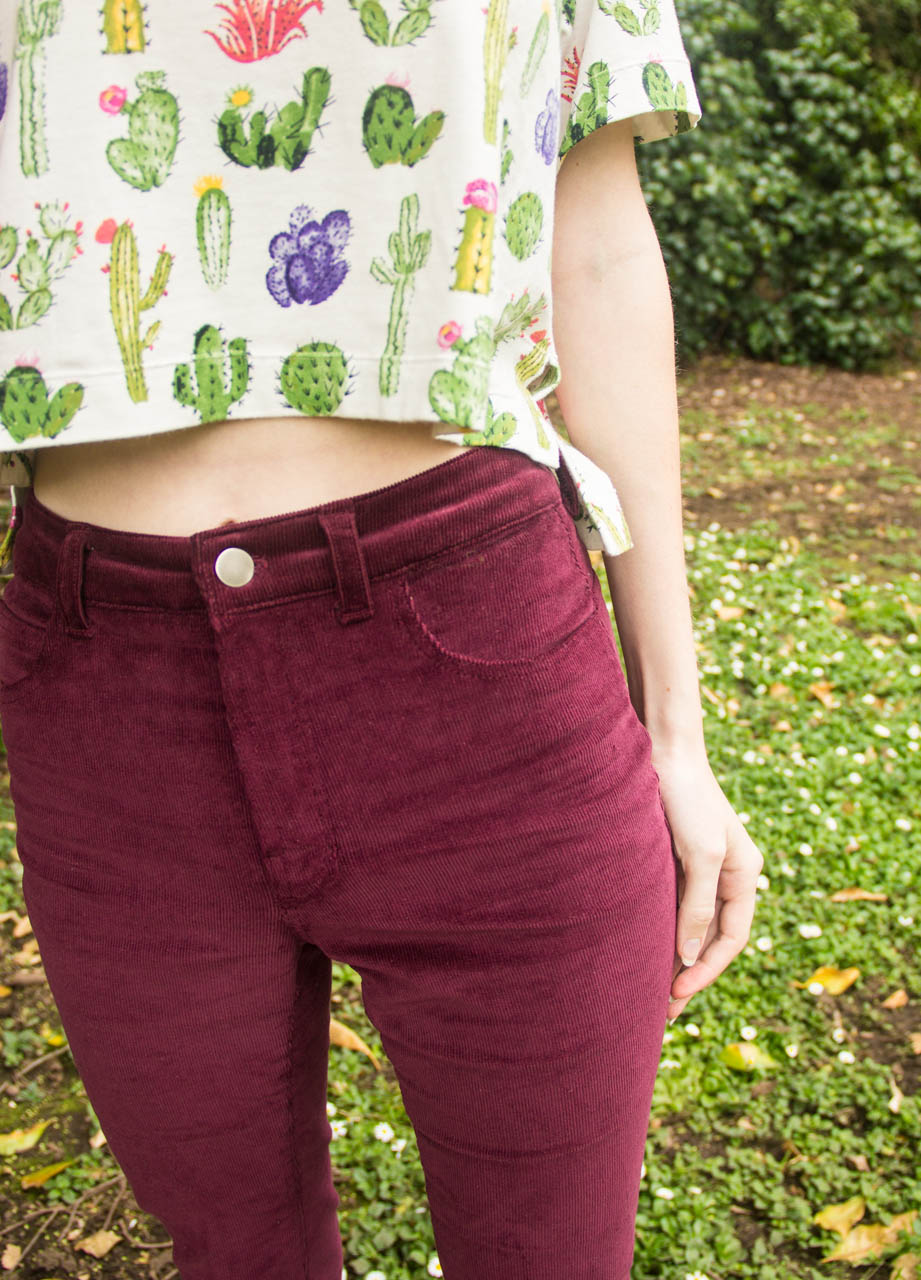
1. Waistband: The Ginger waistband is very near a straight-up rectangle. I don't do well with rectangular waistbands, and I always have to remind myself that every waist is shaped differently when I wonder at the frustrating existence of rectangular waistbands. I redrafted it from the getgo, but this has caused another problem: I cut the waistband with the center back on the fold, and because of the substantial curve, the front part of the waistband ends up on the bias, which causes weird, bubbly stretch problems that are exacerbated when outlined in stable topstitching, as you do with jeans. I tried to fix this on my moto gingers by interfacing the waistband, but that turned the bad thing into a worse thing and there's no give over a part of my body that really, really needs to breathe.
I wasn't sure how to fix this until I had a light-bulb moment on Saturday: a center back waistband seam! Of course! I added a seam allowance to the 'cut on fold' back section of the waistband, and adjusted the grain lines so that the center front was on grain, and the center back was on the bias instead of vice versa. I did not interface the waistband (not making that mistake twice!) - and, as you can see, this has completely fixed my problems. There's no bubbling, the waistband lies flat all the way around, it stretches in tandem with the pants and with my breathing, and it is totally, completely, truly the most beautiful waistband I've ever had the pleasure of constructing. It is the proverbial bee's knees. The cat's pajamas. Even the buttonhole is perfect. Radical, dude! It's so perfect, in fact, that I've put my black moto pair back into the sewing pile so they can have a replacement waistband to match, even though I have to buy a new spool of black topstitching thread and even though it's probably going to take years off my life to unpick all those stitches, which of course have already been graded to within a quarter inch of their lives. Interestingly, the waistband on the Moto Gingers wasn't bothering me nearly as much until I made this pair - now that I know how to fix it, it's suddenly a thing that needs to be fixed.
2. Leg Grain: This is a bit weird, and it took me three pairs of jeans to figure out it was even a problem. My muslin pair was cheap, secondhand denim and I paid exactly zero attention to cutting anything on grain. The inseams, as a result, twist right on around to sit at the center front of my leg by the time they get to my ankle. Aside from being annoying to look at (keeping in mind that nobody has pointed this out to me, so it's very potentially all in my head), it also runs over my knees in a way that makes any sort of leg-bending particularly irritating. That bit's not in my head, at least.
Anyways - I thought it was a problem unique to the denim of unknown origins, so i carried on, carefully trying to line up my grainlines to the pattern on the next two pairs. I batch-cut and sewed them in one weekend which in retrospect was not ideal, because they both also suffer the same leg twist problem. It's hardly noticeable to anyone but me, and definitely less pronounced than the first pair, but also still definitely there. I went back to look at the product photos and none of the legs twist in the skinny jeans on the Closet Case Patterns website, but I do see the same kind of twisting in the sample photos of the flares pattern. In the flares, if I'm looking down at my feet the inseam creeps forward to about one o'clock on my left foot. At this point, I thought surely it was my inability to line up the grainline on my kitchen floor using fabric with such an obvious twill weave, so for my moto pair I drew a parallel grid of lines on-grain (with a ruler) to help guide my cutting. This was a pair of skinny jeans, and the amount of leg twist is negligible. Success! They sit at about two thirty instead of three, so I'm not complaining. That's the skinnies narrowed down to user error, but when I went back to check the grain of my flares I found that mine matched up exactly with the grain on the pattern piece, yet still twisted.
The solution? For the corduroys, I cut the leg pieces with my grain purposefully off. For sake of explanation, let's take the right leg. It's twisting clockwise, from left to right towards the front, so I need to adjust the leg so that it goes back to the left. Makes sense? Corduroy is particularly easy to line up on grain, but I drew a chalk line down one of the channels to make things even easier. Then, I offset my front right leg so that the top of the leg was on the line and the bottom of the leg was 1.5" to the left of the line (that's 1.5" in the direction of the inseam) - that, I reasoned, would help push the inseam back in towards the inner leg. For the back right leg, I drew the line and rotated 1.5" to the right, in the direction of the outer leg - to help pull the inseam in the same direction.

The short version? It worked a treat! My inseams now line up with three and nine o'clock, right down over my ankles just the way they should! That was quite a novel to fix a fairly minor problem in the grand scheme of things, but I'm so happy I did it! It's something that's always bothered me about my early pairs. Groovy, baby!
td;lr: When making flared Gingers, offset the grainlines to account for leg twist.

My other changes were minor: I changed the pocket placement significantly from the suggested pattern placement (but so does everyone else), I increased the rise by 1/2" (this might be related to my waistband success but also it's just proportionally better on my beanpole torso. That half-inch makes a world of difference), and I used the same modified yoke piece I've used in all my other versions. I also kept my 2" increase to the leg length.

(fun fact: I also finished these socks recently! They're Felici from KnitPicks and the name of the self-striping colorway is 'groovy' which is highly appropriate and makes me smile.
Jon's impression upon realizing they were flares was something along the lines of "Ugh, you've done it again - why have you made the Clydesdale pants? Those died their slow, painful death in the 70's, don't try to bring them back" - but a) I dress for no man, and b) he's pretty much stuck with me at this point and I love them, so he, by proxy, must love them as well. He also says that touching corduroy makes his hands itch but I think he's being a nut.

The pocket fabric is leftover from a dress Jon's mom and I drafted and sewed together - there was just enough left for pockets!
The corduroy has a more forgiving stretch than my denim pairs have had, but they've got surprisingly great recovery! They're so soft that putting them on is some kind of happy medium between pajamas and actual people clothes. That, and I've been staring at the beautiful waistband whenever I wear them... Overall, the logical side of me wants to say that this is probably my last pair of flares for a while, but we all know by now to take that with a grain of salt.
Best of all? I can totally wear them to work, but I can also dress them up as weekend wear with my cropped shirts - I don't have a lot of 70's action in my wardrobe at the moment, but I think it's pretty clear that I've overlooked this decade for far too long!
