• blog
  • What Kat's Made
  • The Wedding Dress
  • Tambour Embroidery
    • Workshops and Teaching
    • Shop
    • Beadwork Portfolio
    • Tutorials & Guides
    • About Me
Menu

Kat Makes

Kat Waters
  • blog
  • What Kat's Made
  • The Wedding Dress
  • Tambour Embroidery
  • More
    • Workshops and Teaching
    • Shop
    • Beadwork Portfolio
    • Tutorials & Guides
    • About Me

Blog: Kat Makes

Adventures in Obsession

tambour bead wedding dress

Handmade Wedding Dress Chapter 12: The Dress Meets The Embroidery

April 8, 2019

Up until this point, the dress existed independently of the embroidery. I was even working on them on opposite sides of the city - the embroidery at my house, and the dress at Jon’s parents, where it could stay on the dress form. After completing the skirt, attaching the bodice, and installing the zipper, I had two things left to do: Attach the embroidery, and hem the dress. I’d finished the embroidery by this point, but I had not yet finished telling you about it, so I’ll catch you up and then we can talk about the Biggest Moment so far - attaching the embroidery to the dress!

finished front panel tambour beading

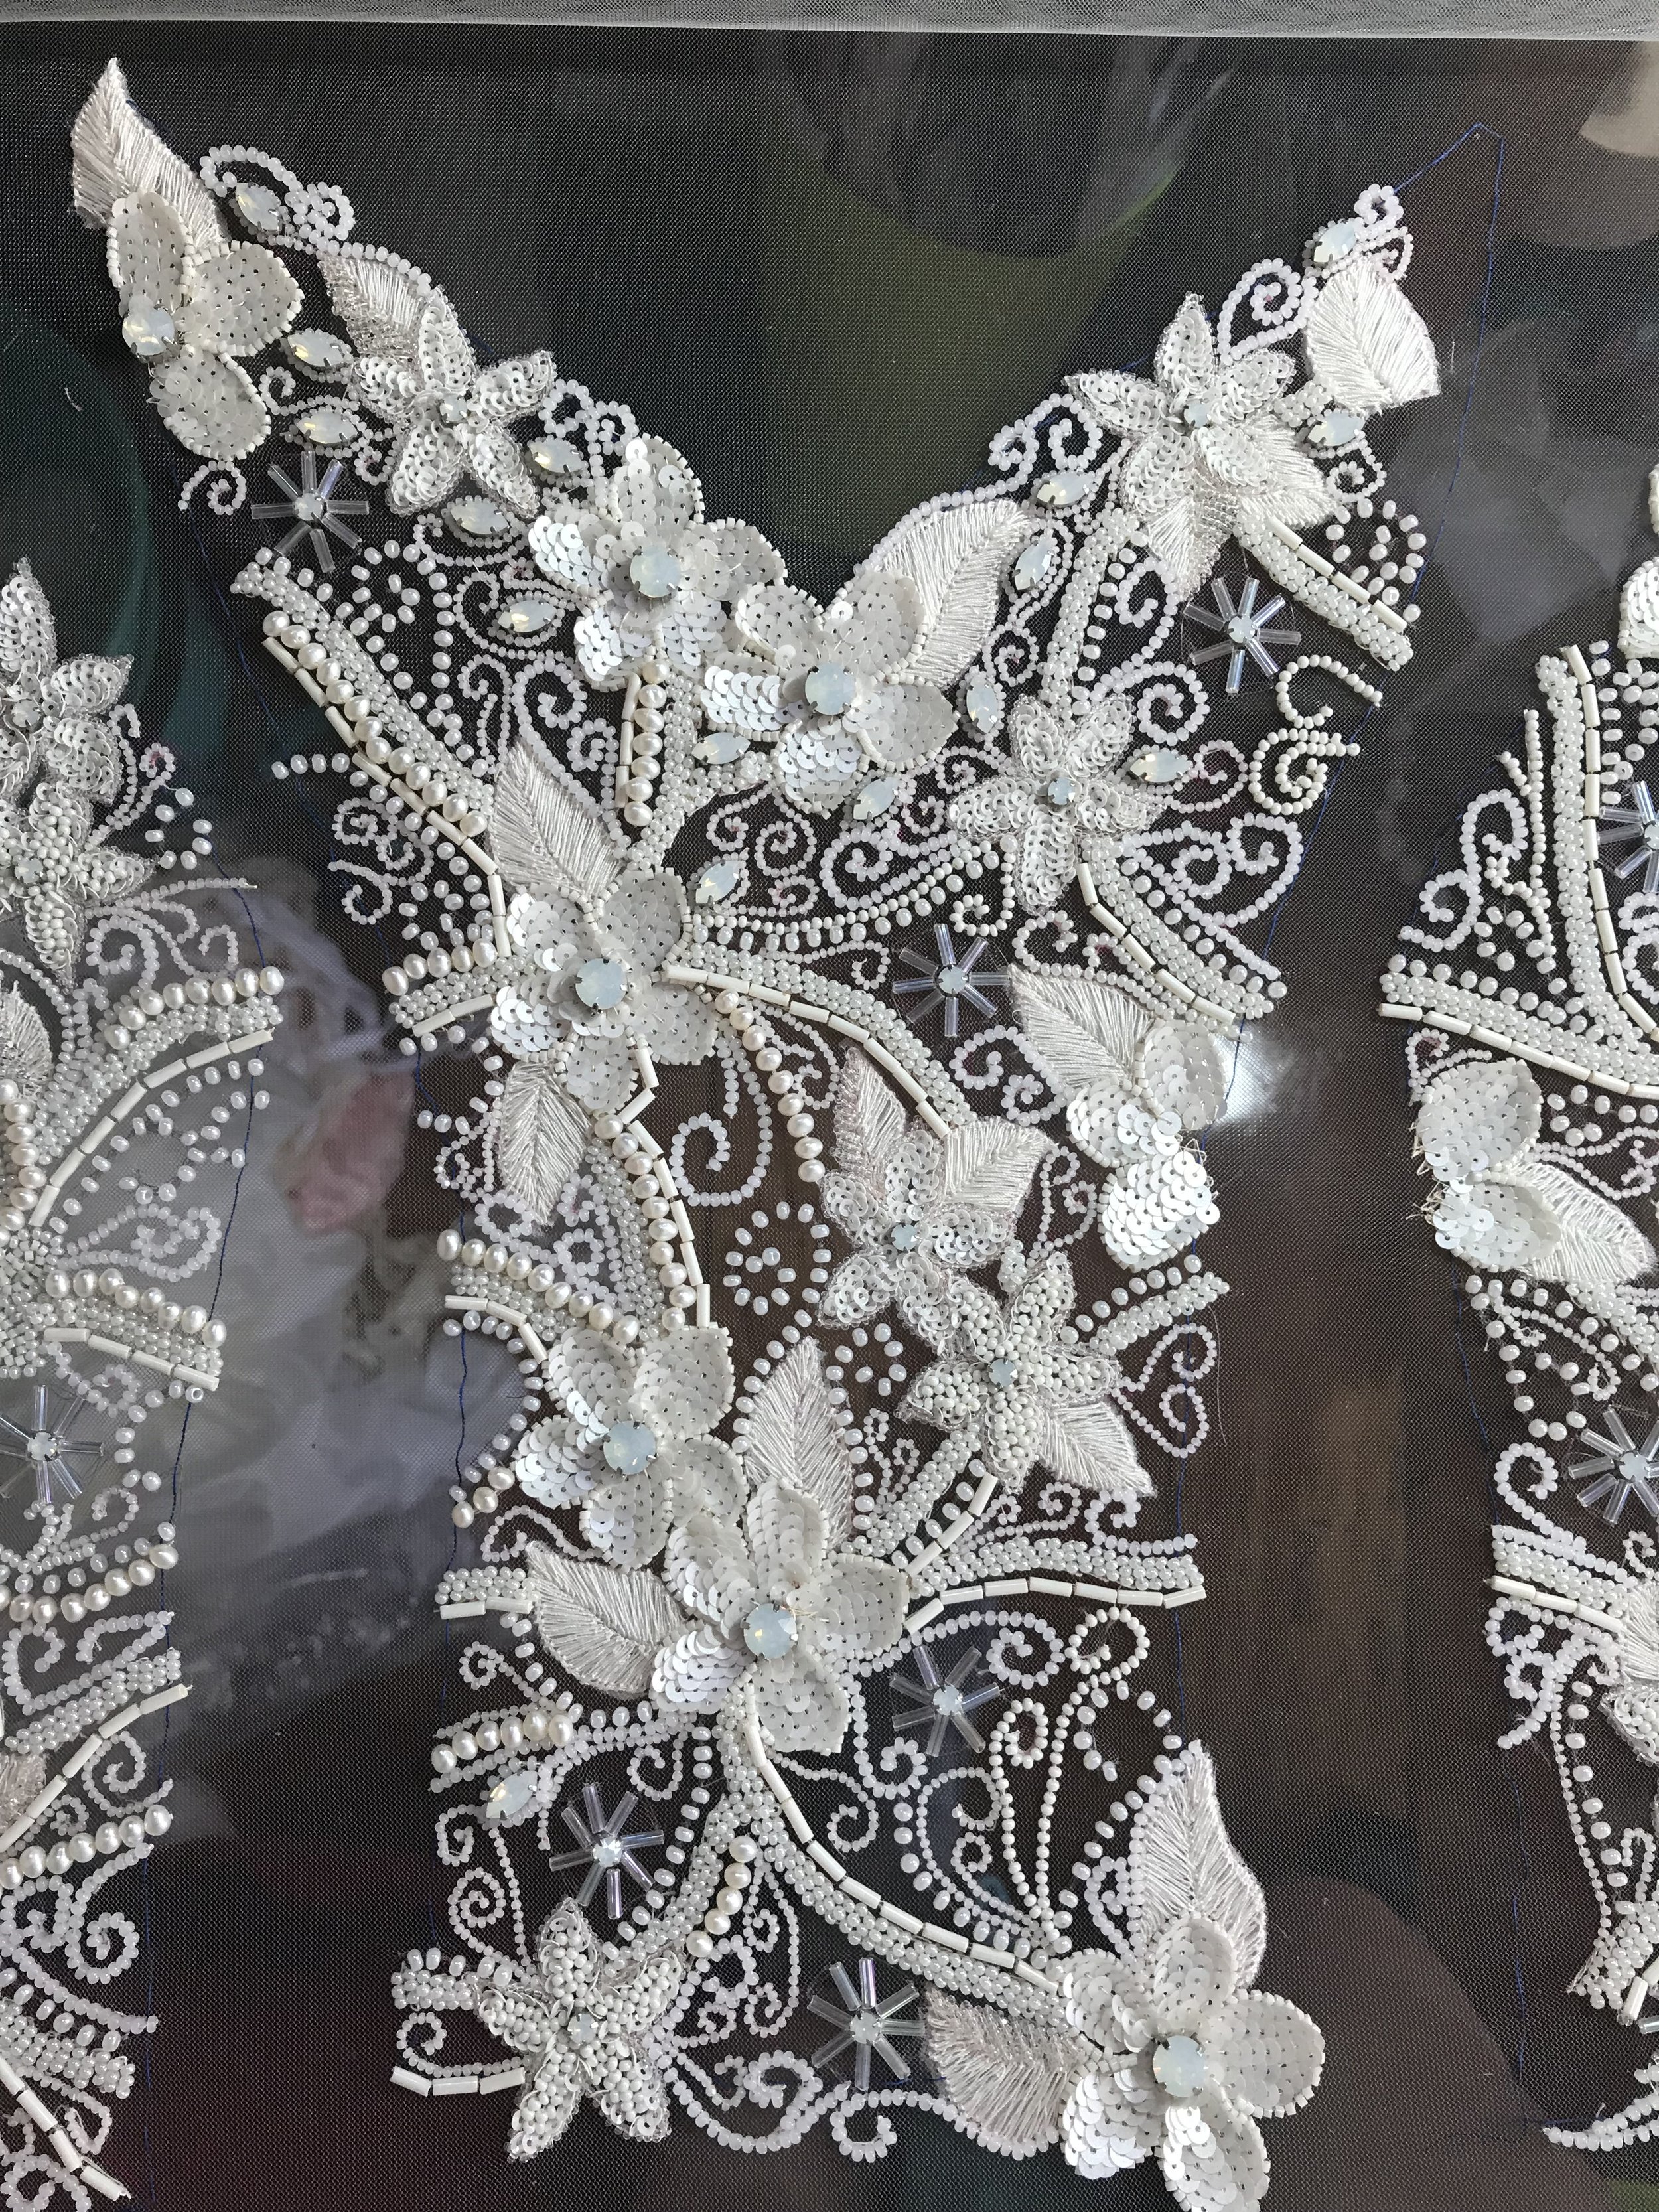
Fortunately, no major drama followed for the Tambour. I did have to order some more Swarovski crystals for the flower centers, but they came along without incident. As with any skill you decide to pick up, I worked on it every day and every day I got more efficient and more confident in my stitches. I don’t think the areas I worked on first look too different from the areas I finished up with, but I definitely got quicker as I went! The last pieces I filled in were the leaves, and let me tell you, weaving in the ends on that last leaf was a very strange experience. Here it is, just a few stitches before I finished it:

embroidering the last piece of the wedding dress

The dress only took a few weekends to sew, but the embroidery I’d been working on for the better part of a year! It was strange when it just finally…stopped. There was more of the dress left to work on, of course, but the thing I’d been coming home and working on every day after work - the thing I’d been spending every spare minute of free time working on - was suddenly just gone. I can’t say it was a 100% nice feeling, but then again, It’s certainly ignited a love for tambour embroidery - I’m in the planning stages of a new tambour project, so that’s a bonus!

As I embroidered, I was tying off and weaving in threads so that the back of the work was as neat as possible, but it turns out there was one last step before the embroidery could come off the frame. There are two schools of thought regarding finishing the back of a tambour beaded piece: whether or not to glue your knots. I couldn’t find definitive information online that swayed me in a particular direction - every new resource I found said something the opposite of the last. I had decided not to glue because I couldn’t find any information about what type of glue to use if I did, and as I intend for the dress to be around for quite a while (even if it was only worn once) - I didn’t want to risk the glue discoloring with age.

BUT. over the course of the embroidery, I’d made a new friend on Instagram - a wedding dressmaker who studied Tambour Embroidery at Lesage - and when I posted that I’d finished the embroidery, she sent me a message that said “Don’t forget to glue your knots!” - and I was SO confused. She also told me that before Lesage embroiderers glue their work, they steam it to set the threads in their new position (I imagine it’s a bit like blocking your knitting, or pressing a garment when it’s complete). To do this, I held my iron upside down and laid a damp tea towel over the plate. I held the tea towel wrapped iron about an inch under the embroidery (not touching!) so that the steam rose up to - and through - the fabric. It actually made a HUGE difference to the way my embroidery looked - everything relaxed just a bit, the beads laid flat, and the fabric wasn’t puckered at all. This had the added benefit of removing all traces of my heat-erasable pen.

removing tambour embroidery from frame

I decided to glue, because if Lesage does it (and haute couture embroidered garments from Lesage are definitely museum pieces) then it must be correct. My friend told me to use a dilluted blend of Gum Arabic and water - I went with about 1:3 - and to gently rub just the threads and knots on the back of the embroidery with the mixture before removing it from the frame. After it was dry, I carefully unpinned the fabric and disassembled the frame, and felt its weight for the first time! I think the embroidery is about as heavy as the rest of the dress!

embroidery removed from frame
weight of the wedding dress embroidery

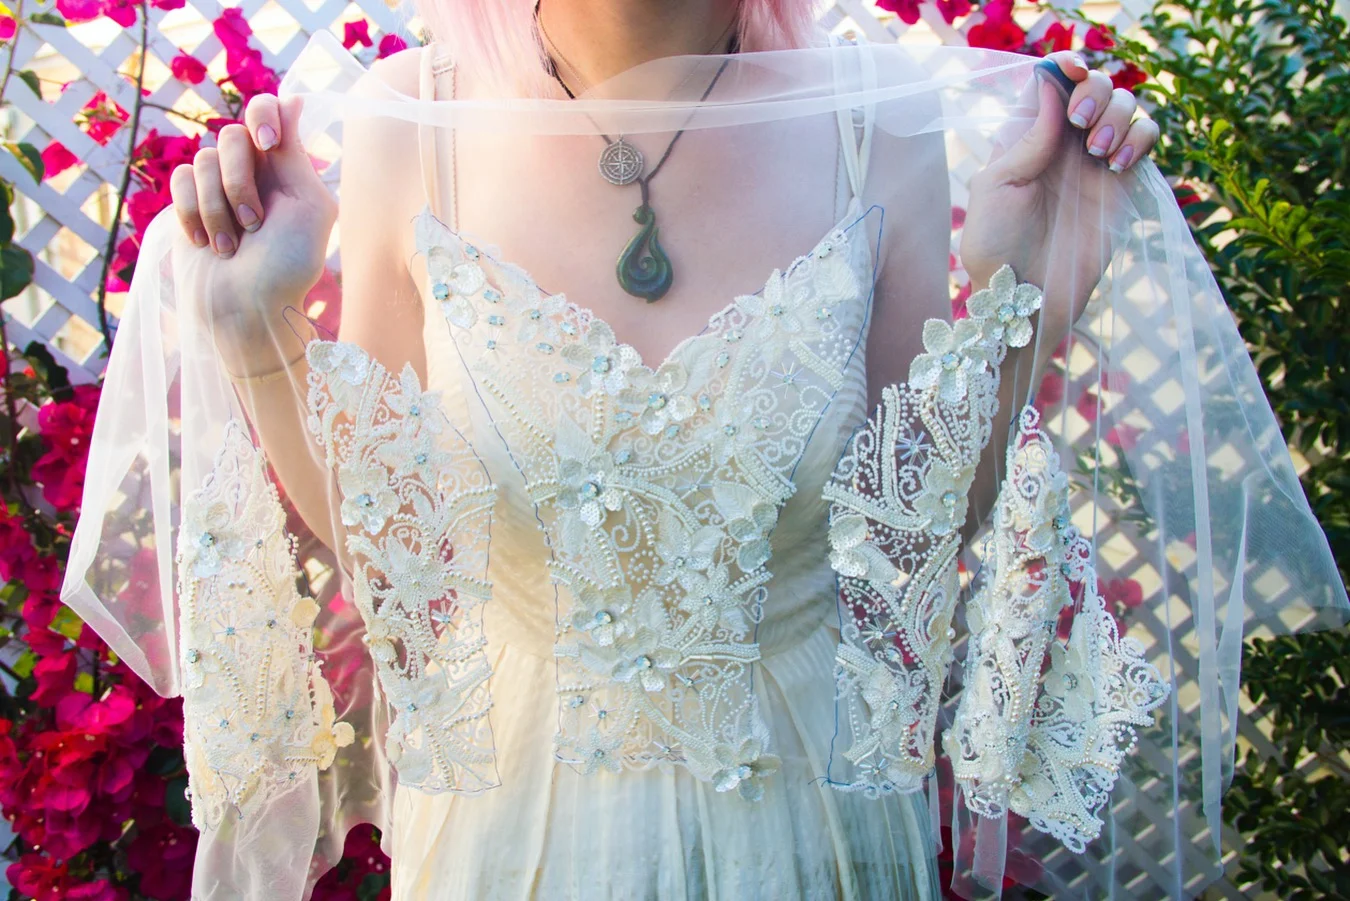
The process for attaching the embroidered pieces to the dress is most easily explained as an applique. I cut each bodice piece out of my tulle (tulle doesn’t unravel, so I could get very close to the edges of the embroidery) and then - starting with the center front - I stitched the embroidery down to the bodice of the dress, trying to catch the corselet layer through the silk as much as possible.

preparing tambour pieces for applique

Each of the bodice pieces has a vine pattern which crosses from one panel to the next, so I used those to line up the pieces along the seams. Each piece was pinned in place as I stitched it, and one thing I will say is that the next time I do something like this, I will go out and buy glass headed pins that have extremely contrasting colored heads - my silk pins are white glass heads, and a white pin head is about the same size as a bead. I couldn’t see where the pins were and kept catching my hands on their business ends as a result. That was my ‘Don’t get blood on the project!’ moment.

sewing tambour embroidery to wedding dress

It took about three hours to applique the beaded panels on to the dress. - I did end up with a few spots where my patterns didn’t quite line up, so I filled these in with a few spare beads sewn on to the dress with a needle, but overall it was a pretty reasonable process! It did come with a fair bit of stress - I’d planned everything as best I could but I suppose there was always a chance that the embroidery wouldn’t fit on the dress somehow. It was definitely a huge relief when the last piece was stitched on!

sewing sheer overlay to wedding dress

Below, the embroidery has all been sewn to the dress. You can see a few spots I had yet to fill in with extra beads, and on the right side, one flower center crystal that needs to be added - I didn’t add it before since it was right on top of a seam.

beading on wedding dress

There was one issue - the back. The zipper ends at the top of the bodice, but the beading extends past this point by about 2.5” in a sheer overlay. My overlay needed (somehow - I hadn’t worked out the details at this point) to be attached so that it would stand up against my back, but the beading couldn’t be under the same tension that the bodice was under. As a result of the negative ease in the bodice, I’d ended up with a wedge-shaped gap above the zipper at the center back. I needed to fill it in with a small piece of beading, and decide how to attach it in the middle. That small task was actually the last thing I did (along with sewing in a wedding label) that marked the dress as completely finished, so I’m going to save it to tell you about until last. At this point, with the embroidery attached, the last two things are that bit on the back and the hem!

embroidered wedding dress bodice


In Project Wedding Dress, Tambour and Beadwork Tags diy wedding, tambour beading, finishing a tambour beaded project, sewing tambour beading on bodice, sewing wedding dress, nz weddings, new zealand wedding, handmade wedding dress, make a wedding dress, wedding dressmaker, tambour embroidery, bridal embroidery, sew embroidery to dress, bodice embroidery
← Handmade Wedding Dress Chapter 13: The Hem Party and Finishing TouchesHandmade Wedding Dress Chapter 11: Skirt Construction and Dress Assembly →

Support me on Patreon

Hi! I'm Kat, I don't have any cats, and this is organized chaos. If you'd like to chat about catlessness, sewing, knitting, or other forms of world domination, I'd love to hear from you!katherine.klebenow@gmail.com

Hi! I'm Kat, I FINALLY have a cat, and this is organized chaos. If you'd like to chat about cats, sewing, knitting, or other forms of world domination, I'd love to hear from you!

hellokat.makes@gmail.com

Category
  • Bernina
  • Bramaking
  • Machine Embroidery
  • Making Clothes
  • Pattern Sewing
  • Project Wedding Dress
  • Projects
  • Self Drafted Sewing
  • Shoemaking
  • Tambour and Beadwork
  • The Monthly Draft
  • Travel
  • Tutorials
  • Yarn and Handknits
Subscribe on YouTube
Featured
Tutorial: Sewing a custom Cat Carrier Cover for your cat's travel box
Oct 9, 2024
Tutorial: Sewing a custom Cat Carrier Cover for your cat's travel box
Oct 9, 2024

Today's project is a cover, custom made to fit over my cats' travel carrier. This project has everything - custom drafting, magnets, hardware installation, problem solving: All in the name of keeping my kitties happy in transit! It's a long one - you've been warned.

Oct 9, 2024
Weaving your First Project on a Rigid Heddle Loom
Apr 26, 2023
Weaving your First Project on a Rigid Heddle Loom
Apr 26, 2023

My very first project on my new rigid heddle loom! I so enjoyed learning this new skill - here are a collection of tips as well as links to tutorials I found helpful as I made my first project!

Apr 26, 2023
DIY, Sewing, and Craft Supply Shops in New Zealand
Apr 13, 2023
DIY, Sewing, and Craft Supply Shops in New Zealand
Apr 13, 2023

Ever wondered where to get a weirdly specific hardware? supplies for making shoes, bags, or embroidered tea towels? Dye supplies or fancy zips? I've compiled a list of my favourite sources!

Apr 13, 2023
Sewing the Haptic Lab Constellation Quilt (again)
Mar 30, 2023
Sewing the Haptic Lab Constellation Quilt (again)
Mar 30, 2023

I’m making a northern stars constellation quilt to match my southern stars one! This one has started quite a bit differently from the last one - so I’ve shared my process in case it helps you with a similar project!

Mar 30, 2023
The Tambour Embroidery Hoop Holder: A Woodworking DIY
Mar 23, 2023
The Tambour Embroidery Hoop Holder: A Woodworking DIY
Mar 23, 2023

In which our intrepid tambour embroidery fanatic once again attempts woodworking in the name of beads. (Also, in which fortunately the attempt is once again successful!)

Mar 23, 2023
The Home Sewist's Guide to Snap Fasteners for baby clothes, bag making, and more
Mar 15, 2023
The Home Sewist's Guide to Snap Fasteners for baby clothes, bag making, and more
Mar 15, 2023

A deep dive into the world of snap fasteners! Did you know there were so many options to choose from? We go through five popular options for fasteners and discuss the pros and cons, as well as applications, of each

Mar 15, 2023
Lillian's Embroidered Wedding Veil
Mar 1, 2023
Lillian's Embroidered Wedding Veil
Mar 1, 2023

Making Lill’s cathedral length floral embroidered wedding dress - all in one monster post!

Mar 1, 2023
Art Deco Wardrobe Collection
Feb 19, 2023
Art Deco Wardrobe Collection
Feb 19, 2023

This was going to be the year I finally attended the Art Deco festival in Napier - here’s everything I made to wear for the weekend, all in one place!

Feb 19, 2023
Tutorial: Pullover Hoodie with Cat Pocket
Nov 9, 2022
Tutorial: Pullover Hoodie with Cat Pocket
Nov 9, 2022

Do you have a velcro kitty like me? I made my very own cat-pocket hoodie so I can carry my little guy around wherever he wants to go, and it’s a tutorial now so you can make one yourself!

Nov 9, 2022
The Prick and Pounce Method for Tambour Embroidery
Nov 9, 2022
The Prick and Pounce Method for Tambour Embroidery
Nov 9, 2022

Today we’re exploring one of the oldest methods of embroidery design transfer - the prick and pounce method!

Nov 9, 2022

Get the Updates!

Customize Updates
choose 'Blog Updates' to get an email whenever I publish a new post, and 'Newsletter' for the newsletter. Or choose both!
Thank you!

Instagram

Woven scarf number two! For this one, I tried weaving with laceweight which I was *certain* would require a 15 dent heddle but the wpi math said 12.5 so I went with it. Woven on my @ashford_wheels_looms 16” rigid heddle loom using alpaca yarn w
Pink scenes from a weekend of sewing: I’m having a summer birthday for the first time in almost a decade, and the occasion calls for a summer birthday dress! I’m tackling the bustier style, which i anticipate may be a bit of a mission bec
Happy first Gotcha Day to this little dude! It’s been so fun to watch him grow up from a tiny little puffball into a Whole Cat, who is somehow also just a tiny human fellow in a cat suit 💕 here’s to another 365, and may the future, perha
Finished Scarf!! It took a while for the weather to cooperate for these photos but that’s all good because it gave me time to write my blog post! 

This is my Very First Ever project on a rigid heddle loom- mine is the @ashford_wheels_looms 16&
Archive
  • October 2024
  • April 2023
  • March 2023
  • February 2023
  • November 2022
  • March 2022
  • January 2022
  • November 2021
  • September 2021
  • July 2021
  • January 2021
  • April 2020
  • March 2020
  • August 2019
  • July 2019
  • June 2019
  • May 2019
  • April 2019
  • March 2019
  • February 2019
  • December 2018
  • November 2018
  • October 2018
  • September 2018
  • August 2018
  • July 2018
  • June 2018
  • May 2018
  • April 2018
  • March 2018
  • February 2018
  • January 2018
  • December 2017
  • November 2017
  • October 2017
  • September 2017
  • August 2017
  • July 2017
  • June 2017
  • May 2017
  • April 2017
  • March 2017
  • February 2017
  • January 2017
  • December 2016
  • November 2016
  • October 2016
  • September 2016
  • August 2016
  • July 2016
  • June 2016
  • January 2016
  • December 2015
  • May 2015
  • April 2015
  • March 2015
  • December 2014
  • November 2014
  • October 2014
  • August 2014
  • June 2014
  • March 2014
  • January 2014

Get the Updates!

Put your Email Address in the box, and I'll ask the friendly internet robots to send you a message when I post an update!

I'll send an email for each new post.

Thank you!