• blog
  • What Kat's Made
  • The Wedding Dress
  • Tambour Embroidery
    • Workshops and Teaching
    • Shop
    • Beadwork Portfolio
    • Tutorials & Guides
    • About Me
Menu

Kat Makes

Kat Waters
  • blog
  • What Kat's Made
  • The Wedding Dress
  • Tambour Embroidery
  • More
    • Workshops and Teaching
    • Shop
    • Beadwork Portfolio
    • Tutorials & Guides
    • About Me

Blog: Kat Makes

Adventures in Obsession

hemming+a+silk+wedding+dress

Handmade Wedding Dress Chapter 13: The Hem Party and Finishing Touches

April 22, 2019

Oh my goodness. Did you ever think this day would come? This is the last of the Wedding Dress sewing posts! I do have some other wedding sewing and DIYs to share with you (an army of dressing gowns, Jon’s clothes, my flower crown, the painted signs) but this…. This is the last of the dress posts.

Before we get too far into the fun, here’s an answer to a question. Sarah asked for clarification on the piece of boning I called the ‘power bar’ in my corselet-building post, and I didn’t have a photo at a better angle, so I’ve made a diagram. Hopefully this explains the boning placement a bit better, Sarah!

boning diagram for wedding dress corselet

The black drawn-on lines represent boning - all the seams are boned (the front is cut on the fold, and there’s no boning in the CB because of the zipper) - but you’ll notice the extra line on the side-front piece - it gently curves from the bottom front to the armhole, and it’s this piece that acts as a power bar to push the bust forward. Depending on your shape you may need to relocate the bone slightly, but something like this will work with a variety of shapes!

Now. The hem!

My final steps were leveling and sewing the hem (with a little help from my friends) and finishing up that little section of the back that wasn’t quite sitting right. Here we go!

bias hem drop silk circle skirt

After the zipper was in, my friend Jay helped me level off the skirt. On the bias sections of the gauze, the hem had dropped up to 17 inches!! We started with the lowest satin layer - I stood on a chair while she cut off length, first a rough pass leaving things about 2” longer than required, and then a leveling pass to set the final hem length (plus the 3/8” that the rolled hem needed). I tested moving around in the skirt, and then we did the same for the second layer of skirt.

trimming wedding dress hem

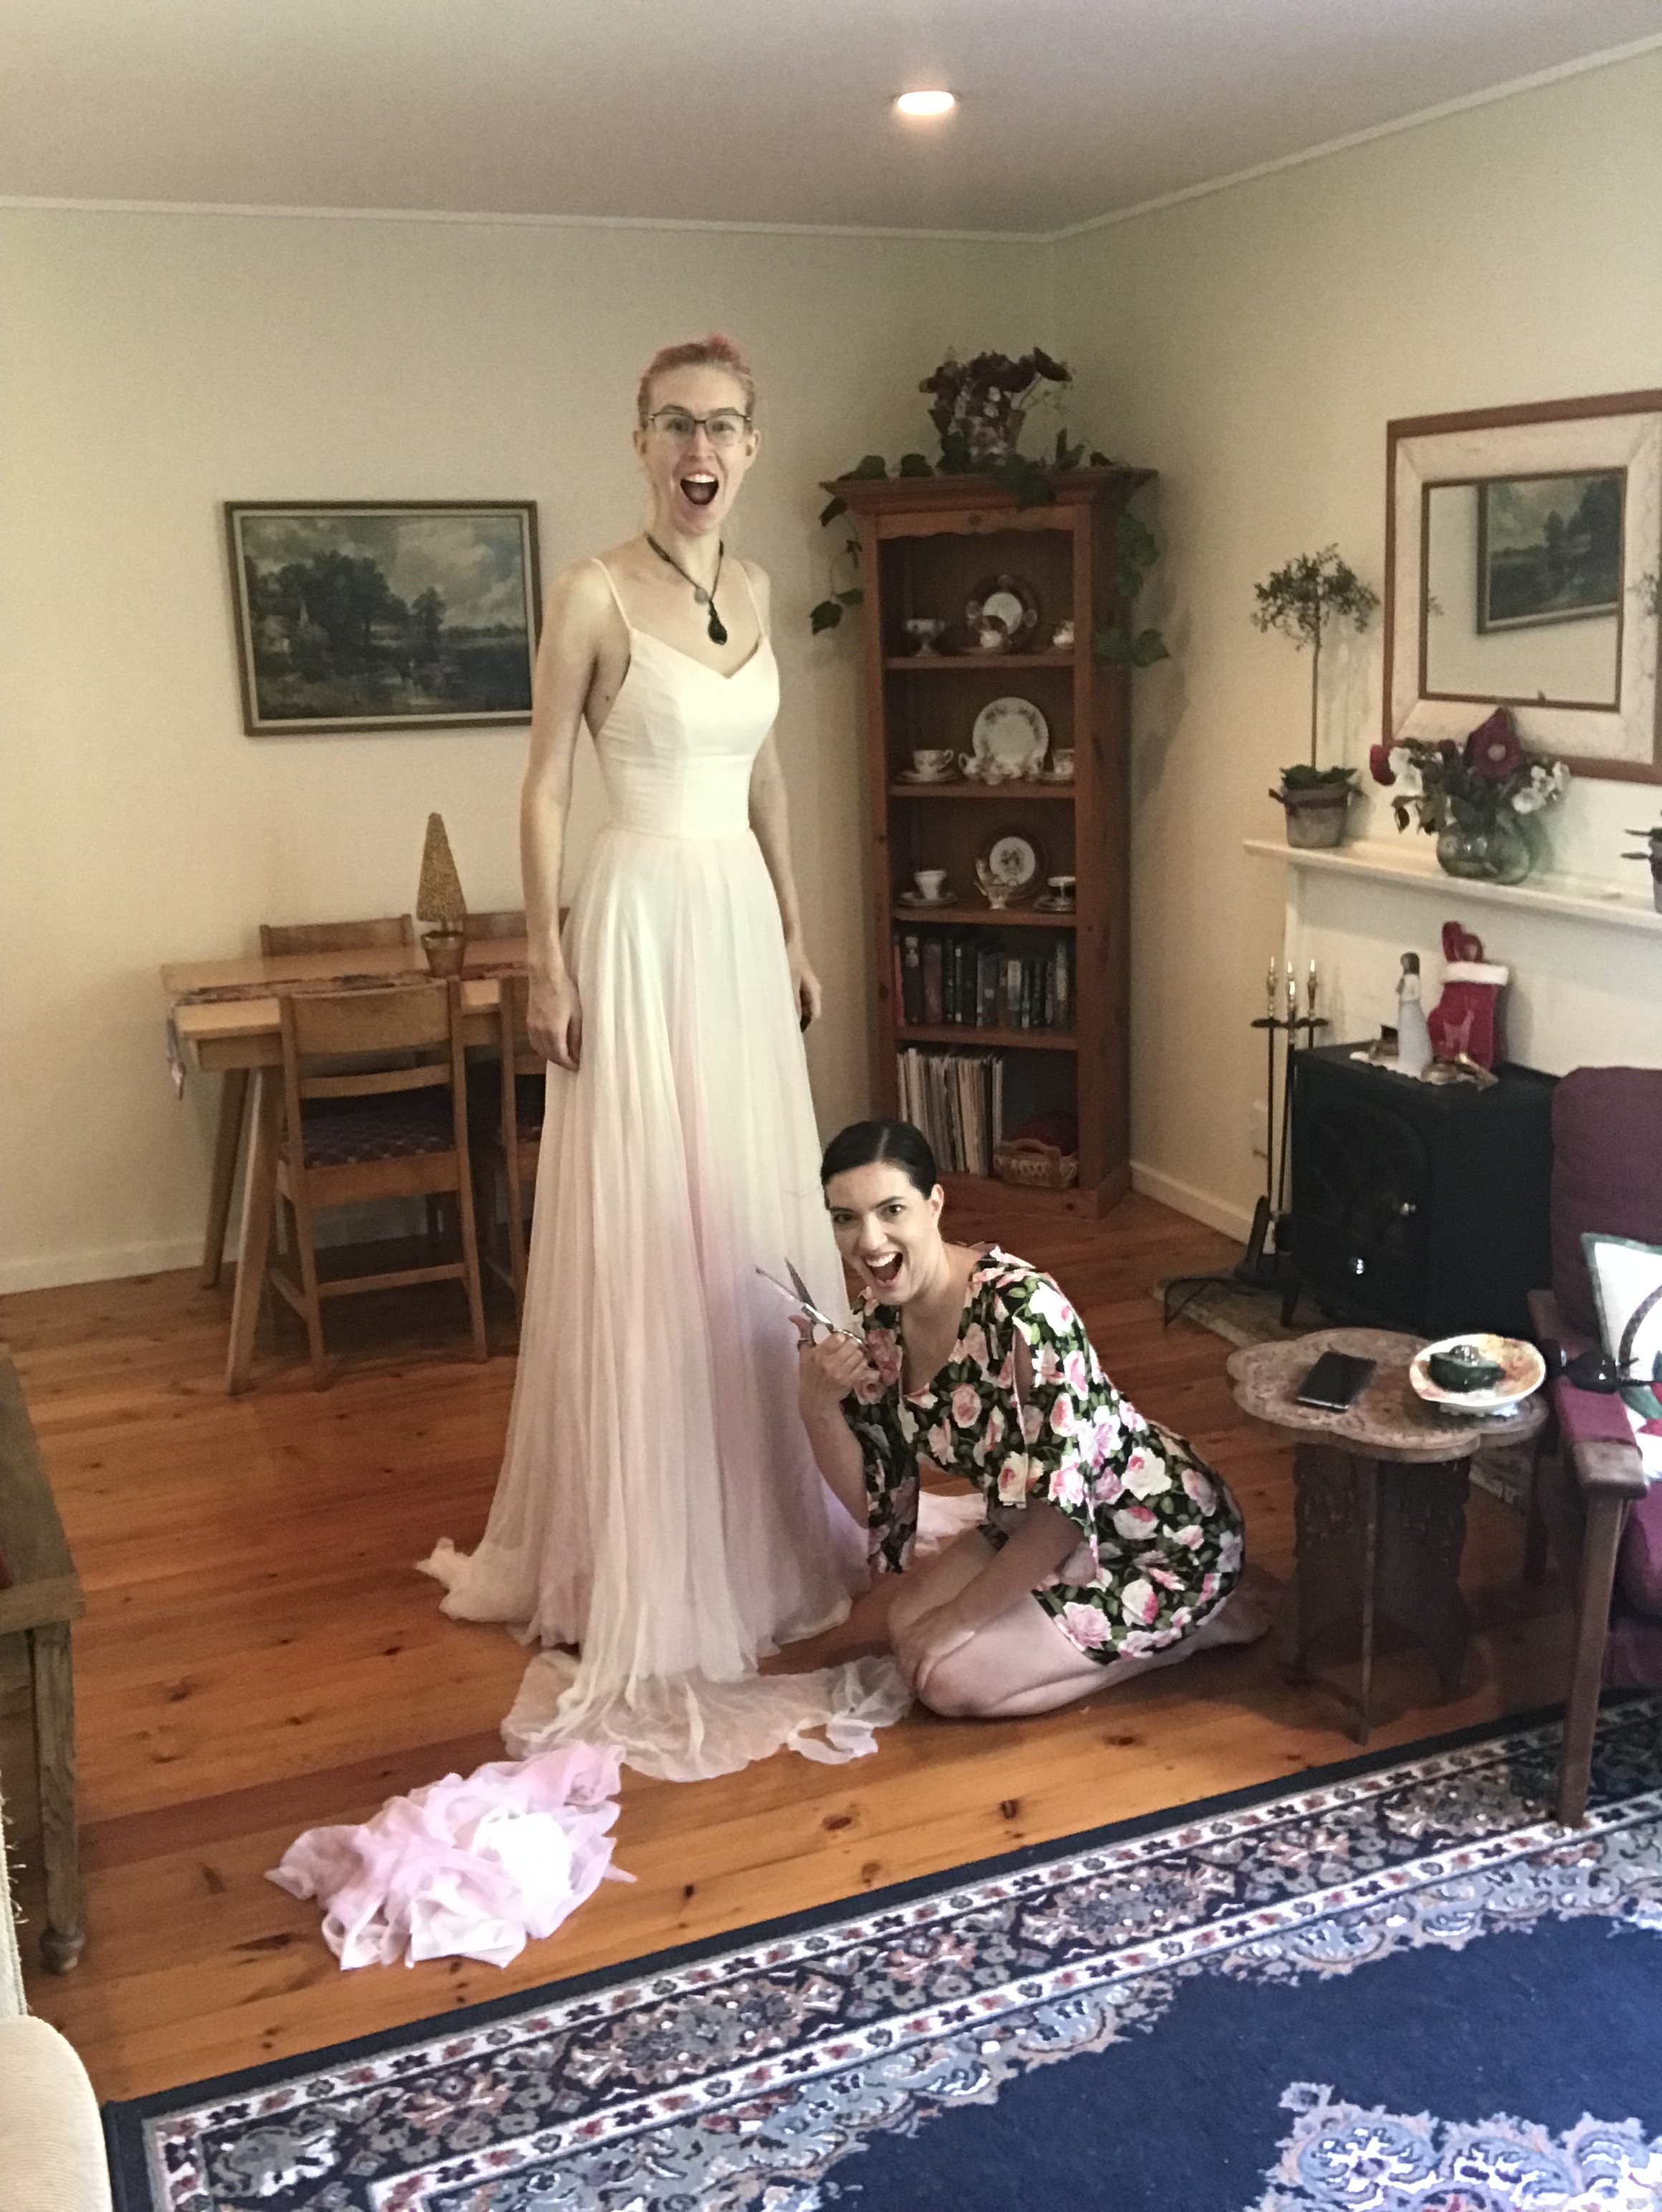
I hemmed these two layers by machine - they needed to be hemmed but they didn’t need to be up-close visibly perfect, so the machine rolled hem was fine. There are definitely a few spots that aren’t the prettiest in all the land, but the hem is even, enclosed, and most importantly - hidden under the top layer of skirt. You have to pick your battles, and hand rolling all three skirts was just never going to happen. Hemming by machine creates quite a dense hem as well, which is nice because the stiffness helps the hem stand away from my feet just a little bit more.

testing hem length

The top layer was a different story. Jay helped me level it, same as the others, but this time the hem treatment was a bit different. hemming the gauze was an exercise in creating a finish as unobtrusive as possible - I wanted the dress to look like it just ended. no visible stitching, no change in behaviour. It’s a tough ask from such a delicate fabric. I chose a hand rolled hem, and decided that for the penultimate task in the creation of my wedding dress, I wanted to spend it with all of my friends: I wanted a hem party.

wedding dress hem party
hem party in progress

(I feel like it’s not an amazing pun if I have to explain it, but I’m doing it anyways - get it? It’s like a hen party, except it’s a Hem! Because sewing! insert clip of me, giggling maniacally)

hem party in progress hemming
hem party friends

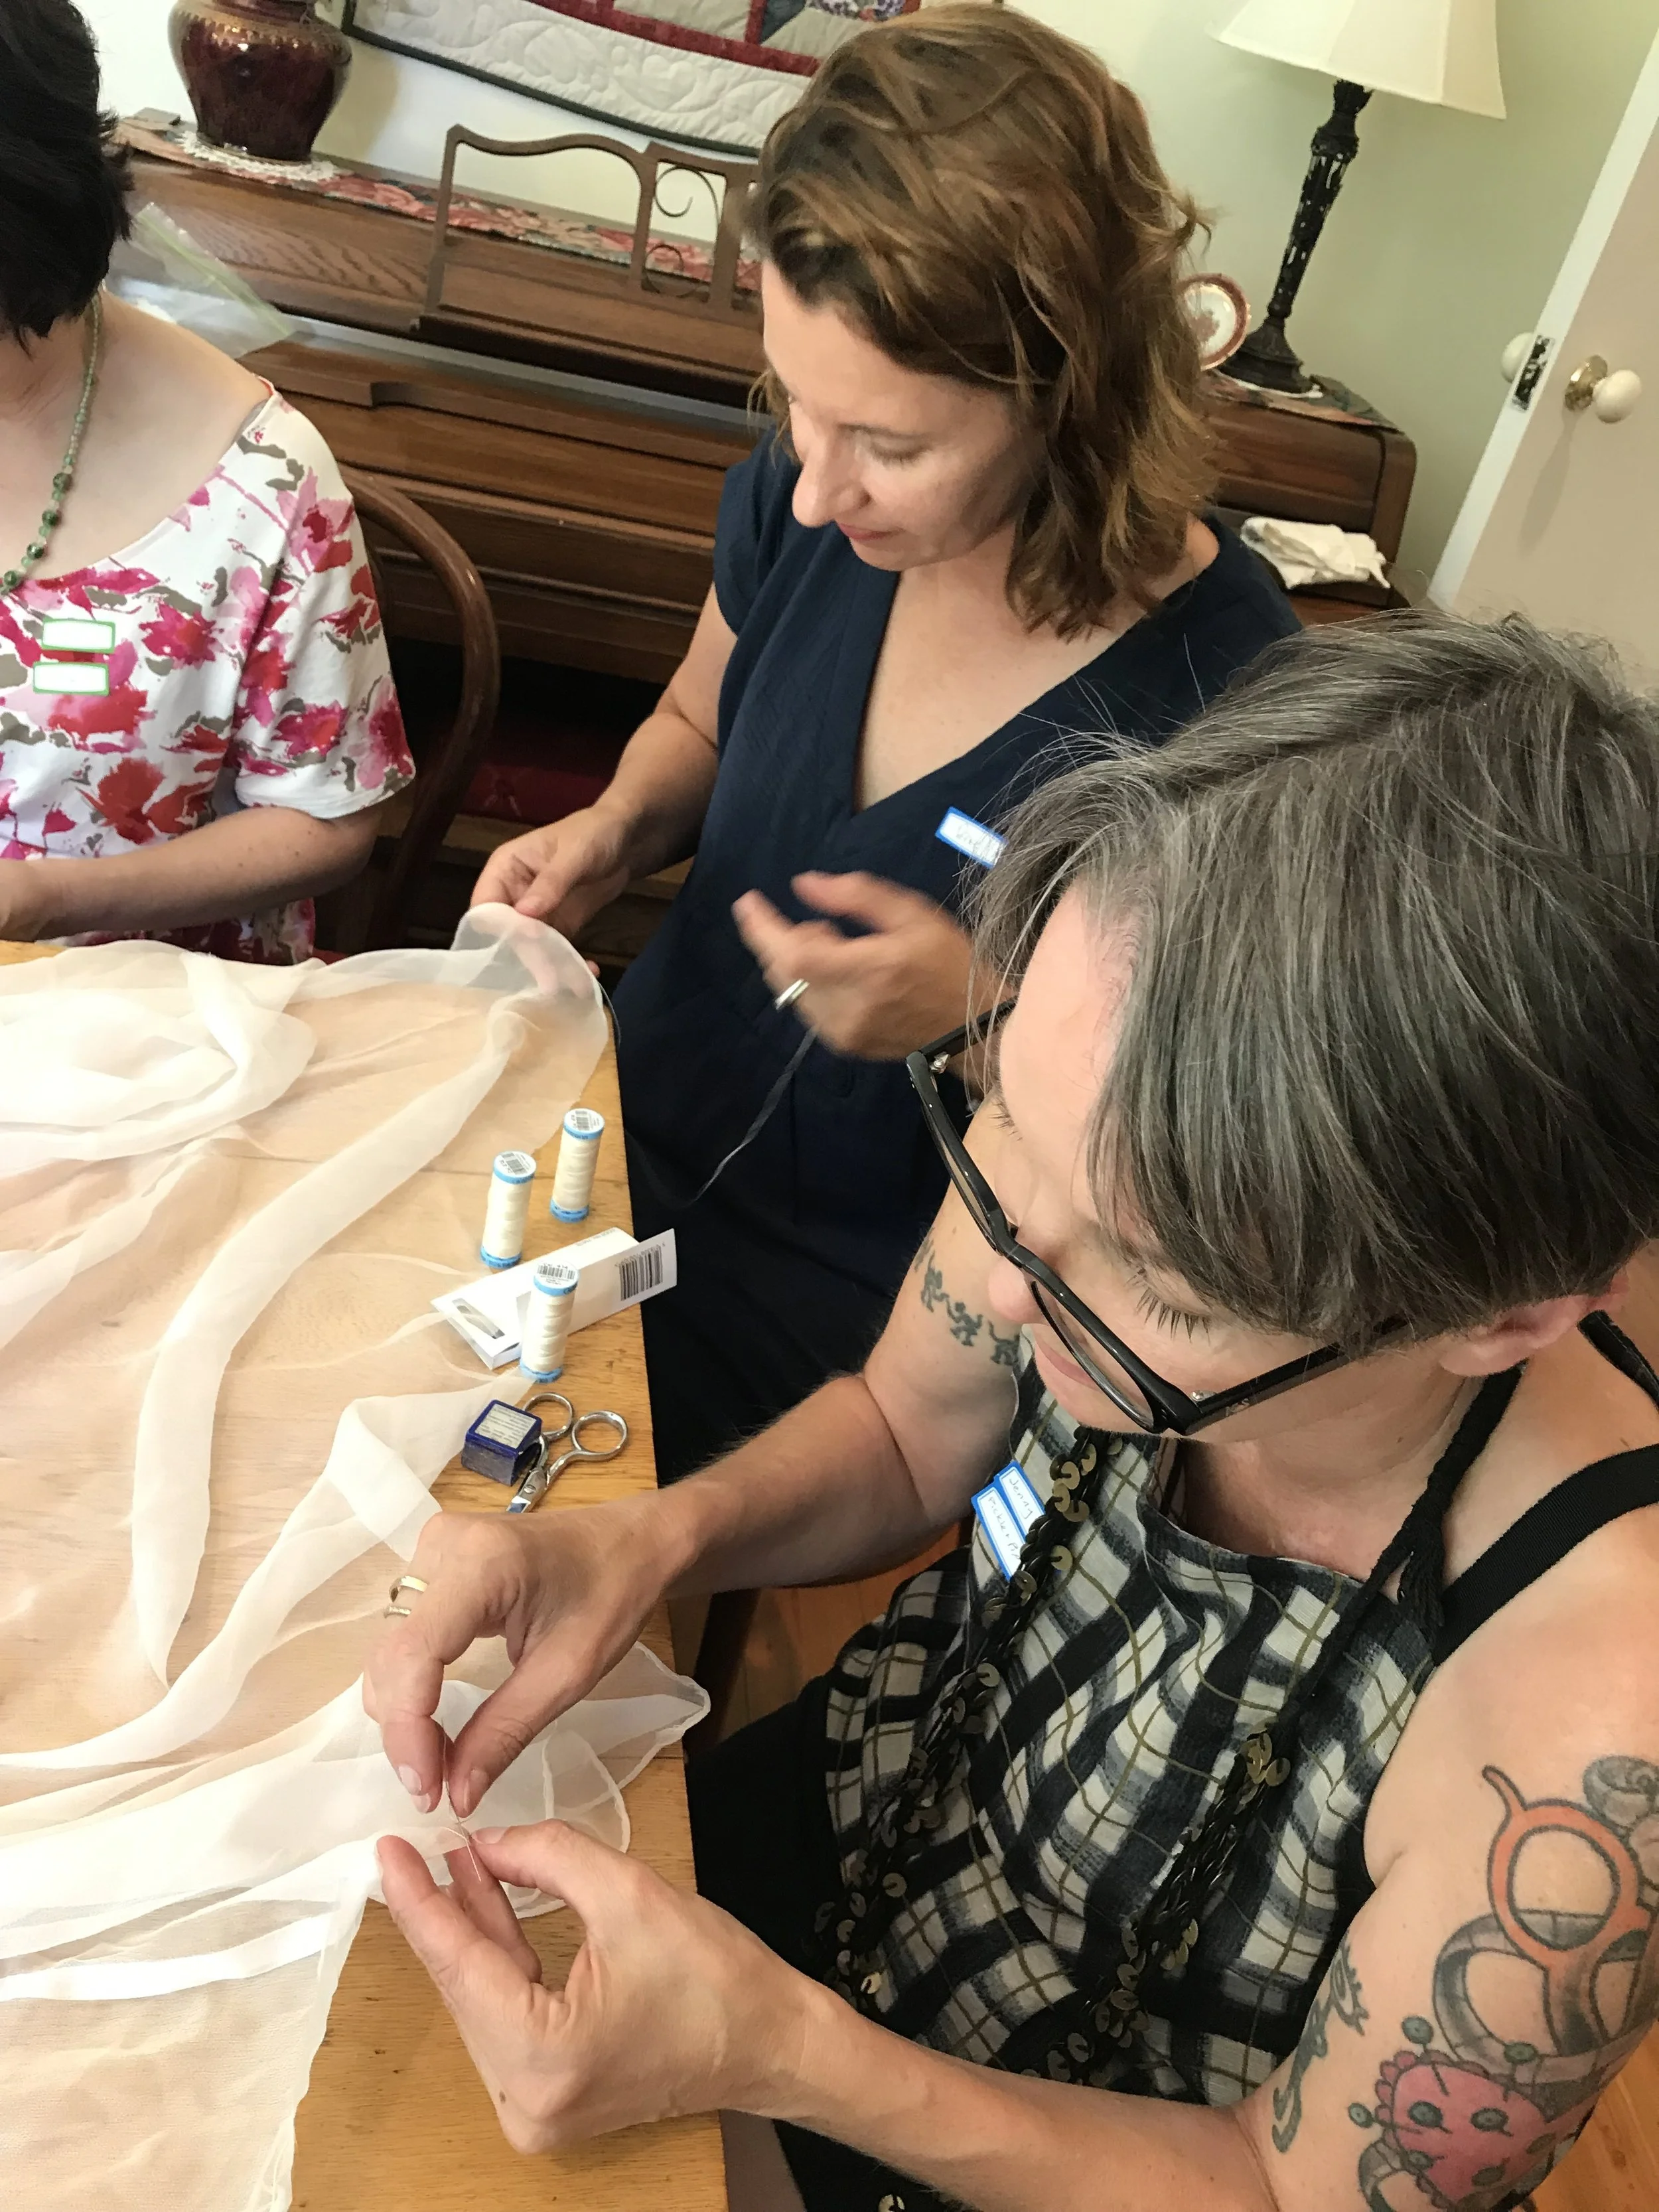
Sorry. So I invited a group of lovely local sewing ladies over (Jon’s mom Gill was kind enough to let us borrow her backyard and parlour - parlour for sewing and backyard for snacks and hangouts) and all together, everyone took turns with a section of hem and we got it knocked out in under an hour and a half! All 12 metres of circle skirt hand rolled! After that, I had a ceremonial try-on of the dress, we popped a bottle of champagne, and hung out and chatted and snacked! It was incredible.

hem party group

I’m so thankful to have met so many amazing sewists here in Auckland - a place I haven’t really lived all that long, and that they’ve absolutely accepted me as one of their own. I love that we all got to come together to make this happen, and it was also awesome to show the dress, in person, to a bunch of sewing people who understood the nerdy little bits of it - just the way you all do!

hem party sewing

Jay, bless her, also commandeered my phone for the duration of the party which was delightful because otherwise I’d have exactly zero photos of the entire thing.

completed Hem with friends

So. Hemmed, my last task was that little bit at the back. A few times I’ve mentioned that the bodice of the dress has negative ease, which is how it’s able to be supportive but also have such a low back. You’ll also remember that the embroidery uses the exact shapes of the bodice pieces, so that they all line up exactly on the bodice. Now, the tulle sits nicely on that negative eased bodice which is great because I get all squeezed up in there when the zipper is closed up, but the sheer overlay section at the back doesn’t have the structured bodice underneath it to continue the squeeze. I can’t put the same type of tension on just the tulle, without the bodice underneath, or the fabric would pull apart, and the result is that the sheer overlay section ends up with a gap.

beading overlay wedding dress
complete back of dress

I had kind of anticipated this would happen, but I’d put it in the list of things to sort out when they actually became a problem. I wasn’t sure it was going to be a problem until I’d sewn the embroidery to the dress (in last week’s post) and here it was, so time to fix.

design for back gap cover

I got Jay to measure the gaps while the dress was on - at the top and at the bottom of the overlay section, so that I knew what shaped panel I needed to create to fill the void. I created my small pattern piece, bound some leftover pieces of tulle along one edge to create a center back opening, and used leftover beads to embroider extensions of the design. Then, I appliquéd the extensions on to the existing overlay edges. I added faux pearl bridal buttons down the left side edge, and added a top hook and a series of snaps so that it would close up above the zipper. The final touch was a little satin tab I added which would protect my skin from the zipper head when the dress was zipped up.

beaded addition to back dress
zipper tab handmade wedding dress

Last step? a little customised wedding label - there’s one of these in every garment I made for the wedding - with our date and our names and the little airplane heart which was an available clipart choice from Dutch Label Shop and very fitting for our relationship.

personalized wedding label

Just like that - after nearly two years of planning and a year of sewing - the dress was done. I finished with eight days to spare, which - I think - is a perfectly respectable number of days (especially given that I was still sewing my prom dress on the day of prom…)

Next week, I’ve got a few more finished-dress closeups and photos for you, but in case you missed it, this post is the story of our wedding day complete with photos, and it’s next up chronologically speaking even though I posted it before I finished telling you about the dress! I’m excited to start telling you about all the other things I’ve been making post-wedding, but I do have a few other wedding makes to share as well. I think I’m going to mix them up a little bit and share some new projects soon, otherwise I’m going to end up with a HUGE backlog of things to tell you about all over again! It’s only April and 2019 already seems to have some pretty awesome things in store for me - I have so much to tell you!

In Project Wedding Dress, Tambour and Beadwork Tags handmade wedding dress, dressmaking, wedding dressmaker, wedding dress progress, weddings new zealand, hemming silk bias dress, hemming circle skirt, hand rolled hem, hem party, hen party sewing, silk chiffon bias drop, finishing handmade wedding dress, sewing new zealand, sewing blog nz, custom wedding labels
← Handmade Wedding Dress Chapter 14: The Photos, and the End.Handmade Wedding Dress Chapter 12: The Dress Meets The Embroidery →

Support me on Patreon

Hi! I'm Kat, I don't have any cats, and this is organized chaos. If you'd like to chat about catlessness, sewing, knitting, or other forms of world domination, I'd love to hear from you!katherine.klebenow@gmail.com

Hi! I'm Kat, I FINALLY have a cat, and this is organized chaos. If you'd like to chat about cats, sewing, knitting, or other forms of world domination, I'd love to hear from you!

hellokat.makes@gmail.com

Category
  • Bernina
  • Bramaking
  • Machine Embroidery
  • Making Clothes
  • Pattern Sewing
  • Project Wedding Dress
  • Projects
  • Self Drafted Sewing
  • Shoemaking
  • Tambour and Beadwork
  • The Monthly Draft
  • Travel
  • Tutorials
  • Yarn and Handknits
Subscribe on YouTube
Featured
Tutorial: Sewing a custom Cat Carrier Cover for your cat's travel box
Oct 9, 2024
Tutorial: Sewing a custom Cat Carrier Cover for your cat's travel box
Oct 9, 2024

Today's project is a cover, custom made to fit over my cats' travel carrier. This project has everything - custom drafting, magnets, hardware installation, problem solving: All in the name of keeping my kitties happy in transit! It's a long one - you've been warned.

Oct 9, 2024
Weaving your First Project on a Rigid Heddle Loom
Apr 26, 2023
Weaving your First Project on a Rigid Heddle Loom
Apr 26, 2023

My very first project on my new rigid heddle loom! I so enjoyed learning this new skill - here are a collection of tips as well as links to tutorials I found helpful as I made my first project!

Apr 26, 2023
DIY, Sewing, and Craft Supply Shops in New Zealand
Apr 13, 2023
DIY, Sewing, and Craft Supply Shops in New Zealand
Apr 13, 2023

Ever wondered where to get a weirdly specific hardware? supplies for making shoes, bags, or embroidered tea towels? Dye supplies or fancy zips? I've compiled a list of my favourite sources!

Apr 13, 2023
Sewing the Haptic Lab Constellation Quilt (again)
Mar 30, 2023
Sewing the Haptic Lab Constellation Quilt (again)
Mar 30, 2023

I’m making a northern stars constellation quilt to match my southern stars one! This one has started quite a bit differently from the last one - so I’ve shared my process in case it helps you with a similar project!

Mar 30, 2023
The Tambour Embroidery Hoop Holder: A Woodworking DIY
Mar 23, 2023
The Tambour Embroidery Hoop Holder: A Woodworking DIY
Mar 23, 2023

In which our intrepid tambour embroidery fanatic once again attempts woodworking in the name of beads. (Also, in which fortunately the attempt is once again successful!)

Mar 23, 2023
The Home Sewist's Guide to Snap Fasteners for baby clothes, bag making, and more
Mar 15, 2023
The Home Sewist's Guide to Snap Fasteners for baby clothes, bag making, and more
Mar 15, 2023

A deep dive into the world of snap fasteners! Did you know there were so many options to choose from? We go through five popular options for fasteners and discuss the pros and cons, as well as applications, of each

Mar 15, 2023
Lillian's Embroidered Wedding Veil
Mar 1, 2023
Lillian's Embroidered Wedding Veil
Mar 1, 2023

Making Lill’s cathedral length floral embroidered wedding dress - all in one monster post!

Mar 1, 2023
Art Deco Wardrobe Collection
Feb 19, 2023
Art Deco Wardrobe Collection
Feb 19, 2023

This was going to be the year I finally attended the Art Deco festival in Napier - here’s everything I made to wear for the weekend, all in one place!

Feb 19, 2023
Tutorial: Pullover Hoodie with Cat Pocket
Nov 9, 2022
Tutorial: Pullover Hoodie with Cat Pocket
Nov 9, 2022

Do you have a velcro kitty like me? I made my very own cat-pocket hoodie so I can carry my little guy around wherever he wants to go, and it’s a tutorial now so you can make one yourself!

Nov 9, 2022
The Prick and Pounce Method for Tambour Embroidery
Nov 9, 2022
The Prick and Pounce Method for Tambour Embroidery
Nov 9, 2022

Today we’re exploring one of the oldest methods of embroidery design transfer - the prick and pounce method!

Nov 9, 2022

Get the Updates!

Customize Updates
choose 'Blog Updates' to get an email whenever I publish a new post, and 'Newsletter' for the newsletter. Or choose both!
Thank you!

Instagram

Woven scarf number two! For this one, I tried weaving with laceweight which I was *certain* would require a 15 dent heddle but the wpi math said 12.5 so I went with it. Woven on my @ashford_wheels_looms 16” rigid heddle loom using alpaca yarn w
Pink scenes from a weekend of sewing: I’m having a summer birthday for the first time in almost a decade, and the occasion calls for a summer birthday dress! I’m tackling the bustier style, which i anticipate may be a bit of a mission bec
Happy first Gotcha Day to this little dude! It’s been so fun to watch him grow up from a tiny little puffball into a Whole Cat, who is somehow also just a tiny human fellow in a cat suit 💕 here’s to another 365, and may the future, perha
Finished Scarf!! It took a while for the weather to cooperate for these photos but that’s all good because it gave me time to write my blog post! 

This is my Very First Ever project on a rigid heddle loom- mine is the @ashford_wheels_looms 16&
Archive
  • October 2024
  • April 2023
  • March 2023
  • February 2023
  • November 2022
  • March 2022
  • January 2022
  • November 2021
  • September 2021
  • July 2021
  • January 2021
  • April 2020
  • March 2020
  • August 2019
  • July 2019
  • June 2019
  • May 2019
  • April 2019
  • March 2019
  • February 2019
  • December 2018
  • November 2018
  • October 2018
  • September 2018
  • August 2018
  • July 2018
  • June 2018
  • May 2018
  • April 2018
  • March 2018
  • February 2018
  • January 2018
  • December 2017
  • November 2017
  • October 2017
  • September 2017
  • August 2017
  • July 2017
  • June 2017
  • May 2017
  • April 2017
  • March 2017
  • February 2017
  • January 2017
  • December 2016
  • November 2016
  • October 2016
  • September 2016
  • August 2016
  • July 2016
  • June 2016
  • January 2016
  • December 2015
  • May 2015
  • April 2015
  • March 2015
  • December 2014
  • November 2014
  • October 2014
  • August 2014
  • June 2014
  • March 2014
  • January 2014

Get the Updates!

Put your Email Address in the box, and I'll ask the friendly internet robots to send you a message when I post an update!

I'll send an email for each new post.

Thank you!